3.3TT AVAILABLE NOW... SSR PERFORMANCE Power Pack 3 Development!

It didn't happen this morning - I let the car warm up a bit first and disabled ECS + Stability control. I'm going to do the same minus letting the car warm up. The left turn leaving work is where it's happened the most. I need to eliminate some variables.

I had the spare tire scissor jack, a jack stand, and a hydraulic jack. I used the scissor jack on the front passenger side (on the indicated lift point - it's basically impossible to put it anywhere else) and engaged the scissor jack half way up. Then I alternated raising the drivers side with the hydraulic jack (slightly offset from the lift point but still on the weld), and the scissor jack on the passenger side. Once the scissor jack was fully extended I put the jack stand on the lift slot and moved the hydraulic jack to the other side to back up the scissor jack.

The intent was to minimize the body twist jacking it up. I'll see if I can record the noise if it happens again later. It's short, maybe 1 second.

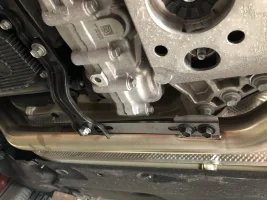
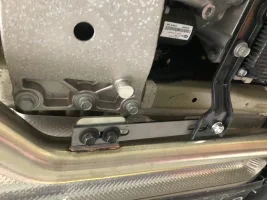
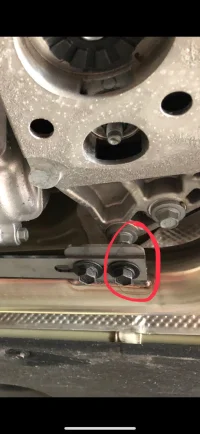
Sounds really strange for downpipes to be causing anything like this. Double check everything underneath the car. We haven't heard this complaint or anything similar from all of the other sets that have been shipped out, both RWD and AWD.

Update us once you have had a chance to take a look. Thanks!

Shah @ SSR Performance
 
Warning.. tl;dr

Did the install this morning. Total of 1.5 hours start to finish including a jaunt around the neighborhood.
My advise to those without access to a lift is to back up or pull forward on ramps and jack up one side at a time. I opted to back on to them. I started driver's side by removing the rear nuts on both sides and then the front driver's side. You'll use 19mm sockets to remove the exhaust nuts with a 12" extension to the front. Breaker bars are handy unless you are gorilla strong. Once broken they come off by hand.
I was able to get to the front passenger side without jacking the other side, but it might be less effort by switching the jack. Then I removed the bracing. Six bolts, all 14mm. No issues there.
Make sure you pull off both sides before you attempt to install ... The exhaust moves enough to allow for the midpipe to slip off the studs up front then pivot sown. Again, take both sides off before installing.

Bolting back up is simple. Stock nuts up front (switching the jack makes it easier) and supplied nuts and bolts at the back. I reinstalled the brace and loosely attached it to the pipes to get them in position to align in the rear. Center by feel both left and right and up and down. The flanges are slightly different in shape but it's not hard to get them aligned. The driver's side was slightly a different angle but still seals perfectly.
17mm box wrench and socket tighten these, or you can double socket/wrench. Use your muscles here... Work each one in slowly. A torque wrench might be helpful but just make them as tight as humanly possible then use your breaker to move a bit more.

Great fit, only a bit of sound in the cabin. Virtually none with the windows open. I'll have to disconnect my jb4 to allow the car to adjust to give a fair assessment of butt Dyno feels. Then I'll log and send to them to fine tune.

Totally worth a couple hours of work... Those midpipes are tiny from the factory.

I installed mine today (AWD). Took me 1.5 hours and I followed a very similar procedure to yours. Only lifted the car on the one side and was able to access both down-pipes without issue. I used an air ratchet which really helped in hard to reach places like the front nuts. I found the most tedious job was installing and tightening the upper rear bolt as there isn't a lot of space there to play with.

Overall, a good fit and a clean install. I was really impressed with the sound as well as the butt dyno. The car really pulls and there is a definite throatier sound to the exhaust which is exactly what I was looking for. I have the stock exhaust and plan to keep it this way for a while. Very happy with these midpipes!
Thanks for your post. I too am installing the SSR DPs next week and keeping stock exhaust. Is there any drone produced at any RPM range after your install?
 
______________________________
Thanks for your post. I too am installing the SSR DPs next week and keeping stock exhaust. Is there any drone produced at any RPM range after your install?

I notice a very minimal amount while cruising at 110 km/h or 68 for you. It wasn’t there before but it’s tolerable. I had my car audio level at 4 and it drowns it out so that should give you an idea of how minor it is.
 
I installed mine today (AWD). Took me 1.5 hours and I followed a very similar procedure to yours. Only lifted the car on the one side and was able to access both down-pipes without issue. I used an air ratchet which really helped in hard to reach places like the front nuts. I found the most tedious job was installing and tightening the upper rear bolt as there isn't a lot of space there to play with.

Overall, a good fit and a clean install. I was really impressed with the sound as well as the butt dyno. The car really pulls and there is a definite throatier sound to the exhaust which is exactly what I was looking for. I have the stock exhaust and plan to keep it this way for a while. Very happy with these midpipes!

Thank you so much for sharing! :) Really glad you enjoyed it and were able to get that stuff installed all on your own in 1.5 hours!!

Shah @ SSR Performance
 
From interior to exterior to high performance - everything you need for your Stinger awaits you...
The 2nd car delete really removed a good amount of restriction, the initial tip in as well as part throttle acceleration is where you feel a sigbificiant difference. Seems like the turbo spools a bit sooner between idle and 2k rpm. I can actually hear the exhaust with music playing in the car now. My shop did the install in about 30 minutes, included a out 5 minutes admiring the beautiful tig welds vs the ugly Machine welds between the mid pipe and the factory cats!
 
Shah @ SSR Performance
I would like to ask if I install your midpipe and downpipe, any other cat still in the car,
I am not sure it is legally in my country or not?

At this moment, i am go to install jun BL DOWNPIPE and borla cat back
Because junBL mentioned their downpipe has not cut the cat, it still legal in my country,
How about your downpipe

Thanks a lot
 
Both JUN BL and SSR downpipes remove the secondary cat. They both leave the primary cat in place.
 
Go to there website new parts are posted........
 
______________________________
From interior to exterior to high performance - everything you need for your Stinger awaits you...
Hey SSRPerformance! Please get to work on some high flow primary cats as well. I promise to buy them. My pipes are lonely down there and need some better tubing.
 
Hey SSRPerformance! Please get to work on some high flow primary cats as well. I promise to buy them. My pipes are lonely down there and need some better tubing.

Same here, but please make sure to make a proper bell-mouth design and use HJS cats!
 
Problem fixed to @SSR Performance calling me right away on a Saturday wow you guys are amazing. Going to put pics just Incase. They put the long screw instead of the short one.
 

Attachments

  • B090CDE3-054A-4889-B855-43D2B55311BF.webp
    B090CDE3-054A-4889-B855-43D2B55311BF.webp
    185.5 KB · Views: 77
  • 30747F3B-A6EA-49B7-9BDC-4C7A1C529D4E.webp
    30747F3B-A6EA-49B7-9BDC-4C7A1C529D4E.webp
    148.3 KB · Views: 79
  • 3BE17645-B477-40FF-B029-97DA50CFB342.webp
    3BE17645-B477-40FF-B029-97DA50CFB342.webp
    98 KB · Views: 80
From interior to exterior to high performance - everything you need for your Stinger awaits you...
Problem fixed to @SSR Performance calling me right away on a Saturday wow you guys are amazing. Going to put pics just Incase. They put the long screw instead of the short one.
Still haven't figured where the one little black bolt goes. Any ideas???
 
______________________________
If you're AWD, look two posts above you. It's the bolt circled in red, passenger side.
 
Sorry, duplicating a message from the other thread but I realised the stock pipes have welded bolts part way through and couldn't wiggle it out. Does this mean the piping after the midpipes have to be removed as well or is there something I am doing wrong (again...)?
 
From interior to exterior to high performance - everything you need for your Stinger awaits you...
Back
Top