Turbo flange studs

The headache was the studs off the turbo flange. Driver side had 3 come off with the studs and 1 nut but no damage just really tight. Passenger side o2 sensor #2 treads crossed when removing. On the flange - 2 nuts came off with the studs, the 3rd snapped off with half the stud, the 4th but came off but nut was worn out but was the only one I could reuse.

Tried to remove the broken stud off the flange with a stud socket but no luck. There were enough tread still on so I tried using the stud socket on the one that snapped off with the stud and a 12mm on the nut hoping to use that nut on the broken stud that's stuck on the turbo but that snapped and now it's stuck in my stud socket!!!
This was not even 24 hours ago so I'm gonna see if the dealer is open tomorrow so I could get new studs and nuts. Need to figure out how to release the stud from the socket and try to get back in that tight ass spot with it and some penetrating spray. Gonna have to do this from the ground at home this time which add to the frustration. (Had to get it back together as much as possible just to drive it home from work last night)


Oh dang, so you put everything back together despite the broken stud? I gotcha. I've got my fingers crossed for you, man! I hope you're able to get those flange studs all fixed up without having to remove the turbos. Definitely replace all the studs and nuts with new ones from the dealer, they aren't very expensive.. And for sure soak the broken stud in penetrating oil spray and then try to remove it so you can replace it.

Keep us in the loop! Good luck!!
 
such an informative thread.
thank you for taking the time to share all of this!!!
 
So, when attempting to install some aftermarket downpipes, I ended up accidentally breaking one of my turbo downpipe studs. Looks like this... (zoom in to see it, snapped stud on the bottom)

View attachment 30627


I could not, for the life of me, get it out despite my best efforts. A major part of the difficulty is the lack of room to work in there. After a couple days, I gave up and had it towed to my local dealer ship. Eventually they were able to get the stud out - BUT, now they say they can't put the new studs in. They tried trapping it, but the material is just too hard, and they simply cannot get the new OEM studs back in. They told me they will have to replace the turbo. I'm okay with that, because it was a nightmare to work on that area, and if they can't do it, I know I can't...

Here's the problem, though. In order to replace the turbo they have to pull the engine out. They said they need a special bench/stand to put the engine on while it's out, and they don't have this part. The service manager told me they would have to buy this part, and it costs $5,800. Add in labor ($4,500), and a new turbo ($1,500), and I'm in over $11k...

So my question is this. Has anything like this happened to anyone on their Stinger or G70? (Mine is a G70). Anybody installed primary downpipes and run into something similar? If so......do you know of any shops in the greater Portland area that might be of help?


Any thoughts would be greatly appreciated.
I just installed my primary HFC performance downpipes and snapped two studs on one side catty cornered and only on stud on the other was mangled but I got it out. I can find the studs and nuts online but I have to drill the old studs out
 
______________________________
To @Toddasaurus and anyone else that might run into these issues with exhaust and other problematic fasteners.

Follow all the PB Blaster, Kroil, AT fluid/diesel pre-soaks to penetrate and break down any corrosion leading up to the disassembly; then, have ready some real wax candles and a MAP gas torch for the day of removal. Heat those nuts up real good and jab that candle in there (make sure if you’re doing it from underneath the superheated wax can’t run down your hand, it sucks, bad).

The heat will vaporize and dry out whatever penetrant you’ve used prior, but the wax will maintain its liquid form and wick into the thread spaces, lubricating the fasteners.

I usually hit it with the torch once more and start backing it off. Works like a charm every time. I’m up in the NE so I use this a lot on old rusty stuff from ‘79 Cherokees, old 80s CJs, etc, up to my current and constant struggle with corrosion, Tacoma.

I used this method just yesterday on what I thought would be a trouble free valve cover stud that I twisted the top off of.

It’s a simple but very effective trick. I’ve used it almost every time with out first doing a penetrant pre-soak.

I also source whatever ARP exhaust studs will fit my application beforehand to avoid some of these potential problems in the future. For instance, LS1 ARP exhaust studs are the exact same needed for the Tacoma 1GRFE if installing headers. If any of you guys have some left over studs laying around and a measurement we can cross reference with ARP.

Hope this saves someone some heartache one day.

The thing I’m curious about is if the turbine housing can be ordered from Garrett separately rather than an entire turbo assembly.

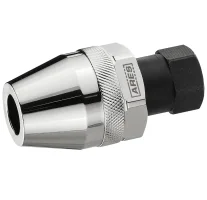
I’ve had great success with this stud removal tool if it fits in the area; not so much with the ‘cam style’ remover.
F414FD8B-960A-4BD3-90C0-017E8B864AB0.webp
 
Fantastic write up! I ended up reviewing this AFTER I broke a stud off my turbo... I tried reusing the studs I took out... Don't do this... Buy new ones. I was replacing primary cats with the Ultimate Performance HFC. Had everything ready to go. Just tighten down the bolts... They wouldn't go back all the way in, none of them fit well. So... I tightened. Nothing... I realized it's not going to work I need new bolts... Go to remove and *snap*. I am not recommending anyone do what I did. But I'm running one turbo shy a bolt. Everything's sealed up and it's extremely risky. I maybe replacing this turbo soon enough. Right now. No leak. But who's to say I don't blow the gasket and need to do this over again. Fyi I broke the same stud as in this write up.
 
From interior to exterior to high performance - everything you need for your Stinger awaits you...
IMG_20200907_162802__01.webp
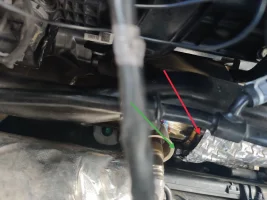
Again, I clearly am not a professional. Nor pretend to be. This is only a cautionary tale of what not to do. Red arrow is where I am missing the bolt green arrow is where I have a bolt.
 
View attachment 34728 Wish I knew the risk beforehand, would've just done my secondary downpipes instead of the primaries. Felt like doing a double shift yesterday (night before Thanksgiving) because nuts were stuck, broke 2 studs and damaged 1 nut. Was expecting to get this done in under 2 hours then nightmare turned into 7 hours. The replacement was fairly easy but ran into issues one after the other! Too much to explain but here's a list of what I wish I knew.
- use penetrant/pb on the turbo flange studs because they will seize or cross thread then break
- use a non fouler/spacer for the o2 sensors for the cel. Unless you use the passive feature in the jb4 (trying to figure out how to set region to Canada for this but would be easier to not have to depend on it by using a spacer)
- pre install both o2 sensor 1 on the DP!!!
* I got the SXTH primarys which gave clearance issues with the sensors. Couldn't fit without removing the intake manifold to head bracket.
* Driver side o2 s1(top) connector wont reach the retainer. Passenger side o2 s2(bottom) was too far so the clip can't be used and has to be left off.
- both back end of the primarys did not line up to the oem secondary downpipes perfectly, shouldn't have had to fight the studs in.
Recommend getting a primary and secondary dp combo to avoid this! Especially since you're already removing it. Now I need to somehow find time to replace the passenger side exhaust manifold studs and nuts.
I have a question I was putting new downpipes and mid pipes and I broke a stud the one that connects the turbo to the downpipes. I wanted to know what you did to repair the stud.
 
Dam I wish I would have seen this post before installing my down pipes as I have snapped 2 bolts, oh the pain. Will be going to get a stud extractor tomorrow and see if I can get them out. had to bolt it all back up for now with just 2 studs. No exhaust leaks but very worried about it.
 
Oh yes does anyone know what the actual stud size is, like a M10 or M8??
 
I just installed my primary HFC performance downpipes and snapped two studs on one side catty cornered and only on stud on the other was mangled but I got it out. I can find the studs and nuts online but I have to drill the old studs out
What website had the right size studs and nuts?
 
______________________________
From interior to exterior to high performance - everything you need for your Stinger awaits you...
What website had the right size studs and nuts?
the stud part #
285152A100

the nut part #
285232B100

the nuts are not normal nuts. they are crimp nuts (they arent round in the middle). this causes the nut to self lock on the stud. dont buy nuts from lowes lol
 
op is a beast!
 
Well i just took my car to the shop for them to install down pipes. He’s snapped two bolts on one side, and one on the other. He’s very doom and gloom about this, and the way he explains it all as a “complete nightmare”, I don’t know that he’s capable of extracting these turbos. Infact, now after looking at all the steps to get it done, I’m actually terrified he’s going to destroy my car.
 
Well i just took my car to the shop for them to install down pipes. He’s snapped two bolts on one side, and one on the other. He’s very doom and gloom about this, and the way he explains it all as a “complete nightmare”, I don’t know that he’s capable of extracting these turbos. Infact, now after looking at all the steps to get it done, I’m actually terrified he’s going to destroy my car.
This is for primaries right. Not secondaries.
 
From interior to exterior to high performance - everything you need for your Stinger awaits you...
alot of patience and PB blaster
We typically recommend soaking the nuts while hot and cold every day couple days prior leading up to the job
And lots of lots of PB blaster during the process and just pray to the car gods

Take it easy and slow
other than that there is no real trick

Even when you do everything "right" theres a chance the nut will seize and ultimately take a few hour job to few days
Turbo studs seizing / breaking is pretty commom occurance in the gencoupe scene
Hey Nick, my machine shop is having issues drilling out the bolts. They’ve tried titanium and carbide bits but it won’t budge. Any tips I can pass to them?
 
______________________________
To @Toddasaurus and anyone else that might run into these issues with exhaust and other problematic fasteners.

Follow all the PB Blaster, Kroil, AT fluid/diesel pre-soaks to penetrate and break down any corrosion leading up to the disassembly; then, have ready some real wax candles and a MAP gas torch for the day of removal. Heat those nuts up real good and jab that candle in there (make sure if you’re doing it from underneath the superheated wax can’t run down your hand, it sucks, bad).

The heat will vaporize and dry out whatever penetrant you’ve used prior, but the wax will maintain its liquid form and wick into the thread spaces, lubricating the fasteners.

I usually hit it with the torch once more and start backing it off. Works like a charm every time. I’m up in the NE so I use this a lot on old rusty stuff from ‘79 Cherokees, old 80s CJs, etc, up to my current and constant struggle with corrosion, Tacoma.

I used this method just yesterday on what I thought would be a trouble free valve cover stud that I twisted the top off of.

It’s a simple but very effective trick. I’ve used it almost every time with out first doing a penetrant pre-soak.

I also source whatever ARP exhaust studs will fit my application beforehand to avoid some of these potential problems in the future. For instance, LS1 ARP exhaust studs are the exact same needed for the Tacoma 1GRFE if installing headers. If any of you guys have some left over studs laying around and a measurement we can cross reference with ARP.

Hope this saves someone some heartache one day.

The thing I’m curious about is if the turbine housing can be ordered from Garrett separately rather than an entire turbo assembly.

I’ve had great success with this stud removal tool if it fits in the area; not so much with the ‘cam style’ remover.
View attachment 42391
I’m kind of in an emergency situation because the machine shop guy leaves for weeks starting tomorrow - sorry for posting twice. I’m not familiar with this tool myself, but could you put into newbie level dialogue what I can tell the machine shop to do with my broken studs? They’ve tried titanium and carbide bits and seem to of given up on drilling them out. Most are now broken off down inside and they have said it appears the material of the bolts literally melted.
 
I’m kind of in an emergency situation because the machine shop guy leaves for weeks starting tomorrow - sorry for posting twice. I’m not familiar with this tool myself, but could you put into newbie level dialogue what I can tell the machine shop to do with my broken studs? They’ve tried titanium and carbide bits and seem to of given up on drilling them out. Most are now broken off down inside and they have said it appears the material of the bolts literally melted.
That doesn't sound good. Hopefully you won't have to take the engine out( in order to remove the turbos).
 
The engine is completely out already lol
Is it possible to weld some nut to that stud? Separate the turbo exhaust housing and heat it up.
 
From interior to exterior to high performance - everything you need for your Stinger awaits you...
Back
Top