Turbo flange studs

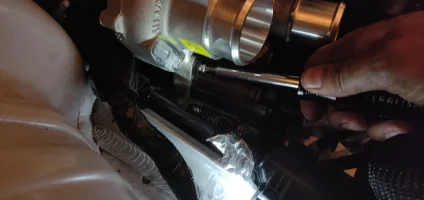
Next, if you're keeping the same turbo it would be helpful to mark your bolts so you know how tight to re-torque everything.
IMG_20190905_133537.webp

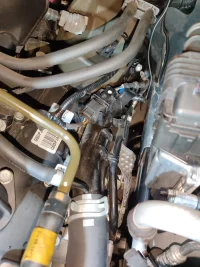
Go ahead and remove the coolant banjo bolts. Keep in mind there are two copper o-rings sandwiched between the coolant hardline, bolts, and turbo. So there is a total of 4 here.


Next, you can unclamp the turbo coolant drain hardline, this goes directly to the water-to-oil cooler located on the back end of the oil filter housing. If I were to do it again, I'd unclamp the other end that plugs into the filter housing, as there will most likely be more coolant in the hose, so you can drain it into your coolant container easier instead of it spilling everywhere.
IMG_20190906_075434.webp

Next unbolt the turbo coolant hardline from the large coolant hardline. Now you can lift the turbo coolant hose out of the way. The back end does not need to be unclamped to do this.
IMG_20190906_080715.webp

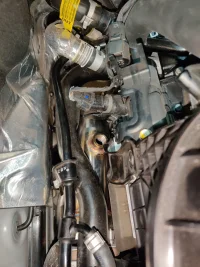
Now, prepare to remove the large coolant hardline. Make sure to unbolt the mounting bracket.
IMG_20190906_081700.webp

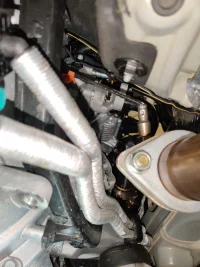
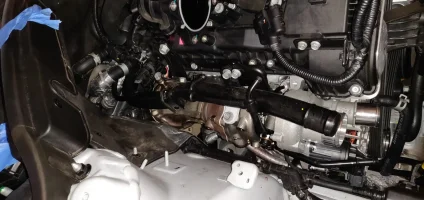
Unbolt the stay on the back of the block that the large hardline connects to... I found that this was easiest done from underneath the car, as pictured below.
IMG_20190906_081813.webp

Now unclamp the large coolant hardline-to-lower radiator hose. Once the hose is off, you can lift the large hardline out of the way. You can use lots of tape or some string to tie both the hardlines out of the way - this is easier than removing them completely (though you can remove them if you want the extra work!)
IMG_20190906_082013.webp
IMG_20190906_082456.webp

From the picture above, you can see the oil feed line banjo bolt. This is removed easily, it also has 2 copper o-rings sandwiched between the turbo, and the hardline. Next, remove the oil drain line by removing the two 10mm bolts on the drain flange. This is where things get difficult, because there is very little room to do anything - ESPECIALLY if you have AWD like me, as the front axle and front differential is in the way.

Here is the drain flange...
IMG_20190906_082806.webp
 

Attachments

  • IMG_20190906_075000.webp
    IMG_20190906_075000.webp
    59.8 KB · Views: 22
To remove the turbo oil drain flange bolts, you need a few long extensions, a slim U-Joint, and a 10mm socket. I was barely able to get them out using a 3/8" drive set of extensions, u-joint, and socket - but when it came time to reinstall, I found you needed a 1/4 drive set of all of the above, as the 3/8 drive was just too big.

First, I found it was easier to remove this small splash guard so you can reach one hand up under the turbo to help guide your extension, socket, and u-joint combo...
IMG_20190907_150844.webp

Once this is out of the way, you can slide in the extension/u-joint/socket set up from a small open area behind the front differential, as seen below...
IMG_20190907_160907.webp

And here is your view of the whole process while unbolting everything (notice 1 bolt is out already!). Yes...it is VERY tedious, but it is doable even on an AWD car. RWD guys aren't allowed to bitch about this part.
IMG_20190907_160955.webp


Now you can unbolt the turbo stay bracket, located on the topside of the turbo.
IMG_20190907_162200.webp
IMG_20190907_162744.webp


Now get ready to remove the exhaust manifold nuts. Doesn't hurt to spray down with penetrating oil first.
IMG_20190907_162330.webp

The rearward 3 nuts are easy to get to at this point, the only somewhat difficult one is this little guy....
IMG_20190907_162539.webp

You have two options at this point. If you want, you can remove the wastegate actuator, then access it from the top. This makes removing the turbo MUCH easier as well (and is what I ended up doing). OR, you can go at it from the passenger side axle area, using extensions and a u-joint, like this...
IMG_20190907_163728.webp

Once all the manifold nuts are out, you can slide the turbo towards you a bit.
IMG_20190907_165024.webp


Make sure to unplug the wastegate actuator.
IMG_20190907_164702.webp
 
______________________________
At this point I was having great difficulty getting the turbo out, primarily due to lack of sleep and lack of patience. So, I decided to remove the wastegate actuator, which made things MUCH easier. You can skip this step if you'd like, but I recommend it because it's so much easier when it comes time to reinstall, and it's very easy to line up the wastegate actuator again.


First, remove the actuator nut. Slide the wastegate arm away so it is hanging down or off to the side. This large barrel nut DOES NOT need to be removed. But if you do remove it, that's totally fine as well.
IMG_20190907_161633.webp

Now you're ready to unscrew the electronic motor. It's just held on by 4 T20 torx screws. It's pretty easy to remove.
IMG_20190907_165514.webp
IMG_20190907_170036.webp


Now you're ready to remove the entire turbo. It will take some fiddling, but don't give up and it will come out with some patience and plenty of manipulation. You do not need to remove the alternator or the wiring harness that is seemingly in the way. You can get it out, just be patient and think about how to move it.

Here it is, in all it's baby snail glory.
IMG_20190907_170109.webp

And here are some close up pics of the damaged threads....
IMG_20190907_170515.webp
IMG_20190907_170519.webp
IMG_20190907_170527.webp


1 hole was fine. 2 of them had old material left in from the old studs, and scraped out pretty easily. The last hole had 1 small damaged thread, and the machine shop drilled out that single thread, leaving the rest of the threads in there usable.
 

Attachments

  • IMG_20190907_165514.webp
    IMG_20190907_165514.webp
    77.2 KB · Views: 10
Even though the threads were largely repaired, I decided to just get a whole new turbo. Here it is in all its glory....

IMG_20190918_104057.webp


For reinstall, I went ahead and just removed the wastegate actuator again. Before reinstalling, it would be good to see how to reinstall the wastegate while the turbo is out. It's easy. Simply bolt the electric actuator to the turbo again, thread down the barrel nut relatively far down the threaded rod. Next slide the wastegate arm down the threaded rod, press down on the wastegate plunger itself so it's sitting flush with the turbine housing, then back up the barrel nut so it's sitting up against the arm - you will see the yellow paint lining up (you can see the yellow marks on the above picture). Lastly, thread the nut back on and tighten it until the yellow mark lines up. It's actually really easy.


And here is the wastegate plunger, simply hold this closed then lining up the barrel nut and the other nut.
IMG_20190918_104125.webp


Now remove it all again to get ready to put the turbo back in... Again, this is optional. You can keep the wastegate actuator assembly on during reinstall if you like, but it just makes things much more difficult. I think it's easier to just remove it. Do what you want.

Anyway, I had all new gaskets. First make sure you clean off the oil drain flange mating surface to prep for the new drain flange gasket... I used a razorblade to scrape off the old gasket material.
IMG_20190918_193909.webp
IMG_20190918_194156.webp


Next install your new exhaust manifold gasket.
IMG_20190918_200109.webp


Now work your magic and put that turbo back in there. Again, be patient if it's not finding its way in there. Don't force things.

IMG_20190918_201558.webp

Now, don't thread in all the exhaust manifold nuts yet. In fact, I only put one in - the nut sitting right between the turbo and the block. Just gently thread it in only part of the way so you still have room to move and manipulate the turbo. This is essential, as you'll spend the next chunk of time trying to line up the bolts on the oil drain flange.

There should be enough room to gently lift the turbo, slide in your new oil drain flange gasket, and start trying to line up the bolt holes to thread in the bolts. For this part, I STRONGLY recommend getting a borescope-like camera to you can see WTF you're doing. I didn't, and it took me FOREVER to get them back in...

https://www.amazon.com/Endoscope-TO...9Y2xpY2tSZWRpcmVjdCZkb05vdExvZ0NsaWNrPXRydWU=

You obviously don't have to get that one exactly, but something like it would be well worth the money.

Anyway, here is a shot from underneath to get the bolt in closest to you... This is the easy one to get in, especially with that wastegate out of the way! Now, once the bolt is in DON'T torque it down all the way just yet, keep it a tiny bit loose so you can still manipulate the turbo to line up the other bolt hole...

IMG_20190919_165344__01.webp

The other bolt is a huge pain in the ass. I used a 1/4 drive 10mm socket and started threading it in from above. Remove the one and only exhaust manifold nut you have on so you can slide out the turbo as far as you can to get enough room to reach your hand inbetween the turbo and the block. Use your other hand and come in from the exhaust turbine side to help guide the bolt in. Once it's all lined up and those threads start to catch, then come from underneath and tighten it...

Here's the 1/4 drive 10mm socket.
IMG_20190921_093802.webp

I ended up placing a small amount of tape around the head of the bolt to keep it in place in the socket. I also gently sanded the tip of the bolt to help persuade it to line up with the bolt holes a little more.
IMG_20190918_221111.webp


Once you get the threads to catch, you'll notice that there isn't enough room to get a u-joint in to tighten it all down. Instead, I was able to use a 1/4 drive wobble extension attached to a bunch of other extensions, and tightened it from underneath!

IMG_20190921_094439__01.webp


FSM states the torque specs on these bolts are 7-8lb-ft. I bought a brand new 1/4 drive torque wrench just for these little guys, so I got them dialed in perfectly.
 
Last edited:
From interior to exterior to high performance - everything you need for your Stinger awaits you...
Now the hardest part is done, and the rest is easy peezy.

Torque down the exhaust manifold nuts to spec. The FSM states these need to be tightened in an opposing star pattern, just like with your wheel lugnuts. The torque should be between 43-47 lb-ft. I set mine to 45 lb-ft.

IMG_20190918_203117.webp

With the wastegate actuator off, access to the frontmost nut is much easier, you can tighten it from the top like this...

IMG_20190918_205445.webp


Now, before reinstalling the oil feed banjo bolt (make sure you have new copper o-rings), I decided to drop in a little bit of oil since it was a brand new turbo. I don't think this is necessary, but it's an easy precaution that won't hurt.

IMG_20190923_155055.webp

Put the new copper o-rings on, torque it to spec. FSM states 9-13lb-ft.

IMG_20190923_155739.webp

Next, reattach the wastegate actuator motor (if you removed it, like me). The torx screws don't need to be super tight. I marked mine before removing them to just to be completely sure.

IMG_20190923_160552.webp
IMG_20190923_160947.webp


Now you're ready to reinstall the wastegate actuator arm hardware. Like I mentioned above, thread in the barrel nut down a fair ways, then slide on the actuator arm and hold the wastegate plunger fully closed, then back up the barrel nut to line up with the actuator arm so it looks like this... (notice the 2 yellow marks are lined up now).

IMG_20190923_161131.webp


Now with the yellow marks lined up, tighten down the outer nut so all 3 yellow marks line up, so it looks like this...

IMG_20190923_161726.webp


Now, we are ready to install new exhaust flange studs. Just thread them in by hand as tight as you can get them (which really isn't that tight....it's no wonder these things backed out in the first place, am i right???)

IMG_20190923_162026.webp


Don't mind the dried blood in the above picture. Just take it as a warning, watch out for the new exhaust manifold gasket - it has a sharp metal edge that is right in the way for your knuckles. Haha.

All 4 new studs installed.
IMG_20190923_162738.webp
 
Last edited:
Now get ready to reinstall the downpipe. Don't forget your new downpipe gasket...

IMG_20190923_163049.webp

IMG_20190923_163254.webp

Again, dried blood. Haha.

Anyway, bring up the downpipe from underneath the car and get ready to line up the stud holes...
IMG_20190923_163514.webp

I found that this bracket/plug was in the way, so I temporarily removed it...
IMG_20190923_163824.webp

Now line up the stud holes.
IMG_20190923_163856.webp


The bottom nut, closest to the block, is best accessed from underneath the car. Here is a view looking up at it, with my extensions ready.
IMG_20190923_165112.webp


And here it is, downpipe all mated up and torqued down. Remember that the downpipe nuts need to be torqued in an opposing pattern, just like wheel lug nuts. Torque should be 26-30lb-ft.

IMG_20190923_170435.webp


Now reinstall the turbo stay bracket.

IMG_20190923_171249.webp

And you're ready to reinstall the large coolant hardline. Bolt on the stay bracket...

IMG_20190923_171502.webp
 

Attachments

  • IMG_20190923_165432.webp
    IMG_20190923_165432.webp
    79.8 KB · Views: 8
Last edited:
Reinstall the plug shield above the downpipe...
IMG_20190923_170847.webp

Don't forget to reinstall the 10mm bolt on the back of the large coolant hardline... It's a little tough to reach, but easy peezy compared to those oil drain flange bolts!!!
IMG_20190923_171752.webp


Now you're ready to install the turbo coolant hardlines... If you're re-using the same turbo, tighten it back up so your marks line up. For me, I tightened it back to spec according to the FSM, which is 26-28lb-ft. Use your NEW copper o-rings.

IMG_20190923_172537.webp

IMG_20190923_172818.webp

Once the coolant banjo bolts are in, put on the stay bolt that attached to the large coolant hardline...

IMG_20190923_173355.webp


Now you can put on the turbo heat shield. One of the bolts is a little tough to tighten, i came from underneath to finally get it on.

IMG_20190923_175319.webp

Attach the rubber coolant hoses to the large coolant hardline, and the turbo coolant hardline.

IMG_20190923_182440.webp


Now is a good time to plug in the primary, and secondary o2 sensors. The downpipe has an o2 sensor stay bracket that needs to be reinstalled as well.

Before...
IMG_20190923_175431.webp

After....
IMG_20190923_175755.webp
 

Attachments

  • IMG_20190923_173128.webp
    IMG_20190923_173128.webp
    158.8 KB · Views: 6
Finally, bolt on the downpipe stay bracket at the end of the downpipe....
IMG_20190923_180140.webp


Now is a good time to reinstall the midpipe.

I find that it's easier to line up the back end studs first, then prop up the front end of the midpipe on the subframe. Then, bolt up the transmission-to-midpipe bracket. THEN you can tighten down the midpipe connecting bolts and hardware.

Back end of midpipe, front is also propped up on the subframe...
IMG_20190923_180536.webp

Stay bracket attached.

IMG_20190923_181046.webp


Now line up and attach the large downpipe-midpipe bolts, don't forget your gasket, then tighten it all up.

IMG_20190923_181056.webp

IMG_20190923_181348.webp


Now, torque down the rear stud nuts. Hopefully you didn't forget your gasket!

IMG_20190923_181741.webp


While you're under the car, now is a good time to reinstall the axle splash guard/cover.

IMG_20190923_182531.webp
IMG_20190923_182938.webp

Now back to the engine bay. Reinstall the throttle body, and connect the coolant hoses to the large coolant hardline.

IMG_20190927_020220.webp

And since there's plenty of room, might as well install the hot side charge hose.

IMG_20190927_020424.webp
 
Reinstall the airbox and intake piping, and strut tower bar...

IMG_20190927_020913.webp

IMG_20190927_021159.webp

IMG_20190927_021659.webp

Strut tower bar is torqued down to 20lb-ft, per the FSM.

IMG_20190927_023436.webp
IMG_20190927_023447.webp

Now install the cold side charge piping... (note you could do this before the intake piping and airbox, in fact it would probably be easier to do so)

IMG_20190927_022002.webp


Don't forget the hardpipe stay bracket...

IMG_20190927_022147.webp

And the vacuum block and sensor combo.

IMG_20190927_022621.webp

And finally the cold side charge elbow.

IMG_20190927_022938.webp

Now it's basically all reinstalled. But there's one more big step.... can you guess what it is?

IMG_20190927_023715.webp
 
______________________________
From interior to exterior to high performance - everything you need for your Stinger awaits you...
COOLANT.

In order to refill the coolant, you need to locate the bleeder hose. It's on the frontmost part of the engine block, at the very top, hidden under the wiring harness and a foam sound deadening block.

To get to it, it helps to unplug these sensors....
IMG_20190927_023916.webp


Unclip 2 clips that hold the harness to the block...
IMG_20190927_024034.webp
IMG_20190927_024105.webp

And unbolt these two bolts that hold the harness stay to the top of the engine....
IMG_20190927_024210.webp
IMG_20190927_024247.webp

Then lift the wiring harness stay, and remove the foam block, and you can see the bleeder hose...
IMG_20190927_024316.webp


Pop that guy off and you're ready to refill with coolant!
IMG_20190927_024515.webp


I used OEM Hundai coolant, and mixed 50/50 with distilled water. Mine took in about 1.5 gallons.

IMG_20190927_030156.webp


When refilling, you may need to squeeze the lower radiator hose to get some bubbles out. It also helps to have the front end of the car jacked up as high as you can go, this helps the bubbles find their way to the bleeder hose. After it's as full as you can get it, start the car up. Let it warm up to where the fan turns on, let it cycle the coolant through, then shut it down. Let it cool off, then check the coolant again and top it off. Do this a few times until you're confident all the air bubbles are out. Make sure the coolant reservoir is at the "FULL" mark as well.

Re-attach the bleeder hose, button up the wiring harness, plug in all your plugs, make sure the radiator cap is snug and same with the radiator drain plug. Before taking it for a drive, start the engine, let it warm up completely again, and do a final inspection to make sure you're not leaking coolant anywhere (or oil around the turbo). If it all looks good, then take her for a spin! And don't forget to enjoy your now working car again. Haha.

I hope this helps anyone who finds themselves in the same position as me.
 
COOLANT.

In order to refill the coolant, you need to locate the bleeder hose. It's on the frontmost part of the engine block, at the very top, hidden under the wiring harness and a foam sound deadening block.

To get to it, it helps to unplug these sensors....
View attachment 32078


Unclip 2 clips that hold the harness to the block...
View attachment 32079
View attachment 32080

And unbolt these two bolts that hold the harness stay to the top of the engine....
View attachment 32081
View attachment 32082

Then lift the wiring harness stay, and remove the foam block, and you can see the bleeder hose...
View attachment 32083


Pop that guy off and you're ready to refill with coolant!
View attachment 32084


I used OEM Hundai coolant, and mixed 50/50 with distilled water. Mine took in about 1.5 gallons.

View attachment 32087


When refilling, you may need to squeeze the lower radiator hose to get some bubbles out. It also helps to have the front end of the car jacked up as high as you can go, this helps the bubbles find their way to the bleeder hose. After it's as full as you can get it, start the car up. Let it warm up to where the fan turns on, let it cycle the coolant through, then shut it down. Let it cool off, then check the coolant again and top it off. Do this a few times until you're confident all the air bubbles are out. Make sure the coolant reservoir is at the "FULL" mark as well.

Re-attach the bleeder hose, button up the wiring harness, plug in all your plugs, make sure the radiator cap is snug and same with the radiator drain plug. Before taking it for a drive, start the engine, let it warm up completely again, and do a final inspection to make sure you're not leaking coolant anywhere (or oil around the turbo). If it all looks good, then take her for a spin! And don't forget to enjoy your now working car again. Haha.

I hope this helps anyone who finds themselves in the same position as me.
OMG THANK YOU so much for taking the time to post all of this! I'm sure it's going to help so many here.
I think it should be a pinned post for sure.
AWESOME!
 
What a guy!! Fantastic effort for the community. Thank you. Cheers:thumbup::thumbup::thumbup:
 
IMG_20191127_201758.webp Wish I knew the risk beforehand, would've just done my secondary downpipes instead of the primaries. Felt like doing a double shift yesterday (night before Thanksgiving) because nuts were stuck, broke 2 studs and damaged 1 nut. Was expecting to get this done in under 2 hours then nightmare turned into 7 hours. The replacement was fairly easy but ran into issues one after the other! Too much to explain but here's a list of what I wish I knew.
- use penetrant/pb on the turbo flange studs because they will seize or cross thread then break
- use a non fouler/spacer for the o2 sensors for the cel. Unless you use the passive feature in the jb4 (trying to figure out how to set region to Canada for this but would be easier to not have to depend on it by using a spacer)
- pre install both o2 sensor 1 on the DP!!!
* I got the SXTH primarys which gave clearance issues with the sensors. Couldn't fit without removing the intake manifold to head bracket.
* Driver side o2 s1(top) connector wont reach the retainer. Passenger side o2 s2(bottom) was too far so the clip can't be used and has to be left off.
- both back end of the primarys did not line up to the oem secondary downpipes perfectly, shouldn't have had to fight the studs in.
Recommend getting a primary and secondary dp combo to avoid this! Especially since you're already removing it. Now I need to somehow find time to replace the passenger side exhaust manifold studs and nuts.
 

Attachments

  • IMG_20191128_010946.webp
    IMG_20191128_010946.webp
    180.2 KB · Views: 24
  • IMG_20191127_232309.webp
    IMG_20191127_232309.webp
    200.4 KB · Views: 25
  • IMG_20191128_005047.webp
    IMG_20191128_005047.webp
    122.9 KB · Views: 23
From interior to exterior to high performance - everything you need for your Stinger awaits you...
How much are you guys gaining in return for all this headache? Do you hate catalytics THAT much? I did catted DP on my Legacy GT (after first gutting OEM DP), but on the Stingers, I'm planning to leave the exhaust stock. Or MAYBE eventually do secondaries. After swapping back to stock for SMOG 4 or 5 times with the LGT, I got tired of it..
 
______________________________
How much are you guys gaining in return for all this headache? Do you hate catalytics THAT much? I did catted DP on my Legacy GT (after first gutting OEM DP), but on the Stingers, I'm planning to leave the exhaust stock. Or MAYBE eventually do secondaries. After swapping back to stock for SMOG 4 or 5 times with the LGT, I got tired of it..
Don't know yet, still have to replace the flange studs and plan on Dyno after intakes. Save the headache and do the secondary pipes back. Haha. I do feel a noticable difference especially on the top end.
 
Don't know yet, still have to replace the flange studs and plan on Dyno after intakes. Save the headache and do the secondary pipes back. Haha. I do feel a noticable difference especially on the top end.


Where you able to get all the studs out on both turbo flanges? How do the threads look? Or are you just talking about the primary-to-secondary downpipe studs?
 
Last edited:
Where you able to get all the studs out on both turbo flanges? How do the threads look? Or are you just talking about the primary-to-secondary downpipe studs?
The headache was the studs off the turbo flange. Driver side had 3 come off with the studs and 1 nut but no damage just really tight. Passenger side o2 sensor #2 treads crossed when removing. On the flange - 2 nuts came off with the studs, the 3rd snapped off with half the stud, the 4th but came off but nut was worn out but was the only one I could reuse.

Tried to remove the broken stud off the flange with a stud socket but no luck. There were enough tread still on so I tried using the stud socket on the one that snapped off with the stud and a 12mm on the nut hoping to use that nut on the broken stud that's stuck on the turbo but that snapped and now it's stuck in my stud socket!!!
This was not even 24 hours ago so I'm gonna see if the dealer is open tomorrow so I could get new studs and nuts. Need to figure out how to release the stud from the socket and try to get back in that tight ass spot with it and some penetrating spray. Gonna have to do this from the ground at home this time which add to the frustration. (Had to get it back together as much as possible just to drive it home from work last night)
 
How much are you guys gaining in return for all this headache? Do you hate catalytics THAT much? I did catted DP on my Legacy GT (after first gutting OEM DP), but on the Stingers, I'm planning to leave the exhaust stock. Or MAYBE eventually do secondaries. After swapping back to stock for SMOG 4 or 5 times with the LGT, I got tired of it..
I wouldn't have don't this if Hawaii had emissions. Haha
 
From interior to exterior to high performance - everything you need for your Stinger awaits you...
Back
Top