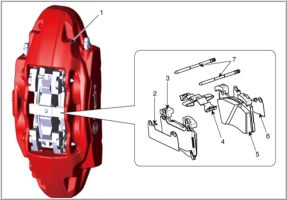
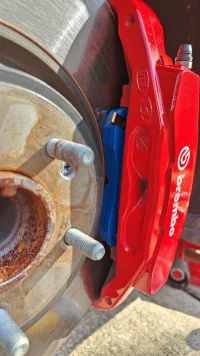
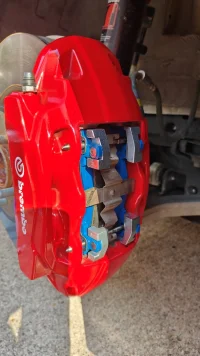
Stinger Brake Pads Replacement

Has anyone tried the Advics Ceramics?

ADVICS AD2145 - Front
ADVICS AD2144 - Rear

I was trying to find the Posi-Quiet, just can't seem to find them in stock. Rock Auto has these Advics, looking for a good daily driver setup.

Also, I'm not quite understanding the Posi-Quiet rears, 105.60410, on the forums they say "weights" what is that? Looking online, I see things listed as shims, is that same thing?


I have not found any rear pads WITHOUT WEIGHTS that will fit.

For the front, any standard 1001 size pad will fit. 1001 pad size, is quite possibly the most common pad size. Massive compatibility.

I am currently using front pads without weights, no sounds or squeals whatsoever.
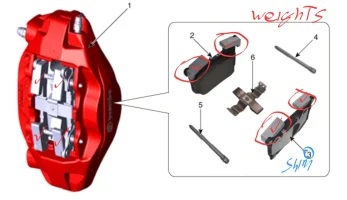
Screenshot_20240204_174202_Chrome.webp
 
Just got the Posi Quiet 1001, noticed there is no L or R on them, nor any indication of direction. I figured the squeal tab goes on this inside of the caliper, and if so, that only goes on one way. I also noticed the "shim" from the stock pads do not fit on the 1001, so, I'm leaving them off.

The stock pads would slide right in and out, no issue, into the caliper when the pistons were fully retracted. However the Posi's didn't slide in per se. It required some love taps from the rubber mallet to put them into position. I'm not saying I was taking full swings, but, gentle love taps for sure.

When inserting the retaining pins, that was a task. The first pin would slide right in, with the retianing clip, no issue. When I went to do the second pin, oh my. It was an act to push in and up on the pin, to compress the retaining clip and get the pin in the correct orientation while quickly tapping with a rubber mallet to get it to slide in.

I'm a bit hesitant, as, on youtube, watching other installs, they don't seem to struggle with the pins when re-inserting, So far I only did the fronts, CENTRIC 10510010, but a bit nervous about the "snugness" of the pads in the calipers.
 
Last edited:
______________________________
Just got the Posi Quiet 1001, noticed there is no L or R on them, nor any indication of direction. I figured the squeal tab goes on this inside of the caliper, and if so, that only goes on one way. I also noticed the "shim" from the stock pads do not fit on the 1001, so, I'm leaving them off.

The stock pads would slide right in and out, no issue, into the caliper when the pistons were fully retracted. However the Posi's didn't slide in per se. It required some love taps from the rubber mallet to put them into position. I'm not saying I was taking full swings, but, gentle love taps for sure.

When inserting the retaining pins, that was a task. The first pin would slide right in, with the retianing clip, no issue. When I went to do the second pin, oh my. It was an act to push in and up on the pin, to compress the retaining clip and get the pin in the correct orientation while quickly tapping with a rubber mallet to get it to slide in.

I'm a bit hesitant, as, on youtube, watching other installs, they don't seem to struggle with the pins when re-inserting, So far I only did the fronts, CENTRIC 10510010, but a bit nervous about the "snugness" of the pads in the calipers.
Kia has drawn the squealer on the inboard pad - positioned at the bottom of the caliper.

I too would be nervous about any snugness of the pads in the caliper

1707366578665.webp
 
The pads are identical otherwise, so you can install the wear indicator on either side. However, a visual indicator won't do much good if you can't check it regularly. I always install it on the outside. Stock pads I've had also have them on the outside.

As for the "snugness"... What might feel tight to you when installing is probably just right. The pads don't move much, so it doesn't take much tolerance to slide laterally a fraction of a mm. Too much wiggle room is actually bad and will lead to vibration and noise. The EBC pads are tighter than a (insert cheeky analogy here). Just make sure you thoroughly clean out the ledges on which the pads ride. I keep all our used toothbrushes for general automotive cleaning jobs like this. Brush clean the calipers and spring clips good. Don't be tempted to apply grease to the brake pad sliding tracks. All that will do is attract brake dust and debris to form grime. Plus, grease anywhere close to braking surfaces is potentially bad news

I do clean the pins really well, almost to a polish. I finger rub a very light coat of grease all over the pins and then wipe it all off, leaving a very slick dry surface that will slip much easier thru the guide pin slots.
 
From interior to exterior to high performance - everything you need for your Stinger awaits you...
I thought the squealer went on the inside because you can see how much material is left on the outside pad, and the inside one tends to wear a little faster (with floating calipers, anyway).
 
The pads are identical otherwise, so you can install the wear indicator on either side. However, a visual indicator won't do much good if you can't check it regularly. I always install it on the outside. Stock pads I've had also have them on the outside.

As for the "snugness"... What might feel tight to you when installing is probably just right. The pads don't move much, so it doesn't take much tolerance to slide laterally a fraction of a mm. Too much wiggle room is actually bad and will lead to vibration and noise. The EBC pads are tighter than a (insert cheeky analogy here). Just make sure you thoroughly clean out the ledges on which the pads ride. I keep all our used toothbrushes for general automotive cleaning jobs like this. Brush clean the calipers and spring clips good. Don't be tempted to apply grease to the brake pad sliding tracks. All that will do is attract brake dust and debris to form grime. Plus, grease anywhere close to braking surfaces is potentially bad news

I do clean the pins really well, almost to a polish. I finger rub a very light coat of grease all over the pins and then wipe it all off, leaving a very slick dry surface that will slip much easier thru the guide pin slots.
I did the same with the pins as you. I also do the same on the inside of the rotors that mate the hub, some people use anti-seize, I just put a very thin, almost dry, layer of moly just to keep the iron oxide welding to a minimum.

I think I'm going to pull the pads again and re-clean the pad guides. I already did that, but, why not right. I read another forum, to "grind" the edges of the pad slightly to remove any paint or similar to remove the "too snug to go in". I'll prob do a video this next time, so everyone can tell me how I'm doing it wrong. :)
 
I thought the squealer went on the inside because you can see how much material is left on the outside pad, and the inside one tends to wear a little faster (with floating calipers, anyway).
Nothing wrong with that logic. Either way, it's there to help the owner catch it before worse things happen.

Realistically, I check my brakes so often, I really don't need to rely on the wear tab.

BTW, if you look at the pic @D.J. posted above, the wear tab is shown on the outside, judging by the direction of the guide pins, which have the pointy end on the outside.
 
This is how mine sits.
IMG20240114141552.jpg

But below view is a far better way to keep an eye on brake pad wear. My wheels are off almost every month to swap track wheel/tires.

BTW, this is right after installing the new pads. Other than cleaning the calipers thoroughly, everything is installed dry. Yes, the pads went in SNUG, as quality replacements with proper tolerancing should be.
IMG20240114141536.jpg
 
Took the pads out, did another round of wire brush and brake cleaner to the caliper, put the pads back in. Still snug, but, not as snug as before.

However, did a video of inserting the pins, having issues with these Posi Quiets. They're in, but.....looking for feedback on what I did wrong here:

Stinger Brembo Retaining Pin Issues
 
______________________________
From interior to exterior to high performance - everything you need for your Stinger awaits you...
Took the pads out, did another round of wire brush and brake cleaner to the caliper, put the pads back in. Still snug, but, not as snug as before.

However, did a video of inserting the pins, having issues with these Posi Quiets. They're in, but.....looking for feedback on what I did wrong here:

Stinger Brembo Retaining Pin Issues
I see what you're talking about now. What I do is to press the spring clip in the middle of the clip, which tend to stretch the spring clip length wise. I guess the end result is the same as what you did, but it doesn't require a tool and (to me) a bit easier to manage.

That spring clip is designed to hold tension between the two pins and also apply pressure inward (radially) to push the pads apart, away from the rotor when the brake pedal pressure is relaxed. Pretty ingenious.
 
if the second pin isn't a pain to put back in you have the clip in upside down. you're pretty much setting the tension when you put the second pin in.
 
Rear pads finally arrived, 3 days late, but, got the rear pads installed, everything back together. Did an oil change while the car was on the lift. Took the Stinger out, did a few wear in stops and then decided to take her on the big road. Put some speed under her, and the brakes were awesome. No noise, no shimmy, no grinding, no pull to either side, no pulsing, just smooth brake.

Huge thanks to the forum and the contributors. My dad use to say, "The joy of success is really the feeling of relief, because that means you finally ran out of wrong ways to do something".
 
Glad everything worked out well. Agreed it's a great feeling you've done the job yourself and done it correctly. Even more importantly, by DIY, you now understand how the parts go together and how they function. If and when something goes awry, you would be better able to put a finger on what might be wrong.

It's a natural high that draws a lot of us seasoned shadetrees to lying/sitting on cardboard on weekends, even more so than saving money and keeping grease monkeys off our cars.

BTW, I forgot to mention earlier that one major reason for the snug pad-to-caliper fit is the fact that these Brembo Monobloc calipers are made of cast aluminum, while the brake pad backing plates are made of steel. Aluminum has a thermal expansion coefficient roughly 3 times that of steel. Brakes get hot, even in normal street driving. That opening in the caliper where the pads sit will enlarger faster with rising temp faster than the brake pads will elongate. This is why at room temp, the pads need to fit as tightly as practically feasible. If they start out snug, they are less likely to get wayyy too loose once brakes heat up.
 
From interior to exterior to high performance - everything you need for your Stinger awaits you...
Time for me to change my pads, looking into the K8SS pads and the EBC reds. Anyone know how they compare since the K8 store ones are quite a bit cheaper
 
______________________________
Time for me to change my pads, looking into the K8SS pads and the EBC reds. Anyone know how they compare since the K8 store ones are quite a bit cheaper
EBC is designed to be more of a track focused pad. For daily usage, spirited driving & an occasional track day, our pads will work great.

We use them on our own 2019 GT1 & I can report there is no vibration or pulsing issues under the pedal at all compared to the original pads.

Shoot me a DM if you have any questions, or would like to order with a discount.
 
Pretty sure Redstuff is a street compound. EBC doesn't even recommend Yellowstuff for track use any longer.
 
Pretty sure Redstuff is a street compound. EBC doesn't even recommend Yellowstuff for track use any longer.
It is a street compound as it’s not made only for the track. However, they still advertise Performance + Race on their packaging, so we still inform customers that it’s OK for some track use.
 
AutoX maybe. Anything more than that I wouldn't run on ceramic pads.
 
From interior to exterior to high performance - everything you need for your Stinger awaits you...
Back
Top