DIY: ARK Performance GT-F Lowering Springs Installation Guide

Thinking about tackling this myself on a 3.3 AWD with ARK GT-F springs. Can someone clarify my understanding of the process for the fronts?

Ark GT-Fs don't require the bump stops to be trimmed. So, can I just remove the end-link nut, strut tower nuts and then compress the spring, tilt the strut/spring assembly without removing it? Then replace the stock spring with the GT-F spring and bolt it back up? Or does the tie rod also need to be disconnected?
You have to remove the tie rod in order to allow the strut assembly to drop enough to get it out.
 
You have to remove the tie rod in order to allow the strut assembly to drop enough to get it out.
Ok awesome. Do I need to work about the axel coming out?
 
______________________________
Ok awesome. Do I need to work about the axel coming out?
I pushed down hard on mine and it didn’t. It’s possible but unlikely.
 
I pushed down hard on mine and it didn’t. It’s possible but unlikely.
Thank you sir. Doesn't sound like it's too hard to do the Ark springs. Anything you ran into to look out for?
 
From interior to exterior to high performance - everything you need for your Stinger awaits you...
Thank you sir. Doesn't sound like it's too hard to do the Ark springs. Anything you ran into to look out for?
No problem. All of my feedback/tips are in this thread from when I did mine. Make sure you set aside enough time for this job and you might want to do it over a couple days.
 
I thought I read somewhere that the bump stops do not need trimming with the Ark GT-Fs, is that correct?
 
I thought I read somewhere that the bump stops do not need trimming with the Ark GT-Fs, is that correct?
I've read that too. Do their instructions say to trim them? I trimmed my fronts with the Eibach's but not the rears and have zero issues. Their instructions say to trim front and rear.
 
I just did this on our AWD yesterday and wanted to pass along some critical tips/details for the front:

- As noted in the original write-up, remove the top hat before taking out the strut assembly. You will find yourself in a world of hurt if you don't and this will give you enough room for removal, without hitting the fender. Just put your spring compressors on, tighten them down quite a bit and remove the center 19mm nut on the top hat. You can then slide the entire strut/spring /compressor assembly out safely. Then remove the top hat from the car after the strut is removed.

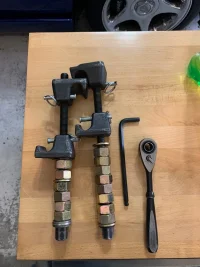
- You will most likely have spring compressors pictured below, which will be too long to work with when the strut is still on the car. Thankfully a previous member mentioned the need for spacers and he is correct. Grab yourself some nuts/washers that are just large enough to slide up/down the threads. I bought 8 for each compressor. This will give you the needed and quick flexibility to make them as long or as short as you need them.

- I would highly advise against using a T-50 torx bit to help removing the top hat nut. Both of mine did not fit well enough when proper force was applied. Instead, use a 8mm allen key, which fits perfectly and does not risk stripping.

- Do yourself a giant favor and grab the craftsman ratchet/socket set shown below, or something similar. They aren't expensive and a welcome addition to any toolkit. This enables allen keys/bits to fit through. It is a lifesaver for the top hat and sway bar link.

- The front axle will most likely uncouple, due to the weight of the hub/rotor/caliper. Don't freak out. It will go back it with a bit of careful love. I did remove my axle nut, to lessen the pull on the axle. You will need a 32mm socket and to remove the nut, with a impact being highly recommended.

- Throw a towel over the axle boot, just in case the strut falls on top of it. It would save it from being damaged.

- After installing the new spring and top hat, I was able to install the strut using the top 3 14mm nuts and then slide the hub into the bottom of it. Just keep those top three nuts loose, so you have some wiggle to work with. This saved any risk in hitting the fender and unnecessary pressure on the axles. One side did not require spring compressors to be installed. The other side needed them to give me about 1mm more room to slide the hub onto the bottom of the strut.

- For AWD cars, the factory instructions has you remove the lower control arms from the hub. You do not need to do this. Save yourself the pain.

Hope this helps someone down the line, especially on the AWD models! I'll post more if I think of other tips.


IMG_4669.webp
 
^^^Great post!

I've had the springs on now for several months and just love them. Looks wise and handling they are perfect. Winter snow isn't a problem either because even though they lowered the wheel to wheel well gap and inch, the car to ground clearance wasn't affected as much.
 
______________________________
From interior to exterior to high performance - everything you need for your Stinger awaits you...
^^^Great post!

I've had the springs on now for several months and just love them. Looks wise and handling they are perfect. Winter snow isn't a problem either because even though they lowered the wheel to wheel well gap and inch, the car to ground clearance wasn't affected as much.
Thanks! I am looking forward to the springs settling and getting new wheels on there. I am 100% happy that I went with ARK's, especially after seeing them compared to others. No big droop in the back and the ride is fantastic without bounce.
 
Hey peeps! I have a 2019 Kia Stinger GT AWD. I just got the Eibach lowering springs and I plan on tackling this project soon in my driveway. I am handy with tools, and did mostly all of my upgrades on my old Z including suspension work. I read through this thread a few times and made the below notes. Can anyone answer my two questions? Thanks!


Questions:
  • Do they make ‘compact spring compressors’? Autozone loans out free ones but they are 10.5 inches long each. Would these be too long without those washer spacers?
  • For Eibachs springs specifically, do I really have to remove the entire Brembo brake caliper?
General Notes:
  • I bought a hex bit socket set for using allen wrench with a socket
  • My Stinger is AWD, so I will have to be aware of the drive shaft up front
  • Do front/rear pairs at a time, and keep them jacked up. So both rear tires are jacked up, work completed, brought down, then both front tires are up.
  • Make this a weekend project. Even though the rears are easier, jack up the fronts the night before and spray PB blaster on all the bolts for overnight.
  • Painters tape (or full on tarp) the front wheel fenders so you don’t scratch it with the strut
  • To quote a previous poster, the torque specs are:
    • Outer 19mm tie rod castle nut = 35 to 40 ft/lbs
    • Lower 17mm strut bolt = 80 ft/lbs
    • Top 17mm strut bolt (allen key bolt) = 80 ft/lbs
    • 14mm strut mount nuts = 45 to 50 ft/lbs
    • 19mm top hat nut = 30 to 40 ft/lbs.
  • Even though I also want to replace my stock brake lines with SS ones, keep it to one project at a time per weekend.
  • For the outer tire rod, twist the rotor left and right to help get it out. If this doesn’t work, then use a mallet/hammer/punch
  • Remove the top hat from the strut before removing it.

Here is a good youtube to help you out:

- Yes, they do make more compact compressors, however I have yet to see them for rent in my region. If you want to purchase they normally run north of $200. See here: https://www.ecstuning.com/b-schwaben-parts/schwaben-strut-spring-compressor-set/013845sch01a~sch/

-The autozone ones are too long without the spacer setup. People have done it, but the spacers make it 1000x easier and you can get full compression. Just bring one of the compressor bolts to the hardware store and spend the $4 on good quality nuts/washers. One compressor will have more nuts than the other side when you use them. Just takes a bit of testing and you will see once you are in there.

- I installed the ARK springs multiple times without caliper removal, so I can't imagine the need to remove the caliper for the Eibachs...since a spring is a spring in this case.

-The roughest part for the AWD driveshafts is getting the strut back into the wheel well. Since the driveshaft will uncouple at the mid-joint, getting it back in takes precision, and you are fighting the top hat not hitting the fender while doing so. Just be patient and know it's possible. The entire knuckle/rotor/strut has to rotate/wiggle into the exact correct position for the driveshaft to re-couple. Do NOT force it, just find the right spot and it will then easily go back together. You might want to practice it beforehand without the strut in place.

-I tried the re-install by installing the strut from the top down, by installing the top hat nuts first and then sliding the knuckle on the bottom of the strut. However, this only worked once and it barely worked. Every other time, I needed 1 more mm of wiggle room from the knuckle, but couldn't get it. If this method worked on a regular basis, you wouldn't have to fight the driveshaft re-coupling.

-The knuckle is aluminum, so be careful in banging the tie rod end loose. It can be malformed and possibly cracked if you are hitting it way too hard.


You can also flip through this new thread, but keep in mind it's for a RWD. The foundation and most tips remain the same...


Cheers!
 
Curious, with the spring compressors, they have to be parallel to the strut. If the strut is still in place perpendicular to the ground, then these compressor bolts are facing downwards. I don't see alot of room for a power tool here (not that its great to use them with springs anyways). I would have to attach a racket with a long handle at the bottom right? This is how I would compress the springs that are still attached to strut, which is still attached to car?
 
From interior to exterior to high performance - everything you need for your Stinger awaits you...
Curious, with the spring compressors, they have to be parallel to the strut. If the strut is still in place perpendicular to the ground, then these compressor bolts are facing downwards. I don't see alot of room for a power tool here (not that its great to use them with springs anyways). I would have to attach a racket with a long handle at the bottom right? This is how I would compress the springs that are still attached to strut, which is still attached to car?

Correct in your thinking, in the the heads of the bolt face downward and the bolt itself is then thrust upward when compressing. If you don't use spacers, the bolts will run into the body of the car or the top hat of the strut. I had to use my impact wobble to work around the knuckle/strut. But a 19mm (dependent on your compressors, obviously) gearwrench or socket/ratchet will work just fine, and it doesn't take a ton of time doing it manually.

The compressors will go at 3 and 9 o'clock. The strut's end link mount will get in the way, but just go to one side or the other of it.

And yes, compress the spring while it is still mounted to the car. And re-install with the spring compressed to make it easy. Just put the compressors at the same location when you removed it from the car.
 
Last edited:
______________________________
Considering ARK GTF springs on my 22 Genesis AWD 3.3t. I'm fairly mechanical and understand the process clearly. I'm just worried about the front axle shaft popping out...My plan is to buy 2x sets of compressors. Both thin, w hooks that extend outwards a decent amount. I want to compress the ever loving shit out of the fronts so I don't have to yank down on the axle and knuckle. Can I achieve this and not have to stress my axle joint?
 
Hey peeps! I have a 2019 Kia Stinger GT AWD. I just got the Eibach lowering springs and I plan on tackling this project soon in my driveway. I am handy with tools, and did mostly all of my upgrades on my old Z including suspension work. I read through this thread a few times and made the below notes. Can anyone answer my two questions? Thanks!


Questions:
  • Do they make ‘compact spring compressors’? Autozone loans out free ones but they are 10.5 inches long each. Would these be too long without those washer spacers?
  • For Eibachs springs specifically, do I really have to remove the entire Brembo brake caliper?
General Notes:
  • I bought a hex bit socket set for using allen wrench with a socket
  • My Stinger is AWD, so I will have to be aware of the drive shaft up front
  • Do front/rear pairs at a time, and keep them jacked up. So both rear tires are jacked up, work completed, brought down, then both front tires are up.
  • Make this a weekend project. Even though the rears are easier, jack up the fronts the night before and spray PB blaster on all the bolts for overnight.
  • Painters tape (or full on tarp) the front wheel fenders so you don’t scratch it with the strut
  • To quote a previous poster, the torque specs are:
    • Outer 19mm tie rod castle nut = 35 to 40 ft/lbs
    • Lower 17mm strut bolt = 80 ft/lbs
    • Top 17mm strut bolt (allen key bolt) = 80 ft/lbs
    • 14mm strut mount nuts = 45 to 50 ft/lbs
    • 19mm top hat nut = 30 to 40 ft/lbs.
  • Even though I also want to replace my stock brake lines with SS ones, keep it to one project at a time per weekend.
  • For the outer tire rod, twist the rotor left and right to help get it out. If this doesn’t work, then use a mallet/hammer/punch
  • Remove the top hat from the strut before removing it.

Here is a good youtube to help you out:

You can jack up the lower control arm some to help compress the spring too, just be careful when doing it.

Also if you have an impact gun you can loosen the cv axle nut to get a little bit more movement out of the knuckle/lower control arm and not worry as much about the axle popping out of the transaxle.
 
Last edited:
Considering ARK GTF springs on my 22 Genesis AWD 3.3t. I'm fairly mechanical and understand the process clearly. I'm just worried about the front axle shaft popping out...My plan is to buy 2x sets of compressors. Both thin, w hooks that extend outwards a decent amount. I want to compress the ever loving shit out of the fronts so I don't have to yank down on the axle and knuckle. Can I achieve this and not have to stress my axle joint?


You can jack up the lower control arm some to help compress the spring too, just be careful when doing it.

Also if you have an impact gun you can loosen the cv axle nut to get a little bit more movement out of the knuckle/lower control arm and not worry as much about the axle popping out of the transaxle.

Yes, you can remove the axle nut to get a bit more wiggle room for the axle. However, it isn't a ton of room that it gives you, as the strut prevents the knuckle from fully swinging out to remove the axle in the first place. It's sort of an awkward double edged sword.

Remember, if you do go the axle nut removal route, you should technically buy a new one for replacement and be able to torque it down to 225 lb-ft. They aren't very expensive at all.
 
My question is will I have enough room to simply pull out the compressed strut and spring, from the front, on an AWD model, by not having to remove anything axle related? Can I just compress it w 3 compressors to make it as short as possible and extract the whole assembly?
 
From interior to exterior to high performance - everything you need for your Stinger awaits you...
Back
Top