Just wanted to thank Team Ark for posting this amazing DIY! Without you, we couldn't have done this.
Just FYI, I'm 50 and I am SO glad my 80yo dad came over to help me. I couldn't have done this without a 2nd person!
View attachment 69030
Some tips from the old men

- We did not remove the front strut from the vehicle. We left it bolted to the hub assembly.
- To tilt the front strut out so the spring can be removed, we put the HF compressor on the springs upside down. This means you cannot tighten the compressor with a tool. But if you compress the suspension with your floor jack, then you can hand tighten the compressor. Put compressor on, pump the jack once, hand tighten, etc. Once you've reached full compression, simply drop the jack and your spring is compressed enough to remove.
- We did not remove the top hat. I am not sure why I need to remove the top hat? It adds a couple inches to the suspension height, making removal by tilting the strut out that much more difficult. Instead, we removed the top 19mm strut nut and allowed the whole assembly to droop. Once tilted out, we could easily pull the spring off (compressor and all)
- I did not need to compress the new spring to put it on the strut and reassemble. Using the same floor jack, we would push the assembly back into place, using a 2nd set of eyes to line up the shaft in the top hat hole. Tighten and done!
One last tip, we removed almost NOTHING in the rear. Just the sway bar bolts and then the bottom arm bolts. Getting the shock bolt in is easy, but it takes some massaging to get the rear arm connection point back on the hub.
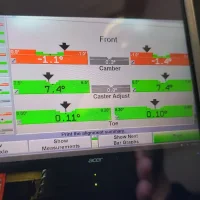
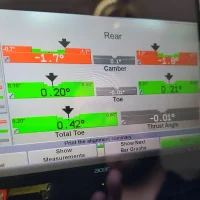
I noticed somebody (3 years ago) asked for alignment specs. These numbers aren't gospel, but are what my shop set me at. I told them get it as close to factory as possible. Not looking for anything but to save money on tires
 View attachment 69031View attachment 69032


