DaJackson
1000 Posts Club!
After installing my springs my headlights were aimed lower. This has been an easy fix on other cars I’ve owned but the Stinger is slightly different.
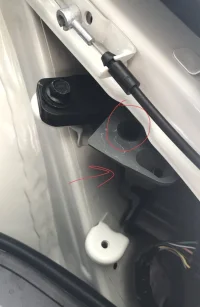
First the headlight adjustment is behind the headlight on each side under where the fender and hood meet.
Generally there is a screw to adjust the height, and this hole that’s circled has a marking saying U<—>D, seems like a logical place.
The other hole says L<—>R but there is nothing in the hole. I’ve never had a reason to adjust a headlight left to right though.
I have the K&N intake and I just had to unbolt the heat shield and remove the filter to get to the adjustment. The stock system should be easy as well as you would just need to remove the air filter box which I think is just 3 bolts and a hose clamp.

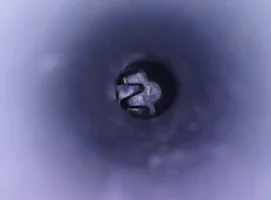
This is what is down that hole. Glad I just purchased an WiFi endescope to get this picture. Obviously that’s not a screw.

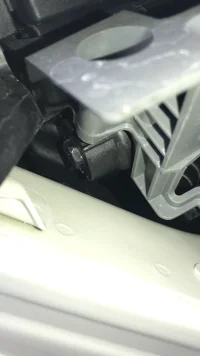
Luckily on the back side of this “gear” is a 12mm nut. It’s marked by the arrow in the top picture.

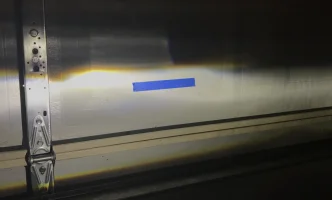
Park the car in front of a wall/garage door and turn on the lights, mark your starting location with something. I like to use painters tape.
Rotate the nut using a crescent wrench (ratcheting makes this much easier) and see which way the beam moves. If it goes up, keep going. If it goes down, go the other direction. It’s a tight fit so you’ll only get maybe 1/10 a rotation before hitting the frame and it’s a fine adjustment so the 1” I moved the beam took 1 - 1 1/2 rotations of the nut.

First the headlight adjustment is behind the headlight on each side under where the fender and hood meet.
Generally there is a screw to adjust the height, and this hole that’s circled has a marking saying U<—>D, seems like a logical place.
The other hole says L<—>R but there is nothing in the hole. I’ve never had a reason to adjust a headlight left to right though.
I have the K&N intake and I just had to unbolt the heat shield and remove the filter to get to the adjustment. The stock system should be easy as well as you would just need to remove the air filter box which I think is just 3 bolts and a hose clamp.

This is what is down that hole. Glad I just purchased an WiFi endescope to get this picture. Obviously that’s not a screw.

Luckily on the back side of this “gear” is a 12mm nut. It’s marked by the arrow in the top picture.

Park the car in front of a wall/garage door and turn on the lights, mark your starting location with something. I like to use painters tape.
Rotate the nut using a crescent wrench (ratcheting makes this much easier) and see which way the beam moves. If it goes up, keep going. If it goes down, go the other direction. It’s a tight fit so you’ll only get maybe 1/10 a rotation before hitting the frame and it’s a fine adjustment so the 1” I moved the beam took 1 - 1 1/2 rotations of the nut.


