
Anything to look for in the rear in order to seat the springs completely and correctly?I followed this guide to install Eibach springs on the rear. I plan to do the same for the fronts in a few days and will report back.
It's a great guide, thorough and easy to follow. A couple tips when doing the rears that differ from the guide and will save you time:
1. You don't need to remove the lower control arm covers.
2. The ABS sensor doesn't need to be completely removed, just unclipped and positioned out of the way.
The rears are an easy job even without a lift. It took me 1 hour to do the drivers side and only 30 minutes for the passenger side and this was being very meticulous.
You are using an out of date browser. It may not display this or other websites correctly.
You should upgrade or use an alternative browser.
You should upgrade or use an alternative browser.
DIY: ARK Performance GT-F Lowering Springs Installation Guide
- Thread starter TEAM ARK
- Start date
socalvn
Stinger Enthusiast
- Joined
- Feb 9, 2022
- Messages
- 888
- Reaction score
- 410
- Points
- 68
The rear is easier part it took me like 25 minutes for each side they'll set in real easy you'll see the pocket where the spring setsAnything to look for in the rear in order to seat the springs completely and correctly?
The reason I ask is because my passenger side rear corner has always sat lower than the other corners ever since I had them installed back in June 2022. I'm wondering if that's due to improper installation by the shop? Originally wasn't a huge concern for me but I just had the wheels off to change my brake pads and noticed that the megan racing camber arms and the eibach sway bars have paint missing right where they would touch each other when going through a large compression. This is unsettling to me so now the ride height on that corner is a larger issue. Might make a separate post about this...The rear is easier part it took me like 25 minutes for each side they'll set in real easy you'll see the pocket where the spring sets
______________________________
socalvn
Stinger Enthusiast
- Joined
- Feb 9, 2022
- Messages
- 888
- Reaction score
- 410
- Points
- 68
I have the M&S lowering springs Eibach sway bar and Megan racing arms and I corner this car hard and never any knocking or paint missing on parts hitting. Sounds like they didn't sit one spring in the pocket. Can you post a picture of whats hittingThe reason I ask is because my passenger side rear corner has always sat lower than the other corners ever since I had them installed back in June 2022. I'm wondering if that's due to improper installation by the shop? Originally wasn't a huge concern for me but I just had the wheels off to change my brake pads and noticed that the megan racing camber arms and the eibach sway bars have paint missing right where they would touch each other when going through a large compression. This is unsettling to me so now the ride height on that corner is a larger issue. Might make a separate post about this...
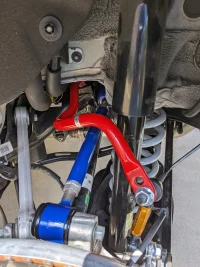
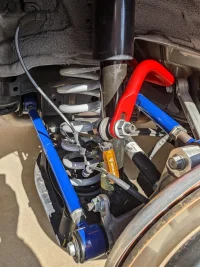
This is the driver side rear because its the only picture I have. But the megan racing camber arm has a touch of paint missing where the circle is and the sway bar also has a touch of paint missing. Leading me to believe that they contact each other. Again, this picture shows the driver side and I'm experiencing this on the passenger side.I have the M&S lowering springs Eibach sway bar and Megan racing arms and I corner this car hard and never any knocking or paint missing on parts hitting. Sounds like they didn't sit one spring in the pocket. Can you post a picture of whats hitting

From interior to exterior to high performance - everything you need for your Stinger awaits you...
socalvn
Stinger Enthusiast
- Joined
- Feb 9, 2022
- Messages
- 888
- Reaction score
- 410
- Points
- 68
This is the driver side rear because its the only picture I have. But the megan racing camber arm has a touch of paint missing where the circle is and the sway bar also has a touch of paint missing. Leading me to believe that they contact each other. Again, this picture shows the driver side and I'm experiencing this on the passenger side.
View attachment 75652 iI just can't see that happening there's not enough articulation those kind of move parallel together
Attachments
socalvn
Stinger Enthusiast
- Joined
- Feb 9, 2022
- Messages
- 888
- Reaction score
- 410
- Points
- 68
Yes you want to make sure both sides of the car are jacked up so the suspension is equally unloadedWhen I tightened my bolts I jacked up both sides, I would also make sure the bar is generally located center of the car
DoctorStiches
1000 Posts Club!
Installed over the weekend. Saturday was front sunday the rear. This is a job for a lift! I was on the ground and no one told me car work in your 30's is painful. But got it done and the guide helped loads too

What went wrong:
>Front is such a pain
>cv popped out and did not want to go back in for a bit
>the spring comprsors were moved many times
>Took maybe 4 1/2 hours of actual work 6 hr total
>recompress to install
>cv again....
>lining up the bolts for the rear lca is rather frustrating
>the rear has many tiny bolts
>maybe 3 hours work 4 hours total on the rear
the plus
Rear!!
Super easy.
Save it for last.
Still alot of steps but easy work.
Breaker bar recomended
Very few tools required.
>end
Last edited:
______________________________
From interior to exterior to high performance - everything you need for your Stinger awaits you...
socalvn
Stinger Enthusiast
- Joined
- Feb 9, 2022
- Messages
- 888
- Reaction score
- 410
- Points
- 68
Nice Sance. Looks good. I paid the Kia dealer to do the front. Sometimes it's just easier that way. The back was no problem. drive it for a week then get it aligned. mine's really planted to the ground lowered a lot more fun to drive
DoctorStiches
1000 Posts Club!
Same but this is day one of driving. Gonna need aligned for sure. It pulls odd sometimes now but i looooove the lookNice Sance. Looks good. I paid the Kia dealer to do the front. Sometimes it's just easier that way. The back was no problem. drive it for a week then get it aligned. mine's really planted to the ground lowered a lot more fun to drive
socalvn
Stinger Enthusiast
- Joined
- Feb 9, 2022
- Messages
- 888
- Reaction score
- 410
- Points
- 68
You probably have toe out of alignment. That's why it'll pulls occasionally mine's planted to the ground at any speed.Same but this is day one of driving. Gonna need aligned for sure. It pulls odd sometimes now but i looooove the look
Now you just need a set of sway bars and your set
Snowwhite
Sustaining Member
- Joined
- Feb 3, 2020
- Messages
- 1,018
- Reaction score
- 596
- Points
- 118
I did all 4 corners without a lift or spring compressors. Just a jack and a jack stand. Granted, I don’t have to worry about cv joints in the front. Rears were 20 mins each, first front took 2.5 hrs because I was wasting time with the spring compressors. second took 45 mins with just the jack. rear bolts are easy to line up if you use the jack to help.Installed over the weekend. Saturday was front sunday the rear. This is a job for a lift! I was on the ground and no one told me car work in your 30's is painful. But got it done and the guide helped loads tooView attachment 79213View attachment 79212
What went wrong:
>Front is such a pain
>cv popped out and did not want to go back in for a bit
>the spring comprsors were moved many times
>Took maybe 4 1/2 hours of actual work 6 hr total
>recompress to install
>cv again....
>lining up the bolts for the rear lca is rather frustrating
>the rear has many tiny bolts
>maybe 3 hours work 4 hours total on the rear
the plus
Rear!!
Super easy.
Save it for last.
Still alot of steps but easy work.
Breaker bar recomended
Very few tools required.
>end
DoctorStiches
1000 Posts Club!
No cv in front lets just enough room to pull it out. Aand they use 1 time use cv bolts so i really didnt want to remove it from the knuckleI did all 4 corners without a lift or spring compressors. Just a jack and a jack stand. Granted, I don’t have to worry about cv joints in the front. Rears were 20 mins each, first front took 2.5 hrs because I was wasting time with the spring compressors. second took 45 mins with just the jack. rear bolts are easy to line up if you use the jack to help.
From interior to exterior to high performance - everything you need for your Stinger awaits you...
socalvn
Stinger Enthusiast
- Joined
- Feb 9, 2022
- Messages
- 888
- Reaction score
- 410
- Points
- 68
So you're able to do it without disconnecting from the knuckle? Just push it down and pull it out. I didn't realize those were one time bolts I may be going to coilovers so no compression needed. I just need to get the strut outNo cv in front lets just enough room to pull it out. Aand they use 1 time use cv bolts so i really didnt want to remove it from the knuckle
______________________________
Snowwhite
Sustaining Member
- Joined
- Feb 3, 2020
- Messages
- 1,018
- Reaction score
- 596
- Points
- 118
jack up one of the fronts, rest on a jackstand. Remove wheel. Use jack to compress suspension enough to undo tension on sway bar link and tie rod end. remove both. I also removed the brake line hanger bolt to give the hub and brake a little more room to move. Use jack to compress suspension all the way up. Loosen and remove top strut nut. slowly lower jack, carefully tilt strut out, remove spring and top pad. Replace with new spring, install pad, tilt back into car. Jack suspension back up, making sure you line up the strut with the bearing. Tighten top nut, relieve some jack pressure, attach sway bar link, brake line hanger, and tie rod.
if you’re also getting the strut out you might be able to loosen the bolts that clamp it on at the time you tilt out the spring, but I didn’t try it.
if you’re also getting the strut out you might be able to loosen the bolts that clamp it on at the time you tilt out the spring, but I didn’t try it.
DoctorStiches
1000 Posts Club!
Sadly different angles but here are pics i took when i got stuck.
Popped in and popped out i took photos for my actual mechanic friend for advice lol

Popped in and popped out i took photos for my actual mechanic friend for advice lol
DoctorStiches
1000 Posts Club!
Pulling your axle out is certainly not the right way to do it but it happened while i pushed down on the hub brake assembly...So you're able to do it without disconnecting from the knuckle? Just push it down and pull it out. I didn't realize those were one time bolts I may be going to coilovers so no compression needed. I just need to get the strut out
And i only say that because its frowned upon ti unbend (they are pinched in 2 spots) and reuse hub bolts according to my mechanic guy.
DoctorStiches
1000 Posts Club!
Oh oh oh the stupid continues.
So whats the life of a relitivly hard driving axle shaft seal? 76k miles?
That photo is of the driver side axle that came out. But out of literally no where the passenger side seal is gone. All the tranny fluid is now leaked out over a day at work. (im assuming what it is as no oil pressure light came on)
Thursday the dealer sees me... needs towed in.
Damn full moons
From interior to exterior to high performance - everything you need for your Stinger awaits you...

