DIY: ARK Performance GT-F Lowering Springs Installation Guide

My main question is, if I use multiple compressors to compress the front spring while it's on the car, do you think I can sandwich it enough to pull out the whole strut / spring assembly WITHOUT having to remove anything other than the tie rod / sway link bolts, etc. If I can get the spring as compressed as possible, maybe I will luck out and not have to worry about the front axle dipping too much?
 
My main question is, if I use multiple compressors to compress the front spring while it's on the car, do you think I can sandwich it enough to pull out the whole strut / spring assembly WITHOUT having to remove anything other than the tie rod / sway link bolts, etc. If I can get the spring as compressed as possible, maybe I will luck out and not have to worry about the front axle dipping too much?

Even compressing the springs to their max will not save you on axle stress, unfortunately.

The only way to not stress the axle at all is to remove the lower control arms from the knuckle. However, they are in there VERY tight and require a specific ball joint removal tool to get them off. Old school banging on the LCA with a hammer/mallet is risky, as they are made out of aluminum. Then depending on how much brake line you have to work with and if you don't have much....removing the caliper, set it to the side on a tall box (since you cant hang it from the strut spring), remove rotor, and swing out the knuckle from the bottom, removing the axle from the hub.

So to really answer your question...do the above to not stress the axle. Or live with the minor pain of dealing with the axle while it is still connected. Hope that helps!

I understand...so not really worth it. I just have to be careful and compress the spring as much as possible either way. I'm assuming you really have to let the knuckle hang / push down on it to cause the axle to pop out?
 
______________________________
I understand...so not really worth it. I just have to be careful and compress the spring as much as possible either way. I'm assuming you really have to let the knuckle hang / push down on it to cause the axle to pop out?

I'm a by the book guy and never like to take shortcuts, but I agree in it's not really worth it to take off the LCA's. But please do whatever makes you feel comfortable.

It doesn't take a whole lot for the axle to separate in the middle joint. 99% chance it will happen. Don't stress about it too much and put it back together carefully when putting the new strut back in. See my above rambling post for how to do it.
 
Many have done their own springs including g myself. I was stressed when my axel popped out, but it just popped back. The biggest issue I think is not to damage the boot. A second set of hands would definitely help but can be done yourself as I did. When the axle popped out on the other side , no stress at all.
 
From interior to exterior to high performance - everything you need for your Stinger awaits you...
Just line up the splines and shove.
 
Just wanted to thank Team Ark for posting this amazing DIY! Without you, we couldn't have done this.

Just FYI, I'm 50 and I am SO glad my 80yo dad came over to help me. I couldn't have done this without a 2nd person!

2022-03-22.webp

Some tips from the old men :D

  1. We did not remove the front strut from the vehicle. We left it bolted to the hub assembly.
  2. To tilt the front strut out so the spring can be removed, we put the HF compressor on the springs upside down. This means you cannot tighten the compressor with a tool. But if you compress the suspension with your floor jack, then you can hand tighten the compressor. Put compressor on, pump the jack once, hand tighten, etc. Once you've reached full compression, simply drop the jack and your spring is compressed enough to remove.
  3. We did not remove the top hat. I am not sure why I need to remove the top hat? It adds a couple inches to the suspension height, making removal by tilting the strut out that much more difficult. Instead, we removed the top 19mm strut nut and allowed the whole assembly to droop. Once tilted out, we could easily pull the spring off (compressor and all)
  4. I did not need to compress the new spring to put it on the strut and reassemble. Using the same floor jack, we would push the assembly back into place, using a 2nd set of eyes to line up the shaft in the top hat hole. Tighten and done!
One last tip, we removed almost NOTHING in the rear. Just the sway bar bolts and then the bottom arm bolts. Getting the shock bolt in is easy, but it takes some massaging to get the rear arm connection point back on the hub.

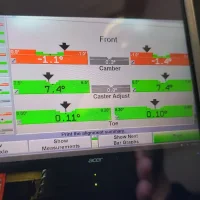
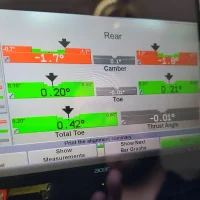
I noticed somebody (3 years ago) asked for alignment specs. These numbers aren't gospel, but are what my shop set me at. I told them get it as close to factory as possible. Not looking for anything but to save money on tires :D

20220322_090934.webp20220322_090943.webp
 
Now if my springs will actually get here.. been on backorder forever.
 
Just wanted to thank Team Ark for posting this amazing DIY! Without you, we couldn't have done this.

Just FYI, I'm 50 and I am SO glad my 80yo dad came over to help me. I couldn't have done this without a 2nd person!

View attachment 69030

Some tips from the old men :D

  1. We did not remove the front strut from the vehicle. We left it bolted to the hub assembly.
  2. To tilt the front strut out so the spring can be removed, we put the HF compressor on the springs upside down. This means you cannot tighten the compressor with a tool. But if you compress the suspension with your floor jack, then you can hand tighten the compressor. Put compressor on, pump the jack once, hand tighten, etc. Once you've reached full compression, simply drop the jack and your spring is compressed enough to remove.
  3. We did not remove the top hat. I am not sure why I need to remove the top hat? It adds a couple inches to the suspension height, making removal by tilting the strut out that much more difficult. Instead, we removed the top 19mm strut nut and allowed the whole assembly to droop. Once tilted out, we could easily pull the spring off (compressor and all)
  4. I did not need to compress the new spring to put it on the strut and reassemble. Using the same floor jack, we would push the assembly back into place, using a 2nd set of eyes to line up the shaft in the top hat hole. Tighten and done!
One last tip, we removed almost NOTHING in the rear. Just the sway bar bolts and then the bottom arm bolts. Getting the shock bolt in is easy, but it takes some massaging to get the rear arm connection point back on the hub.

I noticed somebody (3 years ago) asked for alignment specs. These numbers aren't gospel, but are what my shop set me at. I told them get it as close to factory as possible. Not looking for anything but to save money on tires :D

View attachment 69031View attachment 69032
Good Info Thanks Car looks amazing what size tires and wheels are running ? Please
 
______________________________
From interior to exterior to high performance - everything you need for your Stinger awaits you...
Good Info Thanks Car looks amazing what size tires and wheels are running ? Please

ESR RF02
Continental Extreme Contact DWS06 Plus

Front
19x8.5 +30
245/40R19

Rear
19x9.5 +35
275/35R19
 
ESR RF02
Continental Extreme Contact DWS06 Plus

Front
19x8.5 +30
245/40R19

Rear
19x9.5 +35
275/35R19
Looks awesome. I have that exact same tire size sitting in my shop for the same wheel size and offset. Can't wait to install them now because this looks so much better than the stock tires!
 
ESR RF02
Continental Extreme Contact DWS06 Plus

Front
19x8.5 +30
245/40R19

Rear
19x9.5 +35
275/35R19
Hi so I'm ordering tires and rims same size there recommendation is ET 35 Front & ET 40 Rear I'm lowered too so just want to make sure I'm not going to rub accidentally I like the way your profile looks it's awesome want to do the 30 ET front and 35 ET back just kind of double checking here Thanks
 
Hi so I'm ordering tires and rims same size there recommendation is ET 35 Front & ET 40 Rear I'm lowered too so just want to make sure I'm not going to rub accidentally I like the way your profile looks it's awesome want to do the 30 ET front and 35 ET back just kind of double checking here Thanks
I used this thread: Wheel/size/offset and tire/size/profile...can be confusing.
when sizing my wheels to ensure the look I was going for would fit on the car. Hope it can help you be confident for your wheels also. :thumbup:
 
ESR RF02
Continental Extreme Contact DWS06 Plus

Front
19x8.5 +30
245/40R19

Rear
19x9.5 +35
275/35R19
Well I ordered the same tire and wheel size and offset some M632 wheels so nervous but hopefully they fit lowered on MS springs. no returning once there mounted and balanced and shipped
 
Last edited:
From interior to exterior to high performance - everything you need for your Stinger awaits you...
Well I ordered the same tire and wheel size and offset some Ariana grande M632 wheels so nervous but hopefully they fit lowered on MS springs. no returning once there mounted and balanced and shipped
Ariana Grande does wheels now? :):p
 
______________________________
Hey peeps! I have a 2019 Kia Stinger GT AWD. I just got the Eibach lowering springs and I plan on tackling this project soon in my driveway. I am handy with tools, and did mostly all of my upgrades on my old Z including suspension work. I read through this thread a few times and made the below notes. Can anyone answer my two questions? Thanks!


Questions:
  • Do they make ‘compact spring compressors’? Autozone loans out free ones but they are 10.5 inches long each. Would these be too long without those washer spacers?
  • For Eibachs springs specifically, do I really have to remove the entire Brembo brake caliper?
General Notes:
  • I bought a hex bit socket set for using allen wrench with a socket
  • My Stinger is AWD, so I will have to be aware of the drive shaft up front
  • Do front/rear pairs at a time, and keep them jacked up. So both rear tires are jacked up, work completed, brought down, then both front tires are up.
  • Make this a weekend project. Even though the rears are easier, jack up the fronts the night before and spray PB blaster on all the bolts for overnight.
  • Painters tape (or full on tarp) the front wheel fenders so you don’t scratch it with the strut
  • To quote a previous poster, the torque specs are:
    • Outer 19mm tie rod castle nut = 35 to 40 ft/lbs
    • Lower 17mm strut bolt = 80 ft/lbs
    • Top 17mm strut bolt (allen key bolt) = 80 ft/lbs
    • 14mm strut mount nuts = 45 to 50 ft/lbs
    • 19mm top hat nut = 30 to 40 ft/lbs.
  • Even though I also want to replace my stock brake lines with SS ones, keep it to one project at a time per weekend.
  • For the outer tire rod, twist the rotor left and right to help get it out. If this doesn’t work, then use a mallet/hammer/punch
  • Remove the top hat from the strut before removing it.

Here is a good youtube to help you out:
Are the torque specs the same for RWD? Having some noises up front after a spring install and I want to make sure everything is tightened to specs.
 
From interior to exterior to high performance - everything you need for your Stinger awaits you...
Back
Top