turboAWD
1000 Posts Club!
First batch is all sold out, but I will do another batch soon. Also, I can do custom colors for an extra $10.
Thanks. How / when does one order?

First batch is all sold out, but I will do another batch soon. Also, I can do custom colors for an extra $10.
Just PM him I think.Thanks. How / when does one order?
Would a Dremel make it faster?Thought this would maybe be a 90 minute install. I was SO wrong.
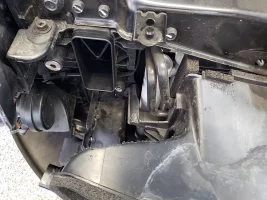
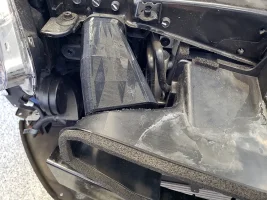
Bust out the jig saw, because the plastic diverter is very thick! Budget 4 hours. I probably could have gone slower, and done more clean-up to get a nicer fit. In the end, I made my holes too big, and ended taping it all up using gorilla tape for a perfect seal.
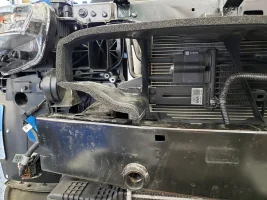
Here is the stock air box removed, and you can see the grill diverter which forces all the air into the radiator.
View attachment 39416
You'll end up trimming the entire back corners off. I also had to trim one of the support structures. Btw, these two items don't play nice with each other. You can't bolt in the snorkels and fit the diverter, or vice versa. You have to get the divert placed, but not bolted, and then fit the snorkels into position.
View attachment 39417
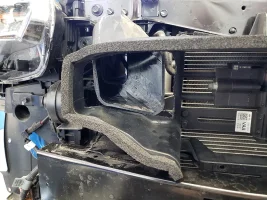
In the end, I over trimmed each corner, but I was able to get the diverter to lay flush.
View attachment 39418
View attachment 39419
My thoughts are that the taping may not have been needed. After all, the name brand snorkels simply have you remove the entire diverter since this area of the car should be a high pressure section anyways. Maybe it was just peace of mind.
I used a dremel to clean some spots up, but a strong box cutter works wonders too.Maybe more precise. I have a cheap HF dremel, and it wasn't up to task, hence the jigsaw...
Thought this would maybe be a 90 minute install. I was SO wrong.
Bust out the jig saw, because the plastic diverter is very thick! Budget 4 hours. I probably could have gone slower, and done more clean-up to get a nicer fit. In the end, I made my holes too big, and ended taping it all up using gorilla tape for a perfect seal.
Here is the stock air box removed, and you can see the grill diverter which forces all the air into the radiator.
You'll end up trimming the entire back corners off. I also had to trim one of the support structures. Btw, these two items don't play nice with each other. You can't bolt in the snorkels and fit the diverter, or vice versa. You have to get the divert placed, but not bolted, and then fit the snorkels into positionIn the end, I over trimmed each corner, but I was able to get the diverter to lay flush.
My thoughts are that the taping may not have been needed. After all, the name brand snorkels simply have you remove the entire diverter since this area of the car should be a high pressure section anyways. Maybe it was just peace of mind.
dang if didn't clash with my color scheme I would be all over it. Guess ill be waiting on the 2nd batchSo I have a set of blue ducts left over from the first batch. Anyone interested? The custom color makes these $60 + shipping, but they will come freshly Lysoled, free of charge
View attachment 39495
How about a square of toliet paper? Im running outSo I have a set of blue ducts left over from the first batch. Anyone interested? The custom color makes these $60 + shipping, but they will come freshly Lysoled, free of charge
View attachment 39495


Haha, no idea how easy they are to paint. I will start production of another batch soon though and can make your red no problem.I wish I wasn’t going with red dammit. What would it take to color them red? I will pay the extra to do that if you want.
Yeah, you have to create a port for the air to come through the grill.Is dremeling/trimming required for all installs of these? I have DIY intakes..
Not in the actual grill tho, in the air shroud behind it.Yeah, you have to create a port for the air to come through the grill.
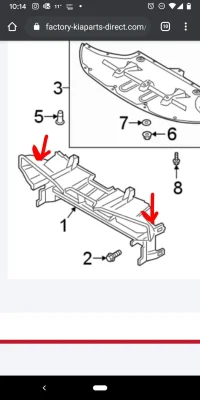
#1 on the diagramIs dremeling/trimming required for all installs of these? I have DIY intakes..
