Spark Plug change tips

DiabloStinger

1000 Posts Club!
Joined
May 16, 2018
Messages
1,072
Reaction score
305
Points
88
Location
Colorado Springs, CO
By now, if you are tuning and want to change your plugs, you probably ran across this video...


Here are a couple of tips from an install on a friend's stinger.

Driver's side is normal. Plenty of room to pull coils and plugs. You don't even have to disconnect the coils from their connectors.

Passenger side is a bit tighter and more challenging.

Tip one... Remove the first coil towards the front of the car. Unclip the connector, then remove the bolt holding it to the block. Remove the connector after lifting the coil up out of the cylinder far enough to get a couple fingers under so you can disconnect. Then remove that coil and plug.
Tip two. Remove the rear coil and plug second. You do not have to unclip this coil from the connector.
Tip three. Unclip the connector on the middle coil, then remove the bolt. You'll have to use a wrench or a 1/4" rachet on this on reaching under the intake manifold to get it moving .it's only held on by maybe 20 pounds of torque so it is easy. You now can work the coil out towards the back of the car slowly. Don't be alarmed if it comes apart into it's components as you remove it from the cylinder. Just don't lose any pieces or pull on it too hard.

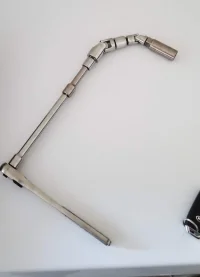
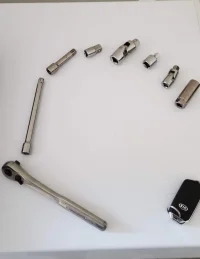
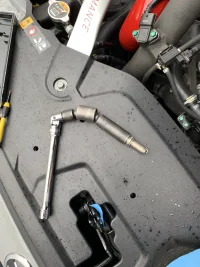
You will be able to use your swivels to get the middle plug out.. I used the shortest extension you can buy. The socket is on the end, next the swivel, then the extension. I used a long extension to work it into the hole wiggling it a bit. Remove it and immediately out the new one in. Same process... Socket, swivel, short extension. Use the space under the manifold to direct the plug into the cylinder.
Tip Four.. you must install the middle coil before the front coil. Start it into the cavity facing the wrong direction (connector forward). Once you get it down into the cylinder you will be able to pivot into position.

You can now install the other coil and bolt it down.

Hope this helps. This took as long as the normal method since we had to figure out a way to get that second coil back in.
I would inagine this takes 45 minutes tops knowing what I know now.

Ask me any questions you have. I am blessed with eidetic memory when it comes to things like this

Good info. I wondered looking at the engine if this was possible. I ended up removing the intake manifold to do mine, but it seemed a lot more daunting in retrospect than actuality. I'd have no problem doing it again.

The only issue here is that you want to minimize the angle on the wobble bit when meeting any torque specs. This might not even be that important - I can guarantee you that the OEM plugs I pulled out were not torqued to spec - but when I put them back in I made sure they were.
 
Mine involved the manifold removal also. It's good someone figured this out for us! Those guys deserve a beer.
 
______________________________
Ask me any questions you have.

Where were you 6 months ago?!?!

Nice video. It may not save a bunch of time but it will make it much easier than disassembling the top end. It ok me 2 or 3 hours to do the plugs. I could probably do it in under 45 minutes using that method.
 
I’m going to try this as soon as I get my car back! I already bought spark plugs. And have the right tools for gapping the plugs with swivel and extension.
 
From interior to exterior to high performance - everything you need for your Stinger awaits you...
Where were you 6 months ago?!?!

Nice video. It may not save a bunch of time but it will make it much easier than disassembling the top end. It ok me 2 or 3 hours to do the plugs. I could probably do it in under 45 minutes using that method.
It's all about the timing... I usually do shit way before people figure out a better way.
 
awesome information. Will definitely motivate more owners to tune their Stinger's.
 
Great info I changed mine out on the weekend which was relatively straight forward, it helped dropping down to 1/4 drive halfway through the removal to get plug up and out.

Thanks for the tips
 
Last edited:
Here is the setup I used to get the plugs out. Worked very well!

20181002_175843.webp 20181002_175914.webp
 
______________________________
From interior to exterior to high performance - everything you need for your Stinger awaits you...
I just finished doing the plugs on my 3.3TT. It really was no big deal; fairly easy. Just take your time... The tools above "Brancky3" shows is about what I used. Also, I used an offset 10mm wrench for 2 of the coils.

BTW: It also felt like the plugs were not very tight.

Note: Do not use anti-seize on the plugs. I remember when it was needed for AL heads...back in the day.

upload_2018-10-3_10-27-30.webp
 
I'm definitely glad someone figured it out. I looked at that coil for awhile thinking that there has to be a way besides removing the intake manifold (I firmly believe the less things that have to be touched to do something, the better, lol), so I'm glad someone's gotten that tight spacing to work out :D
 
What torque spec's recommended?
 
From interior to exterior to high performance - everything you need for your Stinger awaits you...
I was trying to post a couple of links images but the forum Gods said "NO". :mad:

I found a few "Flexible Socket Extension Tools" on Amazon which is like a gooseneck for wrenches that should be able to get around the intake neck. The elbow seems to work but would the flexible extensions work easier?
 
______________________________
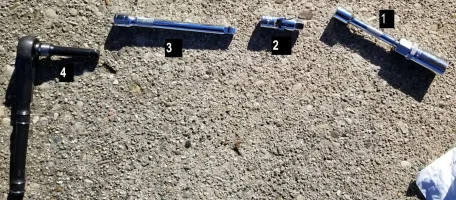
Used the tips from the video and this thread to knock it out quickly, thanks guys! Below was my setup.

1. 5/8" x 6" Magnetic Swivel Socket - https://www.amazon.com/gp/product/B01MZ25YJU
2. 3/8" Drive Universal Joint - https://www.amazon.com/Craftsman-Universal-Joint-Drive/dp/B00GWBLLQ8
3. 3/8" x 6" Extension - https://www.amazon.com/TEKTON-14208-8-Inch-6-Inch-Extension/dp/B000NY6RD2/
4. 3/8" Drive Wrench & 3" Extension - Pickup locally at a hardware store, could probably pickup #2 & #3 there as well.
5. 10mm 60-degree offset wrench (not pictured) - https://www.amazon.com/Performance-Tool-W80620-Offset-Bleeder/dp/B000N35LKI/

The offset wrench was incredibly helpful for getting the coil packs off. Note that the purpose of the 6" extension and the 3" extension is so you can remove one as needed depending on what you're doing or you'll be too high and hitting the hood.

20190105_172356.webp
 
FYI if anyone manages to lose any coil bolts like I did, the part # is 1141706256K :)

Tip one... Remove the first coil towards the front of the car. Unclip the connector, then remove the bolt holding it to the block. Remove the connector after lifting the coil up out of the cylinder far enough to get a couple fingers under so you can disconnect.

This is where I ran into trouble. Going to have to wait until I can enlist the help of someone with smaller hands because there's no way I'm removing that connector with my fat clumsy mitts.
 
I agrea you need smaller hands for this part of the job. I've done three of these since then and it is a squeeze.
 
From interior to exterior to high performance - everything you need for your Stinger awaits you...
Kia Stinger
Back
Top