What did you do to your Kia Stinger today?

the daylight savings time switch is just that... it isn't automatic... you select it during dst and unselect it when it ends... it just changes the time back for you when you uncheck it rather than it "automatically" knowing when it ends... i know.. kinda silly. but it worked this same way on our bmws so i was ready for it.
That's just a retarded design. It's got gps. It knows where you're at. It should know what areas implement DST and when it changes. In fact, I believe there's a timezone file inside the update archive.

I did get a notification from the HU about the xm subscription changing. Notice popped up 6 days after it expired, about 60 minutes into the drive.

For the guy getting his car broken into. Sorry to hear. It's sad these things are happening. Have to be vigilant at all times.

In my area, we've become somewhat desensitized to all the crime.


Just another typical weekend. At least one home owner ended a robber successfully. Read the article, it's just insanity.
 
Started installing dynamat on every metal surface I could get to. Including removing the windows and installing it on the inner door skins. Still have floor, hatch, and roof left to complete.
 

Attachments

  • 20211107_122405.webp
    20211107_122405.webp
    507.4 KB · Views: 30
  • 20211105_165303.webp
    20211105_165303.webp
    129.4 KB · Views: 29
  • 20211104_131810.webp
    20211104_131810.webp
    191.2 KB · Views: 30
That's just a retarded design. It's got gps. It knows where you're at. It should know what areas implement DST and when it changes. In fact, I believe there's a timezone file inside the update archive.
What's stupider is that we still do this whole changing the clocks thing. Completely unneeded and incredibly annoying for people that work internationally.
 
______________________________
I used wheel acid for the first time - it works so much better than sodium hydroxide-based cleaners! I ordered a new pressure washer gun to dedicate to acidic cleaners. :cool:

Time zones: it is weeks like this I am glad I don't work tickets any more. I think we should move New England to Atlantic Time and quit the DST thing.
 
From interior to exterior to high performance - everything you need for your Stinger awaits you...
Installed BMS pedal tuner. Didn’t watch the video the first time, threw a code, watched a two minute video, and got it all set up. Quick little test drive was fun.
 
What's stupider is that we still do this whole changing the clocks thing. Completely unneeded and incredibly annoying for people that work internationally.
Just wait until California switches to full-time DST, while Arizona remains on year-round standard time. The more western state would be one hour ahead of the more eastern state. Crazy.
 
Just wait until California switches to full-time DST, while Arizona remains on year-round standard time. The more western state would be one hour ahead of the more eastern state. Crazy.
Probably won’t happen in our lifetime. While California voted to eliminate the time change, it takes an act of Congress to approve it.
 
Well I got it and installed it last friday.

I uploaded these pictures to e-trailer, so maybe they'll show up there too.

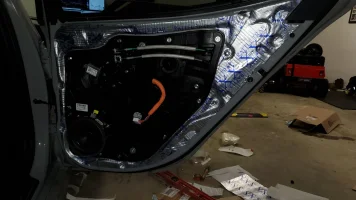
The install was supposedly a 10 out of 10 or whatever scale they use. It's challenging. The step where you have to put a wire through the frame, thread a plate and bolt onto a coil, then pull it back through went fine. I was worried about that one. No one step in the video was crazy hard in my opinion, but it's very slow, a lot to take off and get at. It was also pretty chilly, I had a space-heater for the garage to help. Only had to go to the parts store once, to get a 10mm ratcheting wrench. For some reason I couldn't find a 10mm open-end even, but I had a variety of ratchets and sockets that worked just fine. It was about an 8 hour install. I had a break for lunch and I just tried to go slow and get it right. I did encounter a few problems on the install. The lower receiver (basically the big bar with the "drawtite" on it) was a little too wide for the mounting plates that install on the car frame. The bolts wouldn't go through. I had to dremel-out the inside of the holes with a grinder and remove some material. Also the rack exhaust-cut-out ends up very close to the exhaust, a sharp point. In looking at the video, it's obvious that while almost everything is mechanically the same on the 2022, the exhaust tips are different. This probably accounts for the difference and why I had to remove some material. This is something I'd file down ahead of time if doing it again. As it stands I removed some material, put some cushioning tape in (not seen). I'll be monitoring. The exhaust doesn't move much, but without removing material it was basically like 1-2mm away, super close and I could easily move it to make it bang against, thinking that centrifugal force in turns would probably do it. When I was removing the rear fascia, I also had to remove my mud-guards, so that caused some extra time, especially to put them back on, I had to take the wheels off. I have experience removing facia and had to do something real similar on my BMW to install a rack on it, so this wasn't all completely foreign to me. I also found that it was easier to just reach and disconnect the backup and bumper sensors rather than try to remove the plastic rivets holding the cables to the car-frame. I tried disconnecting them like in the video when it came time to re-connect the fascia, but I couldn't reconnect all of them after plugging in the sensors. I was able to reach up from under the car with the facia on and push them all back in though. When cutting the facia according to the template, I'd go maybe 4.25" up at least, the template calls for 4", but that was on the older non-diffuser facia, so this may be hanging down a little more. If you go just a little wider on the sides too, like an extra .25 each side, you'll have a little more room to straighten the rack (aligning it is one of the steps, but it also doesn't matter a whole lot as far as function). Didn't have to cut the heat-shield nearly as much as they did in the video, this was something that was fairly apparent even in the video, but I thought I'd check when it came time to doing it. Yep, I was able to retain all 6 fastener mounts and cut out significantly less than they did in the video.

Was able to do it on ramps. Was going to try and put the car on jack-stands on the rear by doing the jack-up-a-wheel trick, but that doesn't really work great, since the wheel just goes up into the well and compresses the spring, rather than lifts the car, so it's likely you'll max out the jack before you get it high enough to put some stands in. Ramps worked fine though, no issues with space. You need a deep 19mm/ 3/4" and a deep 17mm doesn't hurt either, since tightening these nuts down exposes a significant amount of bolt threads. A variety of socket extensions is nice to have, as well as a few different ratchets, like a small one for 10mm nuts/bolts and a larger one for big torque stuff. A universal joint too, the rear most upper-brace bolt (picture with the dremel arrows, bolt is visible just above the flat section) is tucked up there pretty good and you need something that will tighten at an angle to get it.

This was easier than installing those goddam swaybars, but a lot longer too.

I have a T2 rack and it works pretty well, except the "safety hook" loops on this rack are a bit annoying, they don't give you much room to tighten a rack-bolt. I could probably saw them off, definitely not necessary for a bike-rack receiver. My other car's receiver doesn't have this, it's intended for bike-racks only. Still, this works, it holds a rack just fine. I have my T2 tray (one) positioned in about the middle of the rack, but if I had two trays on, I'd be able to use the rear-most one and open the hatch all the way. As it stands, my 810mm+end-caps handlebar just ever so barely touches the hatch opening or closing, I should be able to bump the tray back just a little and it'll be totally free.

View attachment 65001View attachment 65002View attachment 65003View attachment 65004
I just finished this on my 2022 GT-Line today, also. Didn't see your post until now. I also took a few shortcuts with the parking sensors, and I trimmed the heatshields with them still on the car. Also, I slid off the exhaust hangers instead of unbolting them. I also didn't bother to put those 2 hellish metal teeth clips back on. The bumper is totally secure without them. I've read other installs where folks left them off as well.

Good idea about trimming off the edge that's so close to the exhaust. I put 2 layers of Gorilla tape there to provide a cushion in case that tailpipe sways and hits it during cornering transitions. If that doesn't work or it burns off, I'll get out the grinder like you did.

I got it to work but also had to enlarge those same 4 bolt holes on the main body of the hitch. Looking back on it, I think the issue could be avoided by modifying the video and printed instructions somewhat. Currently, the video says to first torque down the support brackets. The print instructions and video instructions would be better to say leave the support brackets loose, and torque down later *after* installing the main hitch. This would have allowed more space for the other bolts to fit without having to enlarge the bolt holes. The space isn't there if one tightens down the support brackets first.

20211109_134349-jpg.104889

20211109_201020-jpg.104890

20211109_212858-jpg.104891
 
Last edited:
I just finished this on my 2022 GT-Line today, also. Didn't see your post until now. I also took a few shortcuts with the parking sensors, and I trimmed the heatshields with them still on the car. Also, I slid off the exhaust hangers instead of unbolting them. I also didn't bother to put those 2 hellish metal teeth clips back on. The bumper is totally secure without them. I've read other installs where folks left them off as well.

Good idea about trimming off the edge that's so close to the exhaust. I put 2 layers of Gorilla tape there to provide a cushion in case that tailpipe sways and hits it during cornering transitions. If that doesn't work or it burns off, I'll get out the grinder like you did.

I got it to work but also had to enlarge those same 4 bolt holes on the main body of the hitch. Looking back on it, I think the issue could be avoided by modifying the video and printed instructions somewhat. Currently, the video says to first torque down the support brackets. The print instructions and video instructions would be better to say leave the support brackets loose, and torque down later *after* installing the main hitch. This would have allowed more space for the other bolts to fit without having to enlarge the bolt holes. The space isn't there if one tightens down the support brackets first.

20211109_134349-jpg.104889

20211109_201020-jpg.104890

20211109_212858-jpg.104891
I thought about that, but really you’d need to shim the supports to do it right, and that crazy one through the frame would be a bitch to do that with. I forgot about the hellish metal clips, yeah I got them back on, but not sure if they’ll do anything or it is needed.
 
______________________________
From interior to exterior to high performance - everything you need for your Stinger awaits you...
4444
 

Attachments

  • 20211110_075150.webp
    20211110_075150.webp
    93.8 KB · Views: 24
I thought about that, but really you’d need to shim the supports to do it right, and that crazy one through the frame would be a bitch to do that with. I forgot about the hellish metal clips, yeah I got them back on, but not sure if they’ll do anything or it is needed.
Good point. I'm not sure where something would have to give since it still wouldn't line up, and might stress those bolts too much. It would also work if they supplied some thinner Grade 8 bolts, but that might compromise the overall strength too much. Maybe enlarging the holes is the best way to go about it after all. It worked for both of us!

Would you mind making your post a separate thread in the "How to and DIY" section of the website for your install pics and instructions? I think it would be helpful for others... I wonder how different the exhaust pipes might be on the 2022 3.3 since that's really the only thing that seems to be different that would interfere with the hitch. I had to put in that my car as a 2021 so that I could order it. LOL

Also, did you do any wiring yet? I've got the harness, but haven't connected yet. Wondering if I should just tap into the fuse panel in the hatch, or direct to the battery in the rear.
I'll try to get around to the DIY section. I am not doing electrical, because it's just for a bike rack. The little safety-chain loops are annoying though, I might saw off at least one side to make it easier for rack on/off.
 
Started installing dynamat on every metal surface I could get to. Including removing the windows and installing it on the inner door skins. Still have floor, hatch, and roof left to complete.
Have you noticed it made a difference? I've been interested in doing this.
 
From interior to exterior to high performance - everything you need for your Stinger awaits you...
This happened Saturday...
50,000 on the way to the meet up
 

Attachments

  • 20211113_073701~01.webp
    20211113_073701~01.webp
    91 KB · Views: 5
______________________________
Now what I'd like to see is 83M on the ODO and 50,000 on the Speedo...:ninja:
Lol. I love that you have Kimberly L’s famous quotes in your signature. God that cracked me up.
 
From interior to exterior to high performance - everything you need for your Stinger awaits you...
Back
Top