• 🔍 Like our community? You can tell Google to show you results from this site more often. Just Click Here and then click the empty checkbox on the right side of our name.

New here and got some ideas any input is welcome.

As an Amazon Associate we earn from qualifying purchases.
Hi, I'm also in the UK and a new stinger owner, looks really interesting what you’re doing and I'm keeping an eye out for your updates. My car is a 2017 so doesn't have any ambient lighting. I did fit one of those kits from Ali express but the app was useless and one of the lights stopped working so I'm in the middle of removing them to return and have ordered a different set. Also 3d printed the big mouth intakes so have those to fit and a replacement maxton splitter since I've destroyed mine already! I'm in Liverpool.
Didn’t realise the early Stingers didn’t have the ambient lights? My previous one was a 2018/19 and that had them above the dash on the passenger side. Might be worth pulling the dash and checking, it’s and easy job and only takes 10min the hardest bit for UK models is the passenger airbag on/off switch is on the trim you’ll have to remove and the harness doesn’t have much slack.
 
Yeah it's really annoying, I have the menu but all it changes is the brightness of the footwell lights and the Speedo etc, I don't have the harness on the back of the dash. New lights received and half installed today but I think I've left a bare cable somewhere as now I get a shock off the door every time I get out 😆
 
So keeping with the updates the slow boat from China arrived and I’ve got the electronics. Home made CK71s and the ambient light mirroring. I’ve put together the LED COB’s and soldered on the components and what do you know the lights so far work! Who’d have thought. I’ve been as far as testing on a bench 12v but all seems good.

I’ve not had a chance to test the ambient light piggybacks yet but the look good! Here are some pics of my not amazing soldering and the piggyback modules IMG_8770.webpIMG_8771.webpIMG_8772.webpimage.webp
 
Watching this with interest, I'd love some CK71s and have toyed with the idea of making my own, not from scratch like this though. Looking good so far so keep it up
 
From interior to exterior to high performance - everything you need for your Stinger awaits you...
Watching this with interest, I'd love some CK71s and have toyed with the idea of making my own, not from scratch like this though. Looking good so far so keep it up
I have 2 spare circuit boards if they work I don’t have the COB strips or housings to complete the build tho if it’s something you’re interested in. Requires basic soldering and I’ll update the page if the potting compound I’m planning to use works and doing a waterproof test too. Obvs it would all be at your own risk I’m by no means an electronics expert just a tinkerer
 
Hey all it’s been a while since my last update and the CK71’s are done. I had a bit of a pain doing them as I initially picked the wrong substance to pot the circuitry in 🤦‍♂️. I initially chose a 2 part silicone mix that in my head would work fine give a little flex and seal everything up. IMG_8840.webpIMG_8841.webpFBA83E03-B7EE-4354-A1B5-086E1A4CEE38.webp
However the chemistry bit me in the arse... Apparently the rubber housing of the lights poisons the catalyst and prevents the mix from curing (who knew!) Do not use the potting mix in the pictures that the stuff that didn’t work. I can give you the name and where to buy the good stuff if anyone’s interested.
So that was a mess to clean out get back to a fresh start. I then used a polyurethane 2part mix which worked a treat cured nice but remained flexible and bonded to the rubber housing.
Then it was just a case of attaching them to the car. I won’t go through the wiring as there’s loads of posts about this on here but again all worked a treat. 61A791CA-4DF3-443D-A4A4-ED234A005F3B.webpIMG_8954.webpIMG_8953.webpIMG_8955.webp
IMG_8956.webp
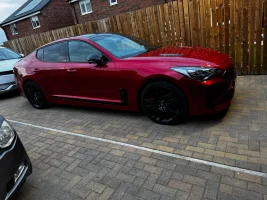
As you can see I’ve added some big mouth air intakes in preparation for getting an induction kit. The DRL work great and the indicator shuts off the white light exactly as it should. They do look slightly DIY with the green circuit board etc something I’d definitely change if I did them again. However I’ve also put the large front canards on which give a great look and mean you can’t see the aesthetics just the light. IMG_8964.webpIMG_8965.webpIMG_8963.webpIMG_8969.webp
Along with a full black out of the grill surrounds (apart from one corner you can see that tore 🤬) , all other chrome and the stinger strip along the bottom of the doors I’m definitely pleased with how this has come out feel free to let me know what you guys think and I’m happy for questions or lessons learned for anyone thinking of doing this. All in the LEDs cost about £70-80 to make the canards were another £120.
 

Attachments

  • IMG_8968.webp
    IMG_8968.webp
    334.7 KB · Views: 10
Last edited:
Image 8968 is kind of a weird one - not really showing off anything, is it?

Congratulations on finishing your project. Very impressive. However, I am not a fan of how they look divided into three pieces by your "embellishments". Maybe it looks better in real life?
 
Image 8968 is kind of a weird one - not really showing off anything, is it?

Congratulations on finishing your project. Very impressive. However, I am not a fan of how they look divided into three pieces by your "embellishments". Maybe it looks better in real life?
Removed that image didn’t notice how dark it had looked till you said it.
Probs need some better pics they’re not as divided up as it looks. Agreed tho the look isn’t for everyone. As I mentioned the circuitry being visible kinda made it look more DIY than I’d of liked so to me the canards help. IMO any way 👌
 
From interior to exterior to high performance - everything you need for your Stinger awaits you...
Back
Top