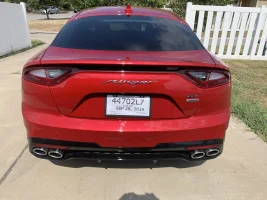
How to remove and replace the rear badge on the Kia Stinger

A pro would definitely do a better job than an inexperienced amateur, plus they have the tools to measure the clear coat thickness and know how aggressive they can get with the repair. They might suggest a respray though. As for brands of polish and compounds, pretty much anything works pretty well enough if it is brand name. This includes Mothers, Meguiars, etc. I've used Sonax which is reasonably high end and didn't see any noticeable difference.

For the silicone, just use a tube of it, cut the hole in the tip close to the size of the holes and fill the holes. It does sink in a little, just get a good thick glob in there and then smooth it out after. You'll likely end up with excess on the paint but you can probably peel that off with a fingernail if needed once it dries if you can't get it cleaned up nicely when wet.

Thanks for the info. The tube of silicone blew out the back end when I loaded it into the caulk gun, so I was just using my fingers to apply it, but it still kept collapsing into the holes. I'll give it another shot.
 
Thanks for the info. The tube of silicone blew out the back end when I loaded it into the caulk gun, so I was just using my fingers to apply it, but it still kept collapsing into the holes. I'll give it another shot.

The tube (if with a caulking gun) might release too much, a small squeeze tube might be better. Try filling the hole from the bottom and then raise the tube as you go, basically creating a base at the bottom of the hole and then fill it upward vertically on top of that mound you created at the bottom, building it up. Maybe I was lucky because my holes filled up pretty easily without much thought.
 
Film from top or bottom doesn't matter as long as the hole is completely sealed. Then, let it skin before doing anything else.
 
______________________________
Thanks for the responses and the OPs video.

Got a different tube of caulk similar to what they used in the video, and it worked fine this time. Let it dry for 30 mins, then went back and touched it up and leveled it off just to be sure.

Measured and remeasured and remeasured the styrofoam stencil and I think I got it about as centered and level as I could (ignore the unlevel license plate frame). Bummed about the scratches in the area of the badge, but I'll live with it for now.
123.webp
 
I had a fair bit of trepidation removing that rear badge due to all the paint issues people have been having. Fortunately the floss "sawing" method plus some plastic decal removers did the job without any paint damage whatsoever. Didn't apply heat, but then again, I'm in Texas and it's 95 degrees outside. I used these decal removers and I found a video on youtube of a guy removing a decal off of a VW where he had a special rubber drill bit. This thing was scary to use, but it literally only took me 10 minutes to go from decal popped off to all the old adhesive removed. If you use it, make sure you have the drill set to rotate backwards, otherwise the wheel will fly off. Keep the speed low. That thing really saved me some time.
 
From interior to exterior to high performance - everything you need for your Stinger awaits you...
I have a 2019 Stinger and wanted to put some vintage badges on the hood and trunk. Are all badges put on by adhesive? Do they make any that possibly "click" on or go over top of the current badge?
 
I have a 2019 Stinger and wanted to put some vintage badges on the hood and trunk. Are all badges put on by adhesive? Do they make any that possibly "click" on or go over top of the current badge?

There are some "overlay" options that stick over the stock badges - but they may not last a long time (they may lift or fade, etc).
 
I have a 2019 Stinger and wanted to put some vintage badges on the hood and trunk. Are all badges put on by adhesive? Do they make any that possibly "click" on or go over top of the current badge?

Search for overlay in the store at the top. Hint: the cardboard that comes with it is meant to be used... If you don't get instructions, ask Sal...
 
I have a 2019 Stinger and wanted to put some vintage badges on the hood and trunk. Are all badges put on by adhesive? Do they make any that possibly "click" on or go over top of the current badge?
The non overlay type badges have the adhesive back on them. Some front badges come with an extra post that has to be removed. These posts slot into the holes in the bonnet where the factory badge is fitted to. This was the case with my "E" badge.
 
______________________________
From interior to exterior to high performance - everything you need for your Stinger awaits you...
Hi guys,

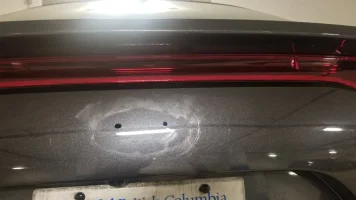
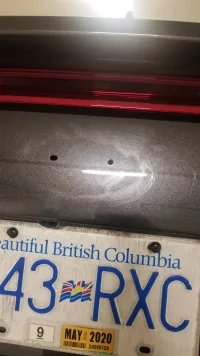
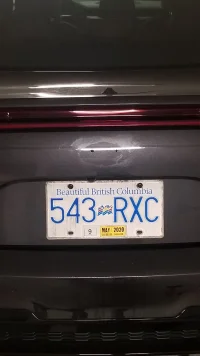
It was my first time rebadging a car and I somehow scuffed up the area around the back emblem pretty bad :( You can't really see it in certain angles/lighting but it is definitely noticeable. I used Goo-Gone, hair dryer, dental floss, quick detailer spray and two plastic wedges that I bought from the stinger forum store.

20190903_115410.webp 20190903_115803.webp 20190903_115818.webp 20190903_115910.webp 20190903_134404.webp


I have no clue how it got so scratched up from using those tools.. I used the exact same method on the front emblem, AWD badge and the small stinger badge with no scratches/issues.

Any products or methods you guys recommend to remove these swirls? I just got the car last week so I'm really bummed out that this happened :cry:
 
Last edited by a moderator:
^ Nevermind. The images work but I can't edit my post to remove the google drive link :unsure:
 
Hi guys,

It was my first time rebadging a car and I somehow scuffed up the area around the back emblem pretty bad :( You can't really see it in certain angles/lighting but it is definitely noticeable. I used Goo-Gone, hair dryer, dental floss, quick detailer spray and two plastic wedges that I bought from the stinger forum store.

View attachment 30611 View attachment 30613 View attachment 30614 View attachment 30615 View attachment 30616


I have no clue how it got so scratched up from using those tools.. I used the exact same method on the front emblem, AWD badge and the small stinger badge with no scratches/issues.

Any products or methods you guys recommend to remove these swirls? I just got the car last week so I'm really bummed out that this happened :cry:
Just cut and polish it out, only fine lines
 
Hi guys,

It was my first time rebadging a car and I somehow scuffed up the area around the back emblem pretty bad :( You can't really see it in certain angles/lighting but it is definitely noticeable. I used Goo-Gone, hair dryer, dental floss, quick detailer spray and two plastic wedges that I bought from the stinger forum store.

View attachment 30611 View attachment 30613 View attachment 30614 View attachment 30615 View attachment 30616


I have no clue how it got so scratched up from using those tools.. I used the exact same method on the front emblem, AWD badge and the small stinger badge with no scratches/issues.

Any products or methods you guys recommend to remove these swirls? I just got the car last week so I'm really bummed out that this happened :cry:

No worries. It's easy to fix

Get a DA polisher, get some meguiars M101 and a microfiber cutting pad and polish it out.
 
From interior to exterior to high performance - everything you need for your Stinger awaits you...
I just received a glossy blank one from ImportShark but some dust, or something else, got on about 30-40% of the adhesive and it's not sticky at all. :(

The left part of the emblem I received was pretty bowed as well. The right part was slightly bowed but not as bad as the STIN lettering. Definitely don't feel like putting it on just for the fact almost half of the adhesive is not sticky.

Really hoping they can send me a new one and I can return the one that was sent.
 
______________________________
I just received a glossy blank one from ImportShark but some dust, or something else, got on about 30-40% of the adhesive and it's not sticky at all. :(

The left part of the emblem I received was pretty bowed as well. The right part was slightly bowed but not as bad as the STIN lettering. Definitely don't feel like putting it on just for the fact almost half of the adhesive is not sticky.

Really hoping they can send me a new one and I can return the one that was sent.
Put some Sticky tape on the back of the badge and see if it lifts off the dust.
 
Email import shark with photos, ask him for a response within two working days. If the goods are faulty then he must replace or refund at his expense. If he does not, let @kiastinger know as import shark is a vendor on the forum. Be civil to import shark even if its not reciprocated. If you paid with paypal and you dont get any joy then contact paypal and raise a dispute. Paypal take over the negotiating so give them all the emails and photos to back your case. Paypal refunds you always if its proven provider is wrong.
 
From interior to exterior to high performance - everything you need for your Stinger awaits you...
Back
Top