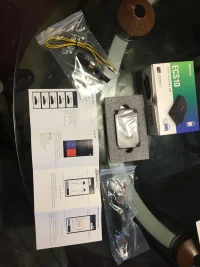
Check this out!!! (ECS control module)

[QUOTE = "Ty Davis, 게시물 : 219725, 회원 : 6654"] 내 독립 소스에서 해당 인보이스를받지 못했습니다.
오 잘 ...

그러나 [USER = 1581] @jongkihong [/ USER]는이 스레드에 자신의 회사가 미국으로 배송 할 것이라고 게시했습니다.
그는 심지어 이베이 링크를 제공했습니다.
나는 이베이에서 토요일 밤에 주문했다.
수요일 아침에 도착했습니다.
FedEx 패키지를 받으려면 누군가 집에 있어야하므로 오늘까지받지 못했습니다.

어쨌든, 나는이 한국 판매자의 슈퍼 슈퍼 슈퍼 배송에 충격을 받았습니다.

튜너는 빠르고 잘 포장되었습니다.

[USER = 1581] @jongkihong [/ USER]의 주문이 필요합니다.

설치 후 모두가 결과를 게시하도록하겠습니다. [/ QUOTE]
:thumbup::thumbup::thumbup::thumbup::thumbup:


I send the product to the FedEx pack.
Average delivery time to US is 1-2 days.
If you order on a Friday or weekend
This may take 2-4 days.

That’s incredible delivery time!
 
I’ll keep everyone posted with results after installation.
Looking forward to hearing your results, and filling in a few of the vague areas on the installation/operation. :thumbup:
 
From interior to exterior to high performance - everything you need for your Stinger awaits you...
Can someone more clearly explain the below in bold? When they say push, do they mean from the inside where the fuse box is to the left?

The driver side knee panel is held in place by 2 Phillips head screws and a side panel secured by clips. Remove the fuse panel cover, and while using your hand push against the side panel and use a nylon panel tool to release the clips. Then use a shallow screwdriver to remove the 1 screw. Use a pik tool to release the cover to reveal the screw to the bottom right. Gently, but firmly pull the panel to remove the entire kneel panel. Be sure not to pull too hard as the OBDII wiring will still be connected.


BajRAzO.jpg
 
Last edited:
On Monday, I will send a photo to an installation specialist for commissioning.
Uninterruptible power may be found.
I will contact you again.
 
Soooo, once it’s ran through the app are the enhanced modes saved to the in car switch or always necessary through the app?
 
______________________________
From interior to exterior to high performance - everything you need for your Stinger awaits you...
This question has been answered several times.
 
Just installed and did some preliminary runs. . .

So I’m guessing you want to know how it feels?

First off the insulation is pretty straightforward and took about an hour for me. I did go slow and methodical.

I haven’t done extensive testing, just 15-20 min driving, but you definately feel the difference! Rear end feels more planted. If you set a Custom setting full stiff it’s FULL STIFF. Way stiffer than any of the Stock Settings

Feels more like a sport sedan for sure.

the Sport mode feels a bit tighter than stock Sport, but I need to evaluate more before I am final in my comments .

For me I’m trying to find one setting that works 90% of the time, this looks like it might be the ticket

Again these are a preliminary, I know you want to hear more, and once I drive for a while I will report back.

It does not appear it saves the settings on any of the stock settings so once you set it on your phone if you want to change it you have to change it on your phone. If you wanna go back to Stock you’ll have to go in and disconnect it through your app, though I haven’t tried that yet. That being said, it appears that when you turn the car off and turn it back on it remembers the setting you set in the app. regardless of the mode the car is in from the Stock computer.

Feel free to ask me any questions I’ll try to answer as best I can.

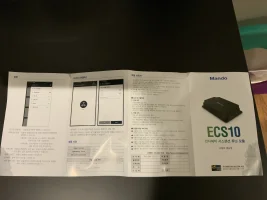
I do have one question, because the directions are in Korean I didn’t know if I was supposed to hook it up to a constant 12 V source or a switched 12 V source. I ended up connecting it to a switched 12 V source. And if it does need to be on a constant 12 V source, does it drain the battery? There appears to be a green LED light that comes on when you turn the car on when it’s connected to a switch 12 V source. Will this green LED light drain the battery if it’s connected to a constant 12 volt source?
 
Last edited:
Will this green LED light drain the battery if it’s connected to a constant 12 volt source?

Yes, but very slowly.
My dash cam (which uses much more current) is recording 24h/7 and I have never had any problem even when leaving the car for over 2 weeks.
 
BFF75BD8-EA6B-4FC4-B374-01DA1240226F.webp I see. So now I just need someone who reads Korean to tell me is I need a switched or unswitched power source. The directions appear to say it requires a 12v source, but I can’t tell which type.
 
From interior to exterior to high performance - everything you need for your Stinger awaits you...
Some tips on installation

To get the side panel off you open the fuse box panel, put your hand in the opening and push the side panel out enough to get a gap and then you get a thin trim tool in the pop the panel out. Now remove the lower kick panel. There two screws on the side behind the side panel: one on the front door jamb and the other where the top right corner where the side panel was attached. Remove those. The last screw to hold the kick panel on is on the right lower side of the kick panel behind a small cover you remove with a pick. Once the screws are removed it’s a matter of popping out the panel. Lots of tabs holding it in so be patient and remember the OBD port and wiring is connected to the kick panel. Be cautious.

Now remove the lower steering wheel cover. First pop off the top cover behind the steering wheel. This gives you access to two screws. Each of the screws are only accessible if you turn the steering wheel first to the left and remove one screw and then to the right and remove the other screw, they are right behind the steering wheel. Now go under the steering wheel and and on the bottom panel there is a screw, remove it. Now you can remove the lower panel. It kind of slides out.

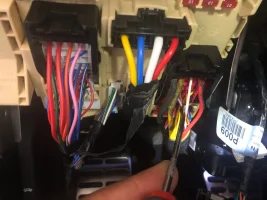
In the picture below you see three gangs of wire. Remove the tape on the right gang. The white wire, second from the right, is the 12v accessory wire - switched. There is a post previous in this thread that gives a link to a tutorial for which wire you should tap into - please go to that post, find the link, and read thoroughly before you begin. I’m not responsible here.

There are a couple screws or nuts to the left of the fuse box where you can attach the ground wire. As for where you connect the ECS connectors, right behind the steering wheel, on the bottom, there two or three connectors, but there is only one connector that will fit, pull it out put the connector in between and replug it back in.

Now turn the car on and make sure the green LED light on the ECS 10 turns on, if it is you’re ready to install which suspension set up you want from the app. Open up your app, go to the settings menu and connect to the ECS10. Once connected you will need to enable the software with a slide toggle in the settings menu. Make sure you route the wires neatly, I suggest small zip ties. I mounted the module to the back of the fuse box cover panel with double sided foam tape. Now go for a drive and enjoy. So far I find the sport option pretty good but it certainly isn’t the stiffest you can make it under the custom settings.

I’ll be interested in others set ups once more people start using this.
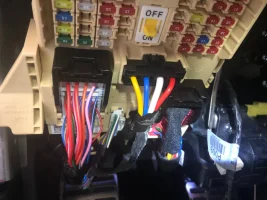
upload_2019-9-7_15-15-32.webp
upload_2019-9-7_15-42-28.webp
 
Last edited:
What happens if you plug in the module, but don't plug in power to it (pull power)? Does it revert to normal operation (passthrough?), or does it mess everything up?

I'm asking because if that works, then maybe adding a small switch could let you switch back and forth between "normal" operation (comfort, sport) and "super-stiff fun mode"? That would be VERY nice. Then we can pick from 3 modes on the fly, more or less.
 
I’ve got this Tuner installed now and a few observations...

The is easy to install.
You must take off the steering column cover (3 screws).
Take off the lower knee panel cover (2 screws).
Also remove the dashboard side cover, visible when the door is open (just clips).

The tuner does save settings after the car is turned off and restarted.
Your Factory ECS is fully functional at all times, even when you set Comfort or Sport mode in the app, you still have two levels of that mode that are selectable with your regular drive mode switch by the shifter.
So you can have Comfort (App) + Comfort (Car) or Comfort (App) + Sport (Car). Or the opposite...
Sport (App) + Comfort (Car) or Sport (App) + Sport (Car). Very nice.

How does it ride and handle?
Right out of the box, it is superior to the factory/stock ECS tuning.
Both Comfort and Sport eliminate the elastic, long legged, vertical body motions the Stock GT2 RWD suffers from.
Body control is tight, taut, and controlled. Only on rough roads/bumpy do you experience a bit of oscillation of the front suspension. Still, it is markedly improved from the stock calibration.

I am toying around with the custom mode of the app.
Originally, from reading Korean reviews for the tuner, I reported that the Ride and Handling section in the Advanced tab of the App allowed you to set straight line (ride) settings and cornering (Handling) settings independently. Perhaps in translating from Korean to English, I misunderstood how this works or maybe the reviewers were in err.

After a bit of experimenting with the settings, it seems to me that the “Ride” setting controls shock Compression.
The “Handling” setting in the App controls rebound of the shocks.
That info helps greatly when you are trying to customize your own settings.

I will reiterate that both Comfort and Sport modes ride pleasantly firm.
If you are disinterested in a firm ride, you can always go to Custom mode and set all sliders to 0% (or soft).
The ride will be smoother, quieter and more well controlled (less bouncy) than stock, but you will have increased brake dive, squat, and roll with everything set like this (full soft/0%).


Also, there is no sign of twitch/skip at the rear end while cornering on bumpy surfaces.
 
From interior to exterior to high performance - everything you need for your Stinger awaits you...
Back
Top