
ZyroXZ2
Stinger Enthusiast
- Joined
- May 26, 2018
- Messages
- 797
- Reaction score
- 356
- Points
- 68
There aren't a whole lot of people rolling around with these, and seeing as how I'd have to trim bump stops to install the Eibachs AND how I didn't want a more aggressive drop (scraping, anyone?), I went with pretty much one of the only other few options outside of coilovers. I immediately want to give @NICK_KHAR a shoutout for getting me these springs priced as a bundle with the Eibach sways. Great guy!
If you've ever installed your own springs before, then there's really nothing I can tell you that you don't already know. If you haven't, though, there are some shortcuts I took that saved time in comparison to Ark's official spring installation guide. I'll follow my shortcut tips with some pics, one of which is a very specific set of spring compressors that allowed me to save time. The fronts only took me about 2.5 hours total (1.5 hours on the first one, 1 hour on the second) because of this shortcut. I'll add some additional installation tips at the end for those of you who wish to try this yourself who may not be used to spring installations.
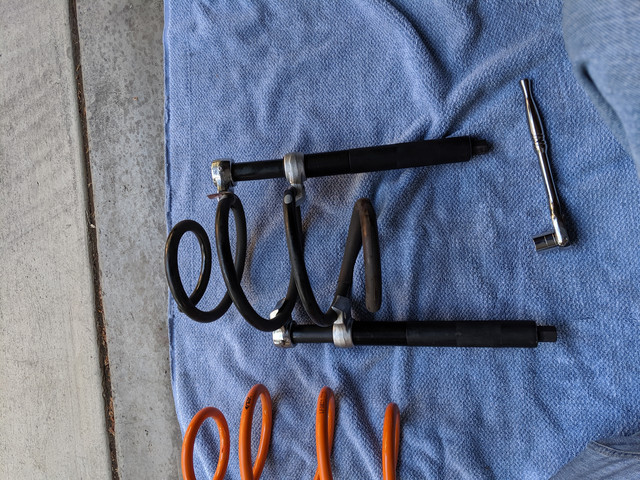
- The spring compressors I use have a fixed end which is specifically useful for situations like this on short springs with few coils. Unlike the Ark installation guide that shows affixing the spring compressors to the bottom of the spring perch (risky!) and a coil, I affixed it to the only two coils exposed.
- This allowed me to not only compress the spring more than enough to clear the fender without issue, but once tilted out of the fender, I simply lifted the spring right off.
- Installing the spring compressors on the Ark spring, I simply slipped it right back on over the strut and onto the perch.
The above saved me tons of trouble/time: I didn't have to hammer the strut out of the pinch; I didn't have to remove the strut mount top plate which means I didn't have to mark/realign it when installing the spring; and the strut mount top bolt is a lot more manageable when the suspension is hanging some load on it (less likely to spin). And now for some installation pics:
Front Spring Installed
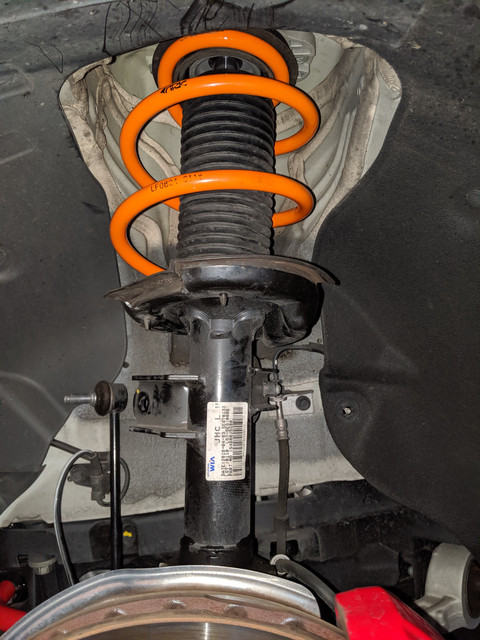
Rear Spring Installed

Spring Compressors Used
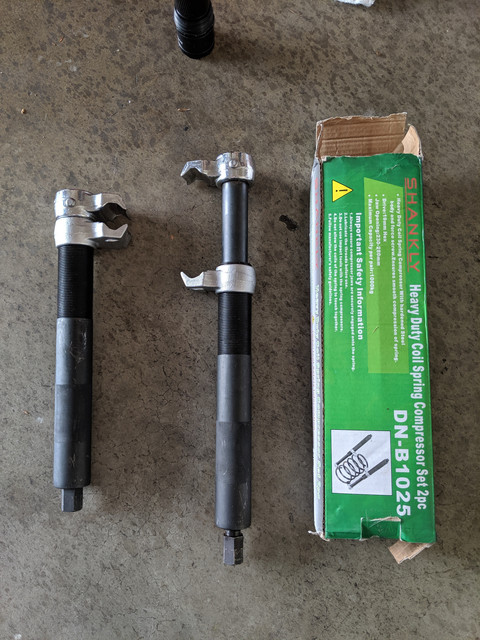
Spring Compressors Mounted
So after a total of about 4.5 hours of work and about an additional 30 minutes of taking about 1 degree of negative camber out of the back wheels, it really turned out to be all pretty standard procedure. But what does the car look like, now? I just installed them, and want to wait a week before I take pics in case there's anymore settling and comment on the ride.
So stay tuned for final words on the springs! Heeeee (that's me knowing this post didn't quite end where you wanted it to, sorry for the disappointment!)
UPDATE:
I am definitely not disappointed in the ride. "Like stock" is an understatement: it corners with more poise than stock while riding just like it. I attribute this to bringing the center of gravity lower. While I haven't gone to a track to see how this translates with any before and after or have a slalom course to run, this really is how the car should be and feel from the factory. Do note, though, that I also have Eibach swaybars on firm, and that could be a factor overall, but the change between post swaybars and post Ark springs is that the car has more balance. If you're going for springs to enhance the feel of the car while not in any way compromising its stock ride quality, this is THE spring to buy.
As for the drop, I want to make a few notes: as mentioned in the comments below, some people believe there is reverse rake on the Eibachs on RWD, but aren't looking close enough to notice that like most cars, the Stinger has a higher cut front fender. I mention this because if you look at my before and after pics, you'll notice that the rear fender gap was always smaller than the front, but that from the factory, the size of the gaps makes this difference harder to notice. Shrinking the gap aggressively like with Eibachs will make the different much, much easier to notice. Despite that, the car is level because the drop from the springs is even front-to-back (on RWD).
And finally: since it seems a few people are adamant about pics after installation, I went outside to take a pic. You'll see just how subtle the drop is. However, it's important to note that my before pic was on a near full tank of gas while my after pic is on near empty. So for people measuring with pixels, that makes a difference, lol
Before Springs, but nearly a full tank of gas...
After Springs, but an empty tank of gas...
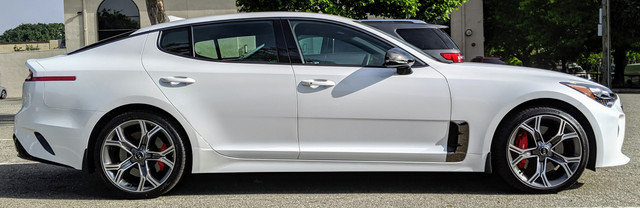
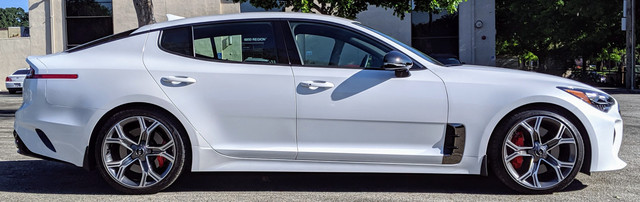
The verdict? To me, this is the best lowering spring to buy because there is zero compromise in any form of any sort, and the mild (but still noticeable, especially when looking at the car from certain angles or the back in particular) drop is how this car should have looked to begin with.
Updated Pics
Ark GT-F Springs Review!
INSTALLATION TIPS FOR LONE DIYERS:
- The outer tie rod on the driver's side for me was stuck like the car had 60k+ miles (it doesn't). After some PB blaster, I had to instead grab the steering wheel and do full lock rotations until I heard the outer tie rod literally "pop" loose. This took about 15 minutes all on its own. The passenger side came right out, strangely enough...
- Support the front knuckle with some sort of small jack before undoing the strut mount top bolt (the one in the trunk works fine for this, too!). This lets you ease the strut down and gauge how much you have to further compress your springs to clear the fender.
- Use the jack to jack the knuckle up when reinstalling so you don't need a helping hand to direct the strut back into the hole in the top plate.
- The rear outer arm bolt may be held tightly in place due to alignment specs on your car. Simply loosen the camber bolt nut and rotate the cam bolt and you'll see the arm move. This will give you all the wiggle room you need to knock that bolt out of the hole. Leave the camber bolt loose until you're ready to reinstall the outer bolt to make shoving it back through the bushing just as easy. Just don't forget where the cam bolt was positioned before tightening it back up.
If you've ever installed your own springs before, then there's really nothing I can tell you that you don't already know. If you haven't, though, there are some shortcuts I took that saved time in comparison to Ark's official spring installation guide. I'll follow my shortcut tips with some pics, one of which is a very specific set of spring compressors that allowed me to save time. The fronts only took me about 2.5 hours total (1.5 hours on the first one, 1 hour on the second) because of this shortcut. I'll add some additional installation tips at the end for those of you who wish to try this yourself who may not be used to spring installations.
- The spring compressors I use have a fixed end which is specifically useful for situations like this on short springs with few coils. Unlike the Ark installation guide that shows affixing the spring compressors to the bottom of the spring perch (risky!) and a coil, I affixed it to the only two coils exposed.
- This allowed me to not only compress the spring more than enough to clear the fender without issue, but once tilted out of the fender, I simply lifted the spring right off.
- Installing the spring compressors on the Ark spring, I simply slipped it right back on over the strut and onto the perch.
The above saved me tons of trouble/time: I didn't have to hammer the strut out of the pinch; I didn't have to remove the strut mount top plate which means I didn't have to mark/realign it when installing the spring; and the strut mount top bolt is a lot more manageable when the suspension is hanging some load on it (less likely to spin). And now for some installation pics:
Front Spring Installed
Rear Spring Installed
Spring Compressors Used
Spring Compressors Mounted
So after a total of about 4.5 hours of work and about an additional 30 minutes of taking about 1 degree of negative camber out of the back wheels, it really turned out to be all pretty standard procedure. But what does the car look like, now? I just installed them, and want to wait a week before I take pics in case there's anymore settling and comment on the ride.
So stay tuned for final words on the springs! Heeeee
(that's me knowing this post didn't quite end where you wanted it to, sorry for the disappointment!)UPDATE:
I am definitely not disappointed in the ride. "Like stock" is an understatement: it corners with more poise than stock while riding just like it. I attribute this to bringing the center of gravity lower. While I haven't gone to a track to see how this translates with any before and after or have a slalom course to run, this really is how the car should be and feel from the factory. Do note, though, that I also have Eibach swaybars on firm, and that could be a factor overall, but the change between post swaybars and post Ark springs is that the car has more balance. If you're going for springs to enhance the feel of the car while not in any way compromising its stock ride quality, this is THE spring to buy.
As for the drop, I want to make a few notes: as mentioned in the comments below, some people believe there is reverse rake on the Eibachs on RWD, but aren't looking close enough to notice that like most cars, the Stinger has a higher cut front fender. I mention this because if you look at my before and after pics, you'll notice that the rear fender gap was always smaller than the front, but that from the factory, the size of the gaps makes this difference harder to notice. Shrinking the gap aggressively like with Eibachs will make the different much, much easier to notice. Despite that, the car is level because the drop from the springs is even front-to-back (on RWD).
And finally: since it seems a few people are adamant about pics after installation, I went outside to take a pic. You'll see just how subtle the drop is. However, it's important to note that my before pic was on a near full tank of gas while my after pic is on near empty. So for people measuring with pixels, that makes a difference, lol
Before Springs, but nearly a full tank of gas...
After Springs, but an empty tank of gas...
The verdict? To me, this is the best lowering spring to buy because there is zero compromise in any form of any sort, and the mild (but still noticeable, especially when looking at the car from certain angles or the back in particular) drop is how this car should have looked to begin with.
Updated Pics
Ark GT-F Springs Review!
INSTALLATION TIPS FOR LONE DIYERS:
- The outer tie rod on the driver's side for me was stuck like the car had 60k+ miles (it doesn't). After some PB blaster, I had to instead grab the steering wheel and do full lock rotations until I heard the outer tie rod literally "pop" loose. This took about 15 minutes all on its own. The passenger side came right out, strangely enough...
- Support the front knuckle with some sort of small jack before undoing the strut mount top bolt (the one in the trunk works fine for this, too!). This lets you ease the strut down and gauge how much you have to further compress your springs to clear the fender.
- Use the jack to jack the knuckle up when reinstalling so you don't need a helping hand to direct the strut back into the hole in the top plate.
- The rear outer arm bolt may be held tightly in place due to alignment specs on your car. Simply loosen the camber bolt nut and rotate the cam bolt and you'll see the arm move. This will give you all the wiggle room you need to knock that bolt out of the hole. Leave the camber bolt loose until you're ready to reinstall the outer bolt to make shoving it back through the bushing just as easy. Just don't forget where the cam bolt was positioned before tightening it back up.
Last edited by a moderator:


") If there is one I'm not seeing it. It's ok if thre isn't if the ride/cornering is improved without lowering at all.
If there is one I'm not seeing it. It's ok if thre isn't if the ride/cornering is improved without lowering at all.


