
ZyroXZ2
Stinger Enthusiast
- Joined
- May 26, 2018
- Messages
- 797
- Reaction score
- 356
- Points
- 68
The first thing I’ll discuss is that the wiring (or at least the appearance of) once you’ve taken it out of the box will look either a) intimidating, b) confusing, or c) downright ridiculous. The good news is that it’s all worth it.
The biggest thing to keep in mind is that you absolutely must set aside a decent amount of time to install this primarily because of the crank position sensor. This isn’t a 5-minute install. Fortunately, most of the connectors are literally plug and play, and from my pictures attached (minus the crank position sensor), you’ll find they’re no-brainers. The wire routing is entirely up to you, but I found that there is at least some level of “clean” wiring possible despite what at first appears to be out of a horror sci-fi movie meant to choke and install itself into your throat.


You’ll notice I opted out of wiring in the speed limiter removal. That’s far more “semi-permanent” in nature and I think the less obvious things under the hood, the easier this will be to deal with when it comes to stealership visits. Also, you’ll want to wrap these wires up to make sure they don’t touch each other if you opt out like I did. They apparently touched on mine and my engine threw a rod through the hood. Just kidding. But definitely wrap the two wires up separately.

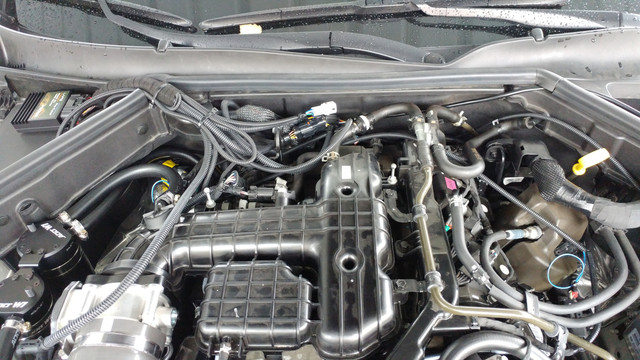
Additionally, their instructions show going through a hole in the panel. That hole, however, does not go all the way through for me. You’ll notice I simply “unplugged” a part of the weatherstripping and used that gap. Completely reversible, and since I’ve driven through the some rain storms already, can also confirm there is no adverse affect.

About that crankshaft position sensor, it is best to remove the mid-pipe to do this. It is a VERY tight space, and I’m not even fat. Most of your time will be spent looking through small gaps to verify you’ve grabbed the right sensor, feeling for the release tab, and then single-handedly attaching the connector from the LAP3 chip to the old connector. Putting the new spliced connector back on is the easiest part. The vast majority of this part is spent using a single hand to connect the connectors. If you’re already good at that, then maybe it won’t take you 30 minutes. But it took me about 25-30 minutes to do this part.
Now on to the butt dyno part. Even with basic intake/exhaust mods, the leap in power is pretty damned substantial. It’s enough that I can’t actually quantify it with my butt except that my hole puckers much more than it did before the chip was installed. Prepare for a sudden jolt when you’re losing traction where you could once floor it and take off (and believe me, I’ve squirmed the rear end quite a bit on just half throttle at low speeds!). However, there are some things I find strange…
When switching between the modes, it seems that Mode 1 and 2 (M1 and M2) employ a less aggressive partial throttle response. When going to stock, my car practically lurches forward on partial throttle. Fortunately, I hate that. When going to M1 or M2, I notice a more linear pedal feel. If you enjoy that more sudden response, it seems to be reduced on the actual tuning maps. I’ve gone back and forth multiple times and confirmed for sure it’s not “just in my head”. Additionally, I carefully watched the tachometer, and low RPMs in the 1.5-2.5k see the needle “fluttering” a very, VERY tiny amount. Switch it back to stock, and it doesn’t do that. I’ve checked and re-checked every connector, and based off the insane sphincter muscles I’ve gained, the chip is working as intended.
To summarize, this thing is expensive and intimidating when you get it out of the box. But an hour or so later, it all becomes worth it. I can confidently say that I’m pushing 500HP, maybe even closer to 520HP. The pull is insane, and if you’ve got breathing modes in place like I do, the freeway is pretty much the only place you can even get on full throttle. And when you do, you’ll pull harder than 99.999% of drivers are expecting from a Kia. Prepare to deliver some butt hurt to unsuspecting ricers while your butt dyno is in for a sphincter muscle upgrade.
The biggest thing to keep in mind is that you absolutely must set aside a decent amount of time to install this primarily because of the crank position sensor. This isn’t a 5-minute install. Fortunately, most of the connectors are literally plug and play, and from my pictures attached (minus the crank position sensor), you’ll find they’re no-brainers. The wire routing is entirely up to you, but I found that there is at least some level of “clean” wiring possible despite what at first appears to be out of a horror sci-fi movie meant to choke and install itself into your throat.
You’ll notice I opted out of wiring in the speed limiter removal. That’s far more “semi-permanent” in nature and I think the less obvious things under the hood, the easier this will be to deal with when it comes to stealership visits. Also, you’ll want to wrap these wires up to make sure they don’t touch each other if you opt out like I did. They apparently touched on mine and my engine threw a rod through the hood. Just kidding. But definitely wrap the two wires up separately.
Additionally, their instructions show going through a hole in the panel. That hole, however, does not go all the way through for me. You’ll notice I simply “unplugged” a part of the weatherstripping and used that gap. Completely reversible, and since I’ve driven through the some rain storms already, can also confirm there is no adverse affect.
About that crankshaft position sensor, it is best to remove the mid-pipe to do this. It is a VERY tight space, and I’m not even fat. Most of your time will be spent looking through small gaps to verify you’ve grabbed the right sensor, feeling for the release tab, and then single-handedly attaching the connector from the LAP3 chip to the old connector. Putting the new spliced connector back on is the easiest part. The vast majority of this part is spent using a single hand to connect the connectors. If you’re already good at that, then maybe it won’t take you 30 minutes. But it took me about 25-30 minutes to do this part.
Now on to the butt dyno part. Even with basic intake/exhaust mods, the leap in power is pretty damned substantial. It’s enough that I can’t actually quantify it with my butt except that my hole puckers much more than it did before the chip was installed. Prepare for a sudden jolt when you’re losing traction where you could once floor it and take off (and believe me, I’ve squirmed the rear end quite a bit on just half throttle at low speeds!). However, there are some things I find strange…
When switching between the modes, it seems that Mode 1 and 2 (M1 and M2) employ a less aggressive partial throttle response. When going to stock, my car practically lurches forward on partial throttle. Fortunately, I hate that. When going to M1 or M2, I notice a more linear pedal feel. If you enjoy that more sudden response, it seems to be reduced on the actual tuning maps. I’ve gone back and forth multiple times and confirmed for sure it’s not “just in my head”. Additionally, I carefully watched the tachometer, and low RPMs in the 1.5-2.5k see the needle “fluttering” a very, VERY tiny amount. Switch it back to stock, and it doesn’t do that. I’ve checked and re-checked every connector, and based off the insane sphincter muscles I’ve gained, the chip is working as intended.
To summarize, this thing is expensive and intimidating when you get it out of the box. But an hour or so later, it all becomes worth it. I can confidently say that I’m pushing 500HP, maybe even closer to 520HP. The pull is insane, and if you’ve got breathing modes in place like I do, the freeway is pretty much the only place you can even get on full throttle. And when you do, you’ll pull harder than 99.999% of drivers are expecting from a Kia. Prepare to deliver some butt hurt to unsuspecting ricers while your butt dyno is in for a sphincter muscle upgrade.
 ***
***
")


