VelossaTech LIT Snorkels not working?

Brooklyn_Ocho

Newish Member
Joined
Nov 25, 2022
Messages
18
Reaction score
8
Points
3
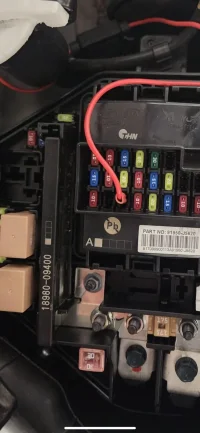
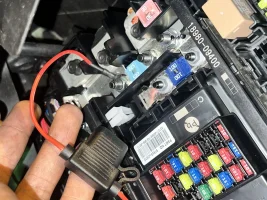
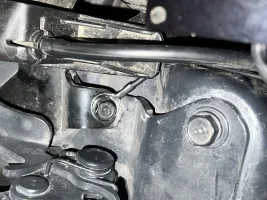
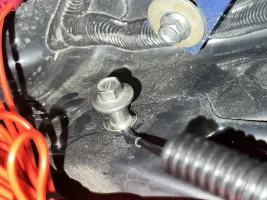
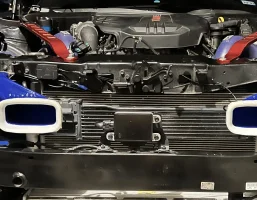
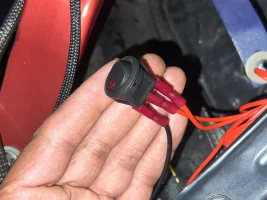
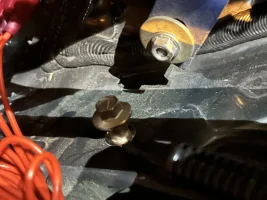
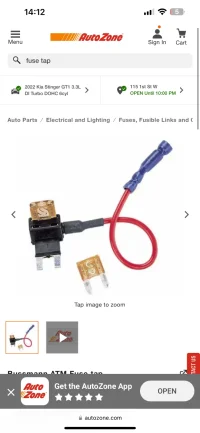
Anyone have any trouble installing the LED snorkels? As far as power to the box? I installed mine per manual but I’m not getting any power to them so they’re just regular snorkels for now. Was wondering if anyone had any suggestions as to what I may have done wrong? I watched tons of YouTube videos and went over the manual plenty times…looked at all wiring, even snipped off the loop that goes to the fuse box and put on a spade and plugged it in directly into the fuse box…still no power? What can be the issue? Any help/suggestions would be greatly appreciated!
 

Attachments

  • IMG_2721.webp
    IMG_2721.webp
    186.1 KB · Views: 23
  • IMG_2720.webp
    IMG_2720.webp
    77.8 KB · Views: 23
  • IMG_2705.webp
    IMG_2705.webp
    258.8 KB · Views: 21
  • IMG_2708.webp
    IMG_2708.webp
    274.9 KB · Views: 18
  • IMG_2707.webp
    IMG_2707.webp
    268.3 KB · Views: 22
  • IMG_2697.webp
    IMG_2697.webp
    272 KB · Views: 22
  • IMG_2702.webp
    IMG_2702.webp
    200.3 KB · Views: 21
  • IMG_2706.webp
    IMG_2706.webp
    192.5 KB · Views: 23
Have you put a multimeter across the wires at the snorkels to confirm they're getting power?
 
Have you put a multimeter across the wires at the snorkels to confirm they're getting power?
No I have not because I know they aren’t getting power since there is no light on the toggle switch. That would be the indication that at least there’s power being supplied to the actual power supply before it hits the snorkels
 
______________________________
Very strange. Once again, if you have a multimeter I'd test a few things. Test continuity in the wires to make sure there isn't a break/cut somewhere in individual wires. Test your positive to your current ground, then test to other grounds just to make sure you aren't hooked up to a bad ground. Only other obvious thing I can think of is to check the inline fuse as well. Also I'm assuming you tried it with the car in accessory mode and with the engine running as well.
 
Very strange. Once again, if you have a multimeter I'd test a few things. Test continuity in the wires to make sure there isn't a break/cut somewhere in individual wires. Test your positive to your current ground, then test to other grounds just to make sure you aren't hooked up to a bad ground. Only other obvious thing I can think of is to check the inline fuse as well. Also I'm assuming you tried it with the car in accessory mode and with the engine running as well.
No, I didn’t try it in accessory mode…I didn’t even know there was a setting? But I did try it with the car on and off. But I didn’t see anyone else do an accessory mode or does it mention in the manual so I didn’t even know about that, but I’ll try thanks. Also no I do not have a multimeter.
 
From interior to exterior to high performance - everything you need for your Stinger awaits you...
No, I didn’t try it in accessory mode…I didn’t even know there was a setting? But I did try it with the car on and off. But I didn’t see anyone else do an accessory mode or does it mention in the manual so I didn’t even know about that, but I’ll try thanks. Also no I do not have a multimeter.
Ahh if you tried it with the car running that should be plenty. Basically if you hit the start button without hitting the brake, the car switches into accessory mode, or something like that.

Damn a multimeter would definitely help in this situation. Especially if you have an issue with specific wire(s) or to test multiple grounding points.

For example, I was replacing a 120vac lighting system for my cabinets with a 24vdc LED system. After wiring everything, flipped the switch and all my lights were blinking. I had a short somewhere and the AC to DC transformer was protecting the circuit. I used the multimeter to check each one of my runs. Found that one had a short across the positive and negative. Tested by disconnecting connections at each end and did a continuity test across each wire. Pulled the entire run, put a new in and all was well. I would never have seen/known about the short just by looking at the wiring as it looked just fine. No kinks, rips in the outer insulation, etc. But I'm guessing somehow inside the outer insulation the inner insulation was damaged and shorted. Could have been a manufacturing defect. No clue.
Hmm…ok good to know. I shall check
 
Ahh if you tried it with the car running that should be plenty. Basically if you hit the start button without hitting the brake, the car switches into accessory mode, or something like that.

Damn a multimeter would definitely help in this situation. Especially if you have an issue with specific wire(s) or to test multiple grounding points.

For example, I was replacing a 120vac lighting system for my cabinets with a 24vdc LED system. After wiring everything, flipped the switch and all my lights were blinking. I had a short somewhere and the AC to DC transformer was protecting the circuit. I used the multimeter to check each one of my runs. Found that one had a short across the positive and negative. Tested by disconnecting connections at each end and did a continuity test across each wire. Pulled the entire run, put a new in and all was well. I would never have seen/known about the short just by looking at the wiring as it looked just fine. No kinks, rips in the outer insulation, etc. But I'm guessing somehow inside the outer insulation the inner insulation was damaged and shorted. Could have been a manufacturing defect. No clue.
SOLVED. I had to cut that fuse that came with the snorkels off…and brought my own fuse tap with a 10amp fuse…connected it to an empty fuse slot inside the fuse box and vuwala…turned on! Thanks for the support
 
SOLVED. I had to cut that fuse that came with the snorkels off…and brought my own fuse tap with a 10amp fuse…connected it to an empty fuse slot inside the fuse box and vuwala…turned on! Thanks for the support
Glad its up and going bro
 
______________________________
From interior to exterior to high performance - everything you need for your Stinger awaits you...
SOLVED. I had to cut that fuse that came with the snorkels off…and brought my own fuse tap with a 10amp fuse…connected it to an empty fuse slot inside the fuse box and vuwala…turned on! Thanks for the support
I'm having the same issue as well. Do you happen to have any pictures of the fuse you had to cut and what the replacement fuse looks like? I just want to make sure I fix it correctly. Thanks for any help!
 
I'm having the same issue as well. Do you happen to have any pictures of the fuse you had to cut and what the replacement fuse looks like? I just want to make sure I fix it correctly. Thanks for any help!
I just cut off the big fuse it came with…then I went to Autozone and brought a fuse tap. Also brought another 10amp fuse to put with it…and that was it. Connected it to the wire that I cut, then plugged it into the 10amp fuse in the fuse box and that seemed to work for me. Hit me up if you have any more questions. Hope that helped.
 

Attachments

  • IMG_2937.webp
    IMG_2937.webp
    47.2 KB · Views: 8
Last edited:
I just cut off the big fuse it came with…then I went to Autozone and brought a fuse tap. Also brought another 10amp fuse to put with it…and that was it. Connected it to the wire that I cut, then plugged it into the 10amp fuse in the fuse box and that seemed to work for me. Hit me up if you have any more questions. Hope that helped.
Ok I'll give that a try! When you say you plugged the 10amp into the fuse box, where exactly do I plug it in? Is there a picture of the location? Electrical things go over my head so I apologize haha. Should I disconnect the battery first?
 
Ok I'll give that a try! When you say you plugged the 10amp into the fuse box, where exactly do I plug it in? Is there a picture of the location? Electrical things go over my head so I apologize haha. Should I disconnect the battery first?
If you are concerned there is a battery off switch in the fuse box inside the car. Less work than gutting the back end
 
From interior to exterior to high performance - everything you need for your Stinger awaits you...
If you are concerned there is a battery off switch in the fuse box inside the car. Less work than gutting the back end
Okay good to know
 
______________________________
I just cut off the big fuse it came with…then I went to Autozone and brought a fuse tap. Also brought another 10amp fuse to put with it…and that was it. Connected it to the wire that I cut, then plugged it into the 10amp fuse in the fuse box and that seemed to work for me. Hit me up if you have any more questions. Hope that helped.
Do you have a picture of, or did you look at, the original fuse? In most cases they're translucent and you can see the metal strand curving through it, and whether it's intact or broken. They also make little testers, often incorporated into fuse-pulling tweezers, that let you stick two probes in the slots on top of the blade fuse and light an LED if there's continuity.

If you still don't have one, probably worth spending $15 on a cheap generic multimeter (or a little more if you want stuff like replaceable probes and a current induction loop). Won't have the precision of professional ones, but that doesn't matter for most scenarios like testing continuity, DC voltage in your car, AC voltage in an outlet, current drain, etc.

If you are concerned there is a battery off switch in the fuse box inside the car. Less work than gutting the back end
That's interesting, I've never messed with that fuse panel, just the one under the hood. Do you know what specifically it disconnects? IE will the jump points still be connected, or other systems of the car? Or does it totally isolate the battery?
 
Do you have a picture of, or did you look at, the original fuse? In most cases they're translucent and you can see the metal strand curving through it, and whether it's intact or broken. They also make little testers, often incorporated into fuse-pulling tweezers, that let you stick two probes in the slots on top of the blade fuse and light an LED if there's continuity.

If you still don't have one, probably worth spending $15 on a cheap generic multimeter (or a little more if you want stuff like replaceable probes and a current induction loop). Won't have the precision of professional ones, but that doesn't matter for most scenarios like testing continuity, DC voltage in your car, AC voltage in an outlet, current drain, etc.


That's interesting, I've never messed with that fuse panel, just the one under the hood. Do you know what specifically it disconnects? IE will the jump points still be connected, or other systems of the car? Or does it totally isolate the battery?
I honestly never checked everything to see. I used it on a 3 week vacation to kill all the constant drains that all cars have. Battery was fine. Had to use the key to unlock it. Quick switch flip and a testor, but im kinda lazy. Sorry i know thats no help
 
Interesting, did you notice any other impacts? Clock reset etc?
 
So I'm still having trouble with getting the kit to stay on consistently (goes on for a little bit, but it's pretty dim and goes dead again.) Here are some pictures of what I've replaced so far. Would shortening the wires between the on/off switch and the inline fuse make a difference? Or Do I cut off the 10A fuse it came with? And I just need a picture of where you plugged it in to the fuse box. Currently connected to the original bolt location in the manual. I'm a slow learner so any pictures would be helpful! Screenshot_20231217_084933_Chrome.webpScreenshot_20231217_084905_Chrome.webpThanks
 
From interior to exterior to high performance - everything you need for your Stinger awaits you...
Back
Top