
You are using an out of date browser. It may not display this or other websites correctly.
You should upgrade or use an alternative browser.
You should upgrade or use an alternative browser.
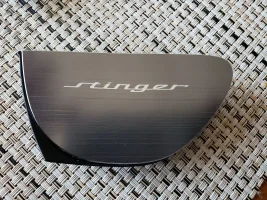
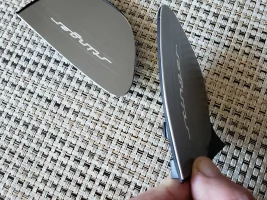
Just installed Stinger Aluminum Handle Inside Door Catch Plates
- Thread starter StingerNick
- Start date
-
- Tags
- catch door door panel plate
OliverNuther
1000 Posts Club!
Ok, what makes you think I saw this thread before the damage was done?
…
You didn’t seem to have any trouble finding this thread to blame everyone else for your problems so it can’t have been too hard to find.
Because it was only after I had issues with installing them and at that point I couldn’t reuse the spacers because they had lost their adhesive after being taken off. And my issues you say, it’s the issue of the stinger shop by not including instructions.
You didn’t seem to have any trouble finding this thread to blame everyone else for your problems so it can’t have been too hard to find.
______________________________
You didn’t seem to have any trouble finding this thread to blame everyone else for your problems so it can’t have been too hard to find.
My problem? Well read the instructions on the site for yourself.
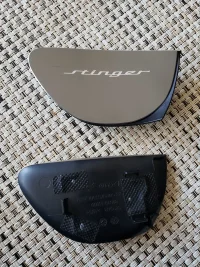
INSTALLATION INSTRUCTIONS:
1. Peel adhesive backing from 3M double-sided tape and apply to spacer.
2. Peel tape from spacer and apply to the back of aluminum plate, centering between the letters (side to side)
3. Remove last backing from 3M tape
4. Press firmly to plastic backing in handle cup
StingerNick
Active Member
The lack of clear instructions is exactly why I made this tutorial. I ordered mine from Amazon and they shipped directly from Korea. They came with super crappy directions on a half sheet of paper. Using google image translate I saw something about “remove”. Then I found some other post where someone said to remove that curves black plastic piece, which is the main reason I bought the removal tool set.
If you messed up on the sticky plastic rectangle, just use a little epoxy to glue the rectangle to the aluminum. It will hold 10x better than the sticky.
Sal has been super helpful over past few months with my purchases and questions. Maybe he could include a link to this tutorial or print out my instructions and put them in the box.
From interior to exterior to high performance - everything you need for your Stinger awaits you...
I’ve ordered another set, I binned the others (one got scratched in the kaffuffle) but yes, instructions are woeful, and we shouldn’t need this tutorial at all if it was handled properly at the get go.The lack of clear instructions is exactly why I made this tutorial. I ordered mine from Amazon and they shipped directly from Korea. They came with super crappy directions on a half sheet of paper. Using google image translate I saw something about “remove”. Then I found some other post where someone said to remove that curves black plastic piece, which is the main reason I bought the removal tool set.
If you messed up on the sticky plastic rectangle, just use a little epoxy to glue the rectangle to the aluminum. It will hold 10x better than the sticky.
Sal has been super helpful over past few months with my purchases and questions. Maybe he could include a link to this tutorial or print out my instructions and put them in the box.
Kamauxx
5000 Posts Club!
- Joined
- Jan 28, 2018
- Messages
- 5,508
- Reaction score
- 2,739
- Points
- 118
Not to mention the damage done to the door handle whilst trying to put these in with the plastic trim in place.
Maybe you should bring your car to a mechanic before you do any more damage to it.
Wouldn't want you to have to suffer any more heartache due to Sal's negligence. /s
cncBilly
2500 Posts Club!
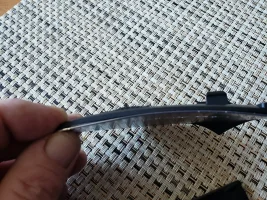
Exactly what I did. Tossed out the spacers and tape patches crap provided and used two sided 3M taped on both pieces (aluminum piece & eye patch). This helped to fill the gap the spacer would have taken up. Before applying the tape I patiently bent and shaped the aluminum pieces to fit the cavity of the stock "eye patch". They will fit perfectly! The first one took a bit but then I started using my knee to roll the aluminum piece around to bent it which work great. So once you have the aluminum pieces bent apply 3M two both pieces, carefully line them up and press them firmly together. Now you just simply pop the eye patch back into place. Easy peezy. Personally I think doing it any other way would result in sloppy craftsmanship.Could you just remove the "pirate eye patches"and stick the aluminum pieces directly onto them?
Last edited:
cncBilly
2500 Posts Club!
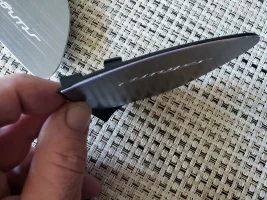
Wrong....Left field wrong!The “pirate eye patches” are curved pieces of plastic. The aluminum is thin but to strong to bend to fit the plastic, plus that would probably deform the “stinger” wording.
StingerNick
Active Member
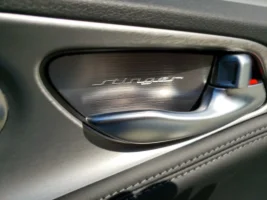
Can you post some photos of the installed curved aluminum?
______________________________
From interior to exterior to high performance - everything you need for your Stinger awaits you...
cncBilly
2500 Posts Club!
Will do. Give me an hour or so. CheersCan you post some photos of the installed curved aluminum?
nhcowboy28
2500 Posts Club!
- Joined
- Oct 30, 2018
- Messages
- 3,500
- Reaction score
- 2,697
- Points
- 118
- Location
- None of your damn business
Sooo. You do know SAL doesn’t manufacture these right? It would the same regardless of where you bought these from (import shark, tuscanicustoms, etc).I’ve ordered another set, I binned the others (one got scratched in the kaffuffle) but yes, instructions are woeful, and we shouldn’t need this tutorial at all if it was handled properly at the get go.
Perhaps you should google before trying to install something... for the love of god please don’t try to change your own oil... you might have to send Kia a strongly worded letter when you forget the tighten the drain plug.
cncBilly
2500 Posts Club!
Here you go. It was to dark in the garage to get a good picture installed. However these will hopefuuly help. IMHO this is the best way I've seen "so far" to do this. Cheers.Can you post some photos of the installed curved aluminum?
Attachments
StingerNick
Active Member
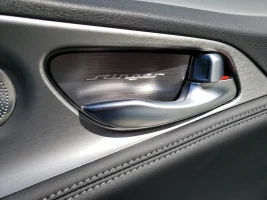
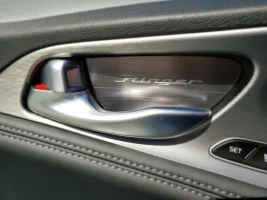
Looking good! When you get a chance, can you post a photo of them installed on the driver and passenger door?
So there are two routes to go, both with slight difficulties.
1. Perfectly line up the aluminum in the door handle with the sticky rectangles and press...you basically get one shot. It royally sucks to pull it off if you stick it off center
Or
2. Carefully bend the aluminum to fit the plastic. Then attach with 3M tape.
Kamauxx
5000 Posts Club!
- Joined
- Jan 28, 2018
- Messages
- 5,508
- Reaction score
- 2,739
- Points
- 118
Looking good! When you get a chance, can you post a photo of them installed on the driver and passenger door?
So there are two routes to go, both with slight difficulties.
1. Perfectly line up the aluminum in the door handle with the sticky rectangles and press...you basically get one shot. It royally sucks to pull it off if you stick it off center
Or
2. Carefully bend the aluminum to fit the plastic. Then attach with 3M tape.
Either way, this isn't rocket science. It only took me a few minutes to install mine and nothing was damaged in the process.
And if I did scratch the car up after taking a butcher's knife to the door I never would have admitted that, let alone blamed someone for selling it to me.
The audacity of some people...
From interior to exterior to high performance - everything you need for your Stinger awaits you...
cncBilly
2500 Posts Club!
You could also add too #2. After attaching with 3M tape you can simply reinstall and uninstall, time after time after time until the cows come home.Looking good! When you get a chance, can you post a photo of them installed on the driver and passenger door?
So there are two routes to go, both with slight difficulties.
1. Perfectly line up the aluminum in the door handle with the sticky rectangles and press...you basically get one shot. It royally sucks to pull it off if you stick it off center
Or
2. Carefully bend the aluminum to fit the plastic. Then attach with 3M tape.
Looking good! When you get a chance, can you post a photo of them installed on the driver and passenger door?
So there are two routes to go, both with slight difficulties.
1. Perfectly line up the aluminum in the door handle with the sticky rectangles and press...you basically get one shot. It royally sucks to pull it off if you stick it off center
Or
2. Carefully bend the aluminum to fit the plastic. Then attach with 3M tape.
Here's them back installed.Looking good! When you get a chance, can you post a photo of them installed on the driver and passenger door?
So there are two routes to go, both with slight difficulties.
1. Perfectly line up the aluminum in the door handle with the sticky rectangles and press...you basically get one shot. It royally sucks to pull it off if you stick it off center
Or
2. Carefully bend the aluminum to fit the plastic. Then attach with 3M tape.
Attachments
______________________________
Maybe you should bring your car to a mechanic before you do any more damage to it.
Wouldn't want you to have to suffer any more heartache due to Sal's negligence. /s
Maybe you should be less of a smartass and realize it’s is his responsibility as a seller to provide proper instructions for anything he is selling. I shouldn’t have to google anything, there’s instructions on the page where you buy them, that at that time were incorrect, so instead of trying to defend Sal and look like the good guy, maybe you should use your brain and realize where the responsibility actually lies.
nhcowboy28
2500 Posts Club!
- Joined
- Oct 30, 2018
- Messages
- 3,500
- Reaction score
- 2,697
- Points
- 118
- Location
- None of your damn business
This is why you can’t have nice things. You’re in a time out mister.Maybe you should be less of a smartass and realize it’s is his responsibility as a seller to provide proper instructions for anything he is selling. I shouldn’t have to google anything, there’s instructions on the page where you buy them, that at that time were incorrect, so instead of trying to defend Sal and look like the good guy, maybe you should use your brain and realize where the responsibility actually lies.
You’re in a time out mister.
Um, ok?
DaBears4Lyfe
1000 Posts Club!

From interior to exterior to high performance - everything you need for your Stinger awaits you...


