
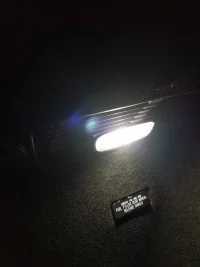
Hello everyone. I was wondering if anyone knows how to remove the cover for the LED bulbs in the cargo area. I have some LED strips I want to put in that I usually do with my other vehicles but the one the kia seseems to have no latch for me to access the bulb. I checked the manual and all it says is to bring it into the dealer. If someone can kindly shed some light on this matter that would be great. Thank you .
You are using an out of date browser. It may not display this or other websites correctly.
You should upgrade or use an alternative browser.
You should upgrade or use an alternative browser.
Cargo LED how to remove?
- Thread starter MackyGio
- Start date
niko
Stinger Enthusiast
Shouldn’t be hard to do I’ll take a look at it and get back to u
Much appreciated .I had tried prying the black housing as well as the bunk housing to no avail. It did not have slits to open like other trunk bulbs in other makes. No sure if this is behind the lining or not. Thanks again .Shouldn’t be hard to do I’ll take a look at it and get back to u
______________________________
Driver
Member
I'm also looking at doing this.
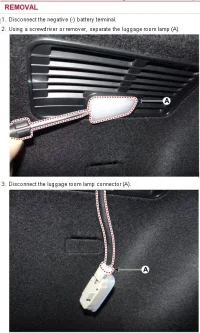
Workshop manual says to pry the LED lens cover out from the surrounding molding with a flat-blade screwdriver or similar from one end.
However, a potentially bigger issue is that these lights are being electronically driven, so you'll need to make sure your new lights don't draw a higher current because the car's electronics can detect this for the luggage lamps (amoung other things), as per the workshop manual...
I can't see any mention of what this actual/programmed current limit spec is.
I think the safest way around this will be to wire a relay in to the existing trunk lamp; which in turn will switch a separate (more powerful) circuit for my additional trunk LED strips. Hopefully the minimal current required to drive the relay won't trigger the over-current detection then.
Workshop manual says to pry the LED lens cover out from the surrounding molding with a flat-blade screwdriver or similar from one end.
However, a potentially bigger issue is that these lights are being electronically driven, so you'll need to make sure your new lights don't draw a higher current because the car's electronics can detect this for the luggage lamps (amoung other things), as per the workshop manual...
(1) PCL (Programmable Current Limit) functions
- PCL replaces the junction box function of protecting wires.
- How to operate : If the lamp current exceeds the standard level, cut off the current to protect the lamp.
- Lamp cut off time : 300ms or less.
- Applied components : all lamp components controlled by SJB
- Output the error code according to the error detection conditions.
I can't see any mention of what this actual/programmed current limit spec is.
I think the safest way around this will be to wire a relay in to the existing trunk lamp; which in turn will switch a separate (more powerful) circuit for my additional trunk LED strips. Hopefully the minimal current required to drive the relay won't trigger the over-current detection then.
Would be great if you can take a few pictures and get a manual going. I had attempted to remove the lens cover without removing the panel and unfortunately it did not work. It ended up scratching the cover so I gave up as I was concerned it will snap if I pryed it more. I'm using some led strip lights from eBay. Not sure of what their draw rate is. It uses 18 3 emitter 5050 smd led chips. If it's doable without triggering I might give it a try and pry it out lol.
From interior to exterior to high performance - everything you need for your Stinger awaits you...
Driver
Member
My other idea is to put a a tilt sensor/relay inside the tailgate, & LEDs mounted on the inside of the tailgate. Then when it opens fully; the tilt-switch will trigger the lights; upon closing lights go off.")
That's interesting. I attempted the picture you had attached. It did not work. Not sure if there's a difference between Australian and Canadian models for the cargo light. I might have been using the wrong screw driver perhaps. But thanks for that photo. If I were to draw too much power what's the worse that can happen if it's electronically driven?
eflyguy
2500 Posts Club!
If there's no dedicated fuse, you blow circuit in the ECU.
Driver
Member
I think you'd have to do something real silly to blow it up entirely
There's a 10A fuse (F4) for all the inside lights; but the actual 'light switch' circuitry will sense an over-current situation, then shutdown that output & generate a fault code accordingly.
But there's no mention of any individual lamp circuit ratings or programmed tolerances/limits.
There's a 10A fuse (F4) for all the inside lights; but the actual 'light switch' circuitry will sense an over-current situation, then shutdown that output & generate a fault code accordingly.
But there's no mention of any individual lamp circuit ratings or programmed tolerances/limits.
From interior to exterior to high performance - everything you need for your Stinger awaits you...
ScottM
Stinger Enthusiast
Do you guys have left and right side cargo lights?
I read it as... "...left or right side cargo lights".

ShannonC
2500 Posts Club!
- Joined
- May 8, 2018
- Messages
- 2,701
- Reaction score
- 1,905
- Points
- 118
- Location
- North Parramatta, Sydney, Australia
Yes, both on AU models.Do you guys have left and right side cargo lights?
nhcowboy28
2500 Posts Club!
- Joined
- Oct 30, 2018
- Messages
- 3,500
- Reaction score
- 2,697
- Points
- 118
- Location
- None of your damn business
Your dealer is full of sh!t.Thanks mine came with only passenger side working but both units were installed but only one electrically hooked up. Asked my dealer and was told only one side should be working!


From interior to exterior to high performance - everything you need for your Stinger awaits you...
An update for anyone that wanted to remove the cargo lights. Funny enough, I gave it another go today cause I happened to stumble across the bulbs I wanted to replace em with. I tried prying it open, it looks like they are glued to the black cover housing as one unit. As I was prying, there was some sort of sticky residue as I was prying. I guess North American Stingers are different than other parts of the world. The bulbs are integrated into the whole unit. When I saw that residue, I stopped and just gave up. It will forever be dark in the back of the stinger lol
______________________________
Driver
Member
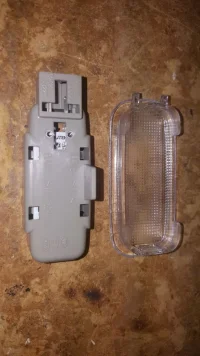
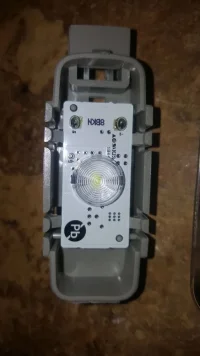
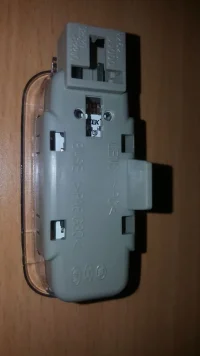
Yes they are LED as well. But as I was praying the clear cover, that is whee the residue was stretching. The grey part did not come attached to it d the more I forced it, it felt like it will snap. Did you replace you lights with an LED strip?I saw no glue - are your lights LED too?
This is what mine looked like?

