Armrest.... So fancy!

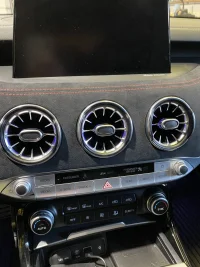
Thanks for the detailed write up DiabloStinger.

Spot on.

Made it a quick install knowing where to dremel.

Hardest part was trying not to make a mess (ok, maybe not scratching the fake brushed silver surround while getting those pesky 2 bottom screws back in).

Taking my time it didn’t even take an hour.

Thanks again!!
 
My pleasure @nhcowboy28 ... i'm sure there is some other way to do it, but this one made the most sense after trying about 5 others!
 
Resurrecting older thread... I would like to find a stretch fabric to go over existing cover.
I had one on one of my Corvettes and it fit perfectly, install was a breeze, and wore well.
I've been looking and one in a previous post is fleece which I think will show wear quickly.
I think I'll go back and look for the one I had and see if it's around the same size as current cover.
Found the cover I used to have. Now have to find one without the logo...

armrest_cover.webp
 
Last edited:
______________________________
"Sweaty forearms", heh! I like the original cover, and it is my wife's favorite feature of the interior, because we can rest our arms and hold hands. Fancy is as fancy does. Somebody has a graphite one out there.

Yeah, I'm not a fan of alcantara material...already looks used and worn to me.
 
Resurrecting older thread... I would like to find a stretch fabric to go over existing cover.
I had one on one of my Corvettes and it fit perfectly, install was a breeze, and wore well.
I've been looking and one in a previous post is fleece which I think will show wear quickly.
I think I'll go back and look for the one I had and see if it's around the same size as current cover.
Found the cover I used to have. Now have to find one without the logo...

View attachment 20821


Ah... just spend the $24!
 
From interior to exterior to high performance - everything you need for your Stinger awaits you...
I just got my new armrest, the one on my CPO stinger was torn from the previous owner.

I actually think it's possible to get that 3rd screw out without cutting. You'd need an ultra low profile screwdriver like this. I'll try it and put a couple layers of masking tape on the aluminum bezel to prevent scratching and use needle nose pliers to get the rest backed out and threaded back into the new one.
 

Attachments

  • Low Prifle Screwdriver.webp
    Low Prifle Screwdriver.webp
    111 KB · Views: 51
All right, I got the ultra low profile screwdriver set today and immediately went and checked. No dice...it wont fit. MAYBE if you were willing to use some non scuffing wedges to bend the plate out at the hinge it would fit but screw that, dremel it is for me.

#SAD and #FAILUREOFSERVICABLEDESIGN
 
Has anyone else been able to install this without using a dremel? They are available for purchase on Amazon now (sold out everywhere else I have seen).

I got mine and it came with the armrest (the console box cover) and attached metal hinge with several screw holes. Like the stock armrest, it is pretty HARD but has a little give and feels soft if you rub it sideways.

A youtube video shows a guy removing the entire center console pretty much even the stereo was taken out lol...
The only ways to install it are taking apart everything like in the YouTube video or using a dremel (I used Tin snips and hacked out the plastic part). That bottom middle screw is the main culprit for the install being such a pain.
 
The only ways to install it are taking apart everything like in the YouTube video or using a dremel (I used Tin snips and hacked out the plastic part). That bottom middle screw is the main culprit for the install being such a pain.
Ok thanks, that sucks even a low profile angled screwdriver doesn't work.
 
______________________________
From interior to exterior to high performance - everything you need for your Stinger awaits you...
Has anyone else been able to install this without using a dremel? They are available for purchase on Amazon now (sold out everywhere else I have seen).

I got mine and it came with the armrest (the console box cover) and attached metal hinge with several screw holes. Like the stock armrest, it is pretty HARD but has a little give and feels soft if you rub it sideways.

A youtube video shows a guy removing the entire center console pretty much even the stereo was taken out lol...
I just did this today in about 45 minutes. Note that I have been working in dealerships and aftermarket for over half my life so interiors are easy for me. I'd say a 2 out of 10 for experienced people, 4 or 5 for novices. I did find a lot of short cuts over the YouTube video. They took out a lot more stuff than was necessary:

  1. Pull off the panels near your knee on both sides of the center console. Start toward the middle of the car and work towards the windshield. There are clips the whole way then near the windshield/firewall there is one last retainer that you'll slide towards the back of the car to get free.
  2. There is 1 10mm bolt behind each one of these holding the front of the console in.
  3. Empty out your main center console armrest storage. lift out the bit of fabric in the bottom of the storage pocket and remove the 2 10mm bolts in there.
  4. Lift off the center console trim (the part with the cupholder, heated/ventilated seat controls, etc) and unplug the two harness to get it out of the car. If you have anything other than a GT2, just pull straight up on the shift knob and it comes right off.
  5. Remove 1 10mm bolt just behind the shifter assembly.
  6. Put the shifter in drive and slide the whole console back as far as you can.
  7. Remove 2 silver Philips head screws from the trim around the wireless charger pocket. Then lift the trim straight up. There are 4 clips holding it into the console.
  8. Lift up on the charger pocket. Once the two clips holding it in let loose, disconnect the 2 wire harnesses.
  9. Get your hands behind the AC controls and pop it off the rest of the console. I didn't bother unplugging it. Just left it hang in the car.
  10. Now you can pull the entire console out of the car.
  11. Flip the console upside down, take out the 4 Philips head screws holding the H snapped bracket in, and 4 other Philips head screws towards the front of the pocket.
  12. Take out 6 small Philips head screws holding on the remaining trim black or aluminum trim piece directly under the console lid.
  13. Flip the console right side up, take out the 6 small Philips head screws towards the front of the pocket.
  14. Lift up on the remaining trim under the console lid and the few clips will release.
  15. Take out the 6 larger Philips head screws holding the console lid to the console and you're done.

I did NOT do the following extra steps some videos showed:
  • Did not remove the rear ac vents from the console
  • Did not remove the ducting going to those ac vent
  • Removed the ac controls after I shifted the console back. It was hard to get a tool in there without feeling like I was going to scratch the trim so it was easier this way. Had plenty of room to get my hand behind the ac controls and just push it out of the console.
No cutting, everything in great condition to put back to factory should I part the car out prior to selling it.

I did do this write up from memory so I may have crossed up a screw type. Also mine is a 2019 GT1 so obviously shifters on GT2 could have some differences around that.

Don't be scared to do it. These cars are easy and great to work on. Of course I also tried both ways to do the spark plugs and actually prefer the option to remove the whole intake manifold so I'm that guy.
 
I just removed my armrest. Followed @DiabloStinger but rather than dremmel, I turned the middle screw a few turns using a small flat head screw driver to create a gap between the two pieces.

I then used a small electric reciprocating saw with a long blade and cut through the middle screw from between the top and bottom of the armrest. Very simple but could have been so much easier had Kia not put a screw there!
 
Last edited:
If you're just after the look a much more easier alternative may be to wrap the armrest with suede.

-803715666597008693.webp
 
If you're just after the look a much more easier alternative may be to wrap the armrest with suede.

View attachment 66604
True. I like the red stitching on the Kia Alcantara armrest and it also matches the Alcantara and stitching on my dash.
 

Attachments

  • E039A175-04A0-4EAA-BC1D-73FE001936E3.webp
    E039A175-04A0-4EAA-BC1D-73FE001936E3.webp
    273.8 KB · Views: 23
Back
Top