You are using an out of date browser. It may not display this or other websites correctly.
You should upgrade or use an alternative browser.
You should upgrade or use an alternative browser.
another badge thread, but this time with a poll!
- Thread starter Doel
- Start date
washguy
Stinger Enthusiast
Guys if you will take your time...use a hairdryer,fishing line mono,dental floss and some goo gone its easy peasy. The sun at 95 degrees wont do it...it takes a hairdryer....I used a cotton swab and dripped some goo be goon at the top of the badge....I had used painters blue tape all the way around the old badge....and also put a paper towel underneath the badge to catch any goo gone.....maybe 4 mins with hairdryer....then drip some goo gone at the top.....more heat for a couple of mins....then using either dental floss or fishing line start sawing back and forth....you can feel the line cutting the adhesive....then use an old credit card or whatever plastic card on the ends of badge wedge it underneath and start pull up on badge.....it will start to give and once it does you are home free....and the goo gone doesn't affect the paint... you can use the goo gone to clean up the old adhesive....you can kinda roll it off with a finger....and don't get all anal with getting the old adhesive off....if theres still some on no worries...slap the new badge on...you cant tell one bit if theres some old adhesive left on....on a 1 to 10 project rating....this is a big 1  Wash
Wash
Schpok
Active Member
I had the badges changed yesterday. I went to a car wrap shop to let them do it professionally.
Well the rear worked out perfectly but the paint underneath the front came off. Simmular problem to all the other cars, the new badge does not cover all of the damage.
Maybe I'll let the spot get paintet, maybe the whole front or I leave the Kia badge on
the guys from the Shop said, they never saw a badge attachend that crazy. Normaly there are only Pins or only tape.
not both, the Pins are totally unnecessary as are the holes. That much tape would hold for 2 lifetimes of the car. Also the badges where applied way to early, beacause the badges are pushed in to the paint. They had to polish my whole rear end to make the edges of the badges unseen.
Well the rear worked out perfectly but the paint underneath the front came off. Simmular problem to all the other cars, the new badge does not cover all of the damage.
Maybe I'll let the spot get paintet, maybe the whole front or I leave the Kia badge on

the guys from the Shop said, they never saw a badge attachend that crazy. Normaly there are only Pins or only tape.
not both, the Pins are totally unnecessary as are the holes. That much tape would hold for 2 lifetimes of the car. Also the badges where applied way to early, beacause the badges are pushed in to the paint. They had to polish my whole rear end to make the edges of the badges unseen.
______________________________
I used goo gone when removing my rear emblems both spraying on to let it seep into the adhesive during the floss sawing action and to remove the residual adhesive left behind. It did not affect the paint for me.
Callum
1000 Posts Club!
I truly think whoever assembled my car, knew what they were doing, or built it to have the badges come back off. I used zero heat, zero chemicals and have zero scratches/paint issues whatsoever.
I refuse to use heat on these cars, since everybody that has lost paint used heat. I refuse to use chemicals, since a lot of folks have lost paint. I took my time and rubbed the old adhesive off with a clean microfiber towel. Who knows, maybe the assembly line got backed up and my car was able to dry a bit longer, or it was a fresh batch of paint that didn't have adhesion issues. Whatever it is, my Aurora Black Pearl didn't have any issues. It was 65*F when I did mine, so you really don't need heat.
I refuse to use heat on these cars, since everybody that has lost paint used heat. I refuse to use chemicals, since a lot of folks have lost paint. I took my time and rubbed the old adhesive off with a clean microfiber towel. Who knows, maybe the assembly line got backed up and my car was able to dry a bit longer, or it was a fresh batch of paint that didn't have adhesion issues. Whatever it is, my Aurora Black Pearl didn't have any issues. It was 65*F when I did mine, so you really don't need heat.
From interior to exterior to high performance - everything you need for your Stinger awaits you...
Doel
1000 Posts Club!
I'm tempted to use warm water to help take it off, maybe somewhere around 100-110 degrees.
BlaydeX15
Active Member
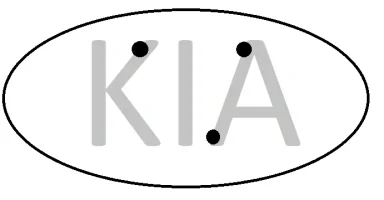
Took mine off, no damage. Was pretty easy and should be safe as long as you don't yank on it. Surround the badge with painters tape (stuck lightly, don't need to press it down). Grab 2 rubber wedges, jam em in either side. Use fishing line to saw slowly, and work the wedges in as you go. When you hit the pins, rotate the wedges down and use the corners to reach the area in the middle of the pins. It's pretty easy if you mark out where the pins are, they're roughly at the top right of the 'K' in Kia, and the Top and bottom left of the 'A'
The big problem is the front badge has 3 pins. It creates a triangle of space that you can't saw away with fishing line, and if you don't saw it away, that's a LOT of adhesive that you're just ripping off. MAKE SURE TO USE THE WEDGES TO GET THE ADHESIVE BETWEEN THE PINS OR YOU'LL HAVE A BAD TIME. The rear only has 2 pins, so it's not nearly as bad. Just a small strip of adhesive in the middle.
I didn't use heat, just sat it out in the sun for an hour before removing them. I used goo-gone to remove the adhesive, and had no lasting damage, though I did make sure to wipe up immediately after, so it only stayed on the adhesive and didn't drip down onto the car. Make sure you get the right kind of goo-gone though, the hardcore stuff might get between the paint and the body and eat at the paint from behind.
My only problem is that the adhesive on the new front badge was super thin, and the new badge didn't match the contour of the front, so the edges of the new badge wouldn't stay down. Fixed that by buying some VHB double sided foam tape, and setting it on the back of the badge on top of the existing adhesive. That gave me some wiggle room for the contour, and it's been rock solid since then.
Edit: Some MSPAINT diagrams to explain, hopefully.
Here's where the pins are in relation to the KIA logo. Mark them off on the badge so you know where to stop sawing.

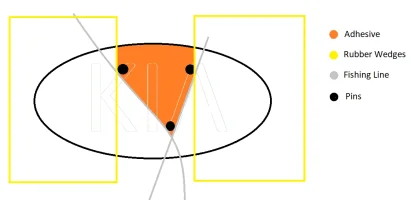
Saw towards the pins with fishing line, push the wedges in as you saw. When you're done sawing and wedging, it will look like this.

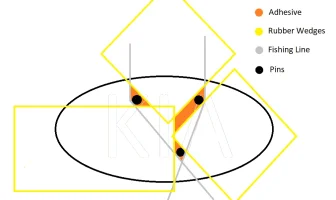
Now, you're not done. I think this is where people are messing up. If you peel it here, there's a TON of adhesive left! Either use another wedge, or rotate the left and right wedge to cut out the sections below.

Once you're here, peel very, very slowly. I put my fingers behind the wedges and just applied pressure to them until the badge lifted.
That should do it. Now get the adhesive off, that's the fun part...
The big problem is the front badge has 3 pins. It creates a triangle of space that you can't saw away with fishing line, and if you don't saw it away, that's a LOT of adhesive that you're just ripping off. MAKE SURE TO USE THE WEDGES TO GET THE ADHESIVE BETWEEN THE PINS OR YOU'LL HAVE A BAD TIME. The rear only has 2 pins, so it's not nearly as bad. Just a small strip of adhesive in the middle.
I didn't use heat, just sat it out in the sun for an hour before removing them. I used goo-gone to remove the adhesive, and had no lasting damage, though I did make sure to wipe up immediately after, so it only stayed on the adhesive and didn't drip down onto the car. Make sure you get the right kind of goo-gone though, the hardcore stuff might get between the paint and the body and eat at the paint from behind.
My only problem is that the adhesive on the new front badge was super thin, and the new badge didn't match the contour of the front, so the edges of the new badge wouldn't stay down. Fixed that by buying some VHB double sided foam tape, and setting it on the back of the badge on top of the existing adhesive. That gave me some wiggle room for the contour, and it's been rock solid since then.
Edit: Some MSPAINT diagrams to explain, hopefully.
Here's where the pins are in relation to the KIA logo. Mark them off on the badge so you know where to stop sawing.

Saw towards the pins with fishing line, push the wedges in as you saw. When you're done sawing and wedging, it will look like this.

Now, you're not done. I think this is where people are messing up. If you peel it here, there's a TON of adhesive left! Either use another wedge, or rotate the left and right wedge to cut out the sections below.

Once you're here, peel very, very slowly. I put my fingers behind the wedges and just applied pressure to them until the badge lifted.
That should do it. Now get the adhesive off, that's the fun part...
Last edited:
washguy
Stinger Enthusiast
So if you had to pay to get the badges taken off Professionally....why isn't the professional gonna make their mistake right for you...as in painting Their screw up ? Hell you could a done that by yourself .... you got bent over
Madman
Active Member
Great description, having done this (twice) I would add one thing in relation to getting in between the pins on the front badge.Took mine off, no damage. Was pretty easy and should be safe as long as you don't yank on it. Surround the badge with painters tape (stuck lightly, don't need to press it down). Grab 2 rubber wedges, jam em in either side. Use fishing line to saw slowly, and work the wedges in as you go. When you hit the pins, rotate the wedges down and use the corners to reach the area in the middle of the pins. It's pretty easy if you mark out where the pins are, they're roughly at the top right of the 'K' in Kia, and the Top and bottom left of the 'A'
The big problem is the front badge has 3 pins. It creates a triangle of space that you can't saw away with fishing line, and if you don't saw it away, that's a LOT of adhesive that you're just ripping off. MAKE SURE TO USE THE WEDGES TO GET THE ADHESIVE BETWEEN THE PINS OR YOU'LL HAVE A BAD TIME. The rear only has 2 pins, so it's not nearly as bad. Just a small strip of adhesive in the middle.
I didn't use heat, just sat it out in the sun for an hour before removing them. I used goo-gone to remove the adhesive, and had no lasting damage, though I did make sure to wipe up immediately after, so it only stayed on the adhesive and didn't drip down onto the car. Make sure you get the right kind of goo-gone though, the hardcore stuff might get between the paint and the body and eat at the paint from behind.
My only problem is that the adhesive on the new front badge was super thin, and the new badge didn't match the contour of the front, so the edges of the new badge wouldn't stay down. Fixed that by buying some VHB double sided foam tape, and setting it on the back of the badge on top of the existing adhesive. That gave me some wiggle room for the contour, and it's been rock solid since then.
Edit: Some MSPAINT diagrams to explain, hopefully.
Here's where the pins are in relation to the KIA logo. Mark them off on the badge so you know where to stop sawing.
View attachment 13479
Saw towards the pins with fishing line, push the wedges in as you saw. When you're done sawing and wedging, it will look like this.
View attachment 13480
Now, you're not done. I think this is where people are messing up. If you peel it here, there's a TON of adhesive left! Either use another wedge, or rotate the left and right wedge to cut out the sections below.
View attachment 13481
Once you're here, peel very, very slowly. I put my fingers behind the wedges and just applied pressure to them until the badge lifted.
That should do it. Now get the adhesive off, that's the fun part...
I used an old store gift card and pushed it down in the space between the pins to break the bond. I agree - don't use heat. It seems from everything I've read to loosen the paint as well.....
Madman
Active Member
Ouch....To be completely honest I used a heat gun on the front and the front being a polymer bumper could have definitely contributed to my paint peeling issue. But in my defense I come from old Japanese cars where most of the badges were mounted on metal and I did not think that the bumper would overheat
From interior to exterior to high performance - everything you need for your Stinger awaits you...
Kia Stinger
5000 Posts Club!
We now have a very easy solution for updating your badges... At least for those who like the Vintage K design: Brand New Item! Vintage K Metal Skin Overlays


 Props to


