Some people may have come across my thread about the ADD W1 Dual Inlet (v3.3) check valves failing, which led to a vacuum leak, if not you can find that thread here: Vacuum Leak? Check your catch can
I reached out to ADD W1 support on 6/3 and was told that perhaps the valve was defective and that they would send out a replacement. As of today, 6/14 I haven't received the replacement. Now, this isn't a thread to bash ADD W1, i've used their catch cans in previous vehicles with no issues.
However, when the check valves blew and causing me to go on a wild goose chase for the vacuum leak, I couldn't help but think that the check valves are the weak leak. They're aluminum, so they're light, but the check bearing open and close with little pressure. I took that to mean that when you introduce boost into the equation, they were simply overwhelmed.
Now let's put things in context, I do have a JB4 and when the check valves failed I was on the dyno. So that means that I am running more boost and the check valves were under high stress during dyno testing. Perhaps I found the weak link on that day, perhaps the valves were just defective, or maybe the valves just weren’t designed to be used in a modified environment.
Regardless, I managed to dodge a bullet because when the bearings let loose, it could've resulted in catastrophic engine failure. Given that I managed to escape once, I did not want to chance it with the possibility that the valves would fail again and maybe I wouldn't be quite so lucky. So even if ADD W1 had sent the replacement valves, I probably wouldn't have installed them.
I began looking into replacement check valves, which could support oil - this is an important distinction because all check valves cannot. I reached out to a local performance shop, told them about the issue and they recommended a company they use for all of their various valves and fittings, McMaster-Carr.
Now these valves are beefy and unlike the ADD W1 valves, which open at about 0.1psi, they do not open until 1psi (i.e. you're in boost and this is the time you want to prevent that oil blow-by).
I ended up going with McMaster-Carr product 7768K53 (Compact Backflow-Prevention Valve for Oil and Fuel, 3/8 NPT Female x 3/8 NPT Female), which were $19.99/each. They have a max operating pressure of 500 psi...if I blow these then I have larger issues.
Keeping inline with my desire to make this the last time I address this problem, I decided in addition to upgrading the check valves, I would also change out all the plumbing to AN braided lines instead of the rubber stuff that comes with the ADD W1.
Why AN? Because they provide a leakproof seal. Granted, nothing was technically wrong with the hoses and clamps provided by ADD W1 but AN is the way to go if you really want to do things once.
ADD W1 offers AN fittings on their site, -10AN and -8AN. For the 3.3TT we technically need -8AN and -6AN given the hose diameter for the ADD W1 catch can. Why didn't I order these fittings from elsewhere? Simple, the ADD W1 can does not take the standard 3/8" fitting or an ORB (o-ring boss) fitting, and they're certainly not an AN fitting. How do I know? Because I spun my wheels on several fittings before heading over to the ADD W1 website.
I figured i'd order four -8AN fittings and once they arrive i'll just use an -8AN to -6AN reducer, which should work fine. While I was ordering, I figured i'd opt for the oil drain valve since who wants to unmount the can each time it needs to be drained??
Naturally, you'll also need the appropriate -8AN and -6AN braided hoses and fittings are well, but you can source these from Amazon, Jegs, or Summit Racing.
The ADD W1 AN fittings arrive and to my dismay, they were loose. They did not fit the catch can snugly.
I pull out the digital caliper and now I see the difference.
The fittings the come with the ADD W1 are 16MM


The AN fittings on the ADD W1 site are about 15.6MM which is just enough for them not to fit snugly and while you could use teflon tape to try to take up the slack, they simply would not torque down to provide an airtight seal, which defeats the purpose of this project if that critical part — eliminating possible vacuum leaks — couldn't be done.
The -8AN to -6AN reducer is on one of the fittings just so you could see it


Armed with this information, I went off to find -8AN to 16MM (Russell 670550) and -6AN to 16MM (Russell 670530) fittings, which I found on Summit Racing, which should fit plenty snug


Prior to install, I used some Vibra-TITE on the threads. I prefer Vibra-TITE to Loctite for several reasons, but chiefly because with Vibra-TITE you can reposition the bolt without needing to reapply and the application is seamless unlike Loctite which just drips all over the place. Apply Vibra-TITE to the threads, it becomes dry to the touch in about a minute, and it's ready to install after 10 minutes.
If you're in a bind, Loctite would do, but use 242 blue as opposed to the permanent red.


Here are the McMaster-Carr check valves with the 3/8 NPT to -8AN Russell fittings attached to -8AN hoses that I made.

Here you can see the two -8AN to 16MM fittings leading to the -8AN hoses and the -6AN to 16MM fitting leading to the -6AN hose

Used an AN hose separator to keep everything tidy

-8AN hose finisher going to the intake (it just looks cleaner than a spring or worm clamp)

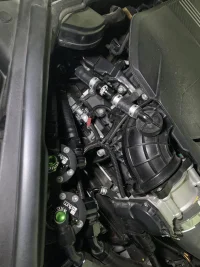
We're all buttoned up

Lastly, you see the rubber drain hose. I can quickly get a cup underneath and flip the valve to drain the oil from the can.

I would strongly recommend, at a bare minimum, upgrading your check valves. You don’t have to go full on with AN fittings and braided hoses like I did, it’s overkill for this application...but it does look nice.
You can simply get the McMaster-Carr check valves and four 3/8 NPT to 1/2” barbs to swap out the ADD W1 check valves and not touch anything else to achieve the same result without the AN hoses and fittings. I would also opt for some spring clips or solid worm clamps just for peace of mind.
I reached out to ADD W1 support on 6/3 and was told that perhaps the valve was defective and that they would send out a replacement. As of today, 6/14 I haven't received the replacement. Now, this isn't a thread to bash ADD W1, i've used their catch cans in previous vehicles with no issues.
However, when the check valves blew and causing me to go on a wild goose chase for the vacuum leak, I couldn't help but think that the check valves are the weak leak. They're aluminum, so they're light, but the check bearing open and close with little pressure. I took that to mean that when you introduce boost into the equation, they were simply overwhelmed.
Now let's put things in context, I do have a JB4 and when the check valves failed I was on the dyno. So that means that I am running more boost and the check valves were under high stress during dyno testing. Perhaps I found the weak link on that day, perhaps the valves were just defective, or maybe the valves just weren’t designed to be used in a modified environment.
Regardless, I managed to dodge a bullet because when the bearings let loose, it could've resulted in catastrophic engine failure. Given that I managed to escape once, I did not want to chance it with the possibility that the valves would fail again and maybe I wouldn't be quite so lucky. So even if ADD W1 had sent the replacement valves, I probably wouldn't have installed them.
I began looking into replacement check valves, which could support oil - this is an important distinction because all check valves cannot. I reached out to a local performance shop, told them about the issue and they recommended a company they use for all of their various valves and fittings, McMaster-Carr.
Now these valves are beefy and unlike the ADD W1 valves, which open at about 0.1psi, they do not open until 1psi (i.e. you're in boost and this is the time you want to prevent that oil blow-by).
I ended up going with McMaster-Carr product 7768K53 (Compact Backflow-Prevention Valve for Oil and Fuel, 3/8 NPT Female x 3/8 NPT Female), which were $19.99/each. They have a max operating pressure of 500 psi...if I blow these then I have larger issues.
Keeping inline with my desire to make this the last time I address this problem, I decided in addition to upgrading the check valves, I would also change out all the plumbing to AN braided lines instead of the rubber stuff that comes with the ADD W1.
Why AN? Because they provide a leakproof seal. Granted, nothing was technically wrong with the hoses and clamps provided by ADD W1 but AN is the way to go if you really want to do things once.
ADD W1 offers AN fittings on their site, -10AN and -8AN. For the 3.3TT we technically need -8AN and -6AN given the hose diameter for the ADD W1 catch can. Why didn't I order these fittings from elsewhere? Simple, the ADD W1 can does not take the standard 3/8" fitting or an ORB (o-ring boss) fitting, and they're certainly not an AN fitting. How do I know? Because I spun my wheels on several fittings before heading over to the ADD W1 website.
I figured i'd order four -8AN fittings and once they arrive i'll just use an -8AN to -6AN reducer, which should work fine. While I was ordering, I figured i'd opt for the oil drain valve since who wants to unmount the can each time it needs to be drained??
Naturally, you'll also need the appropriate -8AN and -6AN braided hoses and fittings are well, but you can source these from Amazon, Jegs, or Summit Racing.
The ADD W1 AN fittings arrive and to my dismay, they were loose. They did not fit the catch can snugly.
I pull out the digital caliper and now I see the difference.
The fittings the come with the ADD W1 are 16MM
The AN fittings on the ADD W1 site are about 15.6MM which is just enough for them not to fit snugly and while you could use teflon tape to try to take up the slack, they simply would not torque down to provide an airtight seal, which defeats the purpose of this project if that critical part — eliminating possible vacuum leaks — couldn't be done.
The -8AN to -6AN reducer is on one of the fittings just so you could see it
Armed with this information, I went off to find -8AN to 16MM (Russell 670550) and -6AN to 16MM (Russell 670530) fittings, which I found on Summit Racing, which should fit plenty snug
Prior to install, I used some Vibra-TITE on the threads. I prefer Vibra-TITE to Loctite for several reasons, but chiefly because with Vibra-TITE you can reposition the bolt without needing to reapply and the application is seamless unlike Loctite which just drips all over the place. Apply Vibra-TITE to the threads, it becomes dry to the touch in about a minute, and it's ready to install after 10 minutes.
If you're in a bind, Loctite would do, but use 242 blue as opposed to the permanent red.
Here are the McMaster-Carr check valves with the 3/8 NPT to -8AN Russell fittings attached to -8AN hoses that I made.
Here you can see the two -8AN to 16MM fittings leading to the -8AN hoses and the -6AN to 16MM fitting leading to the -6AN hose
Used an AN hose separator to keep everything tidy
-8AN hose finisher going to the intake (it just looks cleaner than a spring or worm clamp)
We're all buttoned up
Lastly, you see the rubber drain hose. I can quickly get a cup underneath and flip the valve to drain the oil from the can.
I would strongly recommend, at a bare minimum, upgrading your check valves. You don’t have to go full on with AN fittings and braided hoses like I did, it’s overkill for this application...but it does look nice.
You can simply get the McMaster-Carr check valves and four 3/8 NPT to 1/2” barbs to swap out the ADD W1 check valves and not touch anything else to achieve the same result without the AN hoses and fittings. I would also opt for some spring clips or solid worm clamps just for peace of mind.
Last edited: