DIY Hatch Rattle Repair

jimdr

Member
Joined
Dec 4, 2017
Messages
32
Reaction score
24
Points
8
Dissatisfied with the prospect of listening to hatch rattle until the rumored April delivery of factory repair kits? A successful DIY fix was undertaken.

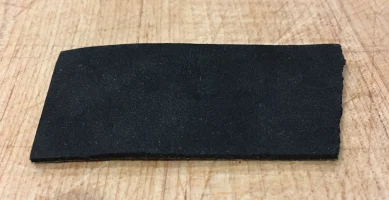
First, some strips of 2 mm thick black rubber foam sheet (see picture below) was taped to the top of the lower hatch bumpers. This cured the rattle and confirmed that some sort of bumper modification could work.

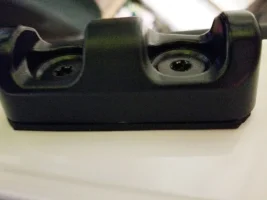
The upper hatch frame bumpers were removed using a TorX 4 screwdriver. This took a lot of force, probably because blue thread lock had been used in assembly.

Inspection of the bumper revealed there was a thin (about 1.5 mm) rubber gasket that did not extend to the edge of the bumper. There were two washers between the bumper and hatch frame for each screw.

A new rubber pad was made with the 2 mm rubber sheet that extended to the edge of the bumper.
The bumper was installed using both the original pad, original washers washers and new pad. The washers were on the bumper side of the new pad. The screws were tightened moderately tight (don't have a torque wrench). With the new pad, the hatch lid popped up slightly when opened.

A test drive in 15 degree weather revealed vast improvement in the rattle! It may have been heard once or twice over a route that previously had 30 rattles. The sheet rubber used was old - I don't know where to buy it.

it seems like dealer service for this would be hastened if they just cut new pads from rubber sheet instead of waiting for the kit.

Jim
pad.webp
 

Attachments

  • upload_2018-1-13_16-37-26.webp
    upload_2018-1-13_16-37-26.webp
    44.8 KB · Views: 180
Dissatisfied with the prospect of listening to hatch rattle until the rumored April delivery of factory repair kits? A successful DIY fix was undertaken.

First, some strips of 2 mm thick black rubber foam sheet (see picture below) was taped to the top of the lower hatch bumpers. This cured the rattle and confirmed that some sort of bumper modification could work.

The upper hatch frame bumpers were removed using a TorX 4 screwdriver. This took a lot of force, probably because blue thread lock had been used in assembly.

Inspection of the bumper revealed there was a thin (about 1.5 mm) rubber gasket that did not extend to the edge of the bumper. There were two washers between the bumper and hatch frame for each screw.

A new rubber pad was made with the 2 mm rubber sheet that extended to the edge of the bumper.
The bumper was installed using both the original pad, original washers washers and new pad. The washers were on the bumper side of the new pad. The screws were tightened moderately tight (don't have a torque wrench). With the new pad, the hatch lid popped up slightly when opened.

A test drive in 15 degree weather revealed vast improvement in the rattle! It may have been heard once or twice over a route that previously had 30 rattles. The sheet rubber used was old - I don't know where to buy it.

it seems like dealer service for this would be hastened if they just cut new pads from rubber sheet instead of waiting for the kit.

Jim

View attachment 2142
Thank you for posting this up, @jimdr! I'm glad to hear this has made such a substantial improvement...
 
After the above, some rattle persisted. A second spacer, this one about 1.5 mm think and made of silicone, was made and installed. So there is the original factory gasket, a DIY spacer 1.5 mm thick of black foam rubber and a second DIY spacer 1.5 mm thick of silicone between the hatch frame and the black bumper. I have not heard the rattle since.
 
______________________________
After the above, some rattle persisted. A second spacer, this one about 1.5 mm think and made of silicone, was made and installed. So there is the original factory gasket, a DIY spacer 1.5 mm thick of black foam rubber and a second DIY spacer 1.5 mm thick of silicone between the hatch frame and the black bumper. I have not heard the rattle since.

Yeah, my dealership ended putting a few washers on mine to stop the rattle.
 
Dissatisfied with the prospect of listening to hatch rattle until the rumored April delivery of factory repair kits? A successful DIY fix was undertaken.

The upper hatch frame bumpers were removed using a TorX 4 screwdriver. This took a lot of force, probably because blue thread lock had been used in assembly.

@jimdr, thank you for posting the DIY instructions!

I don't have Torx tools, so have to buy one. What size is needed?

Eyeballing pics of online products and the fastener on my hatch bumper, it looks like the size might be T40. But I'd rather not guess if you can post the correct size.

Thanks in advance!
 
From interior to exterior to high performance - everything you need for your Stinger awaits you...
Okay, I finally got around to finding a Torx bit to use on my hatch bumpers. As suspected, the proper size is T40.
 
My Dealership told me there is a TSB for this. They're just waiting for the parts to come in.
 
Okay, I finally got around to finding a Torx bit to use on my hatch bumpers. As suspected, the proper size is T40.

Finally got rid of the annoying hatch rattle! :p

Detached the hard plastic bumper on the hatch "door" and inserted 1/8" styrene butadiene rubber (SBR) shims between each bumper and the hatch. I fabricated the shims using SBR with indentation hardness of Shore 60 A, which has a good balance of pliability and compression resistance. Here it is on amazon:
https://www.amazon.com/Styrene-Butadiene-Rubber-Backing-Thickness/dp/B00L8NJW7U/ref=sr_1_1?ie=UTF8&qid=1520819718&sr=8-1&keywords=1/8"+sbr+styrene+60+shore+roll

I used an X-ACTO knife with a sharp new blade to cut the SBR shims to the same shape as the base of the bumpers.

The threaded countersunk bolts that attach the bumpers to the hatch are locked in pretty tight, so I used a cordless electric drill to remove and reinstall the bumpers. The bolts require use of a T40 Torx bit.

Haven't heard the rattle in two days of driving, including a couple of brisk runs on some twisty, bumpy roads that previously made the hatch rattle every few seconds. Also, the hatch now closes with a more solid-sounding "thunk" than it did before.

My Stinger is much more pleasant to drive without constantly hearing the tiresome hatch rattle! :D

Also creates a far better impression when I take friends and family for rides in the new car I've been raving to them about. :rolleyes:

I figure this fix will work at least until KIA comes up with a more effective remedy than the one(s) they have offered so far. :oops:
 
Last edited:
Finally got rid of the annoying hatch rattle! :p

Detached the hard plastic bumper on the hatch "door" and inserted 1/8" styrene butadiene rubber (SBR) shims between each bumper and the hatch. I fabricated the shims using SBR with indentation hardness of Shore 60 A, which has a good balance of pliability and compression resistance. Here it is on amazon:
https://www.amazon.com/Styrene-Butadiene-Rubber-Backing-Thickness/dp/B00L8NJW7U/ref=sr_1_1?ie=UTF8&qid=1520819718&sr=8-1&keywords=1/8"+sbr+styrene+60+shore+roll

I used an X-ACTO knife with a sharp new blade to cut the SBR shims to the same shape as the base of the bumpers.

The threaded countersunk bolts that attach the bumpers to the hatch are locked in pretty tight, so I used a cordless electric drill to remove and reinstall the bumpers. The bolts require use of a T40 Torx bit.

Haven't heard the rattle in two days of driving, including a couple of brisk runs on some twisty, bumpy roads that previously made the hatch rattle every few seconds. Also, the hatch now closes with a more solid-sounding "thunk" than it did before.

My Stinger is much more pleasant to drive without constantly hearing the tiresome hatch rattle! :D

Also creates a far better impression when I take friends and family for rides in the new car I've been raving to them about. :rolleyes:

I figure this fix will work at least until KIA comes up with a more effective remedy than the one(s) they have offered so far. :oops:
Great !! Can you post some pics of them installed ?
Thx !
 
______________________________
From interior to exterior to high performance - everything you need for your Stinger awaits you...
can someone post instructions or a video? very helpful
 
Did you torque them down to a specific tightness,or just until they seemed secure? Been to the dealer twice now, and the rattle persists.

The Shore 60 A SBR is pliable but resists compression. So you can torque the bolts fairly tightly. I set mine just a bit less tight than the factory did.
 
Did you torque them down to a specific tightness,or just until they seemed secure? Been to the dealer twice now, and the rattle persists.
Yeah, I went to the dealer for the fix, too, and the rattle is still there. I may call them again.
 
From interior to exterior to high performance - everything you need for your Stinger awaits you...
I just turned out the two rubber stoppers to spec, an inch, per the TSB and it took care of 98% of the trunk rattle. I then got the replacement part. With the new part the trunk pops loudly when released. Much more pressure on the trunk latch.
 
______________________________
I just turned out the two rubber stoppers to spec, an inch, per the TSB and it took care of 98% of the trunk rattle. I then got the replacement part. With the new part the trunk pops loudly when released. Much more pressure on the trunk latch.
Have you noticed any issue when closing the hatch with the replacement part? I've had mine not seat properly with the latch like once or twice now with just regular pressure when closing it, leading to the trunk release not working until I put my weight on the hatch :(
 
Have you noticed any issue when closing the hatch with the replacement part? I've had mine not seat properly with the latch like once or twice now with just regular pressure when closing it, leading to the trunk release not working until I put my weight on the hatch :(
the kit shouldn't change that look at your stops near the latch maybe screw them in a bit
 
Mine has been fine but I also have the electric hatch so don't ever push I down manually.
 
the kit shouldn't change that look at your stops near the latch maybe screw them in a bit
That did it, they had unscrewed themselves almost halfway. Wonder if adding Teflon tape would keep them in place
 
From interior to exterior to high performance - everything you need for your Stinger awaits you...
Back
Top