Tonkabob
2500 Posts Club!
Any overboost or wondering boost levels with the 400s on ?I ran HFCs for almost a year with no issues. I went catless again had some issues through some 400 cell HFCs back on the other week and no more burning oil.

Any overboost or wondering boost levels with the 400s on ?I ran HFCs for almost a year with no issues. I went catless again had some issues through some 400 cell HFCs back on the other week and no more burning oil.
What is the stock CEL for primaries and secondaries? You said 800 total. 600 and 200?Whew, I haven't written one of these in a while! But as you all know, I had a major setback and this is my second Stinger. Having said that, I've mostly caught up with the basic bolt-ons with one major difference: I've installed LAP3 Primary DPs with HFCs on this one! It's been about 300 miles since, so let's get right into it.
OVERVIEW:
Installing them on your own is entirely possible, but there's not a lot of space to work with. You have to have a sizeable combination of u-joints and socket wrenchs/socket breaker bars, extensions, and patience. From the top, you'll only get the top two bolts: the other two have to be done from the bottom using extensions. You'll want to clear yourself as much space as possible up top to make your life easier. I removed the ECU and bracket and it opens up so much more space for the driver's side. The O2 sensors require the long O2 sensor socket, but be sure to have one with a wide enough opening! The one I had was too narrow of a slit, so I had to borrow one from my exhaust guy that had a much wider slit, and it all went much smoother.
Once you have space you can remove the top two bolts of the heat shield, but leave the bottom one loosened which allows you to spin the heatshield around to give yourself more space. Once you can clearly see the nuts on the studs, STOP. Grab PB Blaster or your favorite nut busting (har har), penetrating lubricant and spray the absolute s**t out of the nuts. Let it drip down the sides to get to the bottom ones. I partially stripped a thread because I didn't let enough PB drip down that side and I was lucky to get it thread tapped just enough to hold!
Now you can just start removing your secondaries while that lubricant soaks around, and the rest from here is actually pretty basic for just about any garage mechanic. Remove bottom O2 sensors, undo nuts, remove DP and take a pic for comparison's sake!
FITMENT:
Fast forward to reversing everything and putting the new one's on is relatively simple if you've gotten this far: the LAP3s are lighter and smaller which means installing them is a heck of a lot easier than factory ones. Bolt that sucker up and you're good to go!... Except there is one QC issue: the weld gets too close to one of the bolt holes and the nut cannot properly clear it for a flat hold on the bracket.
And then you get to putting your secondaries on, and you realize that the LAP3s also don't have a place to mount the support bracket! This is unacceptable to me because that means the entire exhaust assembly is now pulling on your turbo during acceleration, and when you're making more power than stock, it's pulling that much harder. So I went to my exhaust guy, and had him do this:
Ah, much more peace of mind! I refused to get on the gas until I had those brackets in place because I already have one stud holding on by 2.5 threads and another nut that doesn't sit flush. I'm weird like that.
SOUND/PERFORMANCE:
The first thing that you'll notice is that you can hear your turbos much more. At low throttle positions, it sounds a bit like a turbo on a diesel, and then as you climb past 1500RPMs, you start to hear the whooshing from the intake. The engine itself sounds louder, and the exhaust has more growl to it, but the power increase is nominal. It feels like a wider power band is all, rather than a real increase in overall power. That is until I switched my LAP3 Pro V2 from stock to Mode 2, but more on that in a separate review of the V2 chip coming up!
Last but not least: you see all that heat shielding on the factory DPs? That's there for a reason. With these, I find my underhood to be significantly hotter. If you can afford to ceramic coat the primaries before installation, I would recommend it. When driving and then popping the hood, there's no difference since there's airflow, but sitting around in slow traffic or low motion meant not only could I literally see the distortion of heat waves from my hood and the gap around it, but my fender was warm to the touch! The heat blast from opening the hood was quite a shocker, too. Not that the factory DPs can't eventually saturate to the same temps, but there's definitely an increase in heat underhood from the LAP3 DPs' lack of heat shielding. Keep this in mind: your underhood temps in low mobility driving are going to go up, and heat shielding your intake is really the most cost-effective way to combat the effect this has.
BUT WAIT, THERE'S MORE!
I was going to go with ARK secondaries, but the backorder took too long and I gave up and cancelled it. To that end, it actually worked out in my favor: I talked to the same guy that custom made my first Stinger's set and asked if the same cats from the LAP3 primaries could also be fitted onto secondaries and clear everything. He said, "why not?" as he looked at the secondaries, so I went ahead and ordered all the bends and two more of the same HFCs that are on the LAP3 primaries.
Et voila!
I am now one of the likely very small few with both primary and secondaries with cats. I did tell him I wished he had more of a chicane on the S bend rather than two 90s, but considering how much reduction in flow restriction I've accomplished, it's likely negligible if not a non-existent restriction compared to how open everything else is, now.
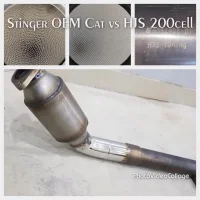
The total cell count is 400 cell per side as opposed to the ~800 cell per side from the factory, but I think it's worth having that safety ceiling in flow to reduce wear on my turbos. Despite a wastegate and computerized things, something about the lack of backpressure is surely causing premature wear and oil to spray out of the turbos. It really shouldn't, all things considered, as long as we're within the operational parameters of the turbos even if we're dangerously on the high end, but... I do want my turbos to last beyond 30k.It really could just be "too much boost", though...
With the secondaries in place, my exhaust at mid throttle is ridiculously loud, but at full throttle, sounds borderline V6 supercar-ish in a tunnel. If you want quiet cruising but some good WOT sound, then a catted turbo-back seems to be the way to go. Keep in mind that the Magnaflow exhaust is straight-through perforated core mufflers, not chambered. This is as much flow as possible while being catted: the only thing that would flow more is just straight pipes everywhere.
I can't say I'm disappointed with my full turbo-back setup, not in the least.
EDIT: Added more info that I forgot about (it's been 300 miles since I installed them!) and typos.
Any overboost or wondering boost levels with the 400s on ?
Oil burn from the turbos. 400 Cel not enough back pressure for the seal. But it seems hit and miss. Not many issues on HFC yet, but doubt you make it 30K.
Probably WOT but either way you would notice the oil usage. The 200 CEL may be enough back pressure.I've had my catless primaries and HJS 200cel on the JUN secondaries for over a year now. No signs of smoke so far, maybe I am not looking at correctly. Is the smoke during Idle, or WOT?
Probably WOT but either way you would notice the oil usage. The 200 CEL may be enough back pressure.
Go pro? Tripod?

@ZyroXZ2 - how's the Stinger running? Still going strong, smoke free?
What is the stock CEL for primaries and secondaries? You said 800 total. 600 and 200?
Well, I DID just get my GoPro in the mail last week and mounted it to the steering column for a test speedo vid, lol... SO MAYBE something soon
Haven't noticed any loss of oil (I'm not really staring out the back when I'm moving forward so quickly) as I've checked my oil levels weekly.
If I had to guess, they're probably closer to 500-300. The factory secondaries look too densely packed to be 200 cell, and the primary ones are too small to be a 600 cell. Without actually counting, I'm estimating a total 800 cell count which is pretty common on factory vehicles to meet emissions standards.
")

The bracket that you had your exhaust guy weld on. What did you use for the part that is welded to the flange with a bolt? Like where did you get that bracket?Whew, I haven't written one of these in a while! But as you all know, I had a major setback and this is my second Stinger. Having said that, I've mostly caught up with the basic bolt-ons with one major difference: I've installed LAP3 Primary DPs with HFCs on this one! It's been about 300 miles since, so let's get right into it.
OVERVIEW:
Installing them on your own is entirely possible, but there's not a lot of space to work with. You have to have a sizeable combination of u-joints and socket wrenchs/socket breaker bars, extensions, and patience. From the top, you'll only get the top two bolts: the other two have to be done from the bottom using extensions. You'll want to clear yourself as much space as possible up top to make your life easier. I removed the ECU and bracket and it opens up so much more space for the driver's side. The O2 sensors require the long O2 sensor socket, but be sure to have one with a wide enough opening! The one I had was too narrow of a slit, so I had to borrow one from my exhaust guy that had a much wider slit, and it all went much smoother.
Once you have space you can remove the top two bolts of the heat shield, but leave the bottom one loosened which allows you to spin the heatshield around to give yourself more space. Once you can clearly see the nuts on the studs, STOP. Grab PB Blaster or your favorite nut busting (har har), penetrating lubricant and spray the absolute s**t out of the nuts. Let it drip down the sides to get to the bottom ones. I partially stripped a thread because I didn't let enough PB drip down that side and I was lucky to get it thread tapped just enough to hold!
Now you can just start removing your secondaries while that lubricant soaks around, and the rest from here is actually pretty basic for just about any garage mechanic. Remove bottom O2 sensors, undo nuts, remove DP and take a pic for comparison's sake!
FITMENT:
Fast forward to reversing everything and putting the new one's on is relatively simple if you've gotten this far: the LAP3s are lighter and smaller which means installing them is a heck of a lot easier than factory ones. Bolt that sucker up and you're good to go!... Except there is one QC issue: the weld gets too close to one of the bolt holes and the nut cannot properly clear it for a flat hold on the bracket.
And then you get to putting your secondaries on, and you realize that the LAP3s also don't have a place to mount the support bracket! This is unacceptable to me because that means the entire exhaust assembly is now pulling on your turbo during acceleration, and when you're making more power than stock, it's pulling that much harder. So I went to my exhaust guy, and had him do this:
Ah, much more peace of mind! I refused to get on the gas until I had those brackets in place because I already have one stud holding on by 2.5 threads and another nut that doesn't sit flush. I'm weird like that.
SOUND/PERFORMANCE:
The first thing that you'll notice is that you can hear your turbos much more. At low throttle positions, it sounds a bit like a turbo on a diesel, and then as you climb past 1500RPMs, you start to hear the whooshing from the intake. The engine itself sounds louder, and the exhaust has more growl to it, but the power increase is nominal. It feels like a wider power band is all, rather than a real increase in overall power. That is until I switched my LAP3 Pro V2 from stock to Mode 2, but more on that in a separate review of the V2 chip coming up!
Last but not least: you see all that heat shielding on the factory DPs? That's there for a reason. With these, I find my underhood to be significantly hotter. If you can afford to ceramic coat the primaries before installation, I would recommend it. When driving and then popping the hood, there's no difference since there's airflow, but sitting around in slow traffic or low motion meant not only could I literally see the distortion of heat waves from my hood and the gap around it, but my fender was warm to the touch! The heat blast from opening the hood was quite a shocker, too. Not that the factory DPs can't eventually saturate to the same temps, but there's definitely an increase in heat underhood from the LAP3 DPs' lack of heat shielding. Keep this in mind: your underhood temps in low mobility driving are going to go up, and heat shielding your intake is really the most cost-effective way to combat the effect this has.
BUT WAIT, THERE'S MORE!
I was going to go with ARK secondaries, but the backorder took too long and I gave up and cancelled it. To that end, it actually worked out in my favor: I talked to the same guy that custom made my first Stinger's set and asked if the same cats from the LAP3 primaries could also be fitted onto secondaries and clear everything. He said, "why not?" as he looked at the secondaries, so I went ahead and ordered all the bends and two more of the same HFCs that are on the LAP3 primaries.
Et voila!
I am now one of the likely very small few with both primary and secondaries with cats. I did tell him I wished he had more of a chicane on the S bend rather than two 90s, but considering how much reduction in flow restriction I've accomplished, it's likely negligible if not a non-existent restriction compared to how open everything else is, now.
The total cell count is 400 cell per side as opposed to the ~800 cell per side from the factory, but I think it's worth having that safety ceiling in flow to reduce wear on my turbos. Despite a wastegate and computerized things, something about the lack of backpressure is surely causing premature wear and oil to spray out of the turbos. It really shouldn't, all things considered, as long as we're within the operational parameters of the turbos even if we're dangerously on the high end, but... I do want my turbos to last beyond 30k.
With the secondaries in place, my exhaust at mid throttle is ridiculously loud, but at full throttle, sounds borderline V6 supercar-ish in a tunnel. If you want quiet cruising but some good WOT sound, then a catted turbo-back seems to be the way to go. Keep in mind that the Magnaflow exhaust is straight-through perforated core mufflers, not chambered. This is as much flow as possible while being catted: the only thing that would flow more is just straight pipes everywhere.
I can't say I'm disappointed with my full turbo-back setup, not in the least.
EDIT: Added more info that I forgot about (it's been 300 miles since I installed them!) and typos.
?That post you qouted is an absolute show
Nothing good is gonna come from that set up...