3.3TT DIY intakes w/Heat shielding drop about 0.2sec off 0-60

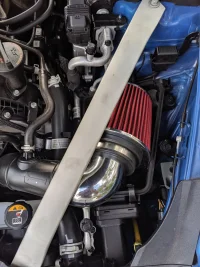
Great thread, looked through this last night and ordered the Spectre intake and rubber elbows - didn't want the chrome piping just based on appearances. Amazon prime is a blessing, got them in this morning. After reading about the potential risk with the filter cap on the inner base, I am considering an AEM filter that is closed - less surface area for the intake to suck in air but I am guessing the practical HP differences will be trivial. For now I'm just going to enjoy my WOOoooosh and PSSsssh sounds, I'm not getting the boost too high on my daily commute anyways.

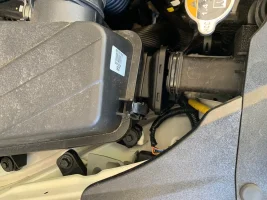
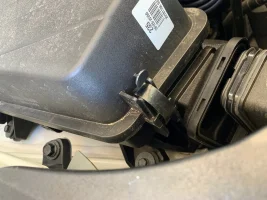
the set up works great but once you put the heatshied in place, you wont have too much room to put the cones , they will pretty much fit one way only. I replied to your other post, I think that is what you are missing on your set up, add another 70CND for the heatshield. I did not think I needed them until I actually had a nice drive when it was 30 outside and the cones were HOT HOT, the heat shield definitely will prevent the heat coming from.
as for changing your cones, I dont fee like our turbos are that powerful that it would rip the cap off ... you should be fine
 
Jut an update on the sensor setup, I've put a prototype of the sensor together and tested it in the house and it seems to be working ok. Just need a nice day and some down time to get out there and figure out a good way to install it to the car. I'll put up some pictures once I have everything together.

After I run some different tests with the sensor placed in the snorkel I will see if I can place it somewhere in the filter to try and give us an idea of how much vacuum the filters are drawing.
 
The stock airboxes are a closed system, with fresh air drawn through the OEM intake tube inlets located on the 'cold' side of the radiator support. When the engine is running, it create a low pressure area in the airboxes, so they are actively drawing through those tubes, even at a standstill. While the design of the plastic intake openings under the rad cover looks restrictive at first glance, its actually of a decent size and should get a reasonable flow - during normal driving and intake demands.

Uncouple/remove the OEM air intake tubes, and all that will accomplish is to draw the heated air directly from the engine compartment.

Wow that’s extremely high IATs.:eek: This was my concern and why I didnt think shielding would help unless it somewhat sealed the filters off from the rest of the turbos/engine. If hot engine air can still be easily drawn into the filters the shielding is mostly useless.:unsure:
They may look similar but they aren’t actually the same type of setup. K&N, BMS, AP, AEM all use shielding to separate the filters from the hot engine air. Their designs create a box barrier that mostly seals off the filters from the rest of the engine bay. Since air follows the path of least resistance the cooler air is drawn from the OEM air inlets and/or from the openings in the front of the car opposed to the hot engine air that is blocked and held behind the shielding box.

That’s one reason I chose to make a soft box barrier with ThrermoTec heat shielding instead. It doesn’t look as good but it does almost completely seal off the filters from the turbos/engine when the hood is closed and only allows the cooler air to be drawn into the filters from the OEM inlets & front of the car.
View attachment 28903 View attachment 28902

@StungBlueGT2 & @Hyperjetta, have you removed the factory snorkels? I bought an extra set of airboxes and did some modifications over the weekend to them thinking it may help, but after looking at the factory design, I'm with @SteveCo on how it works.

The factory airbox is completely sealed all the way from the airbox through to the snorkels. The engine, therefore, pulls air in actively. Air won't actually blow in, like it would with the Velossa Tech scoops installed. I can't see any way that air would actually flow from the factory snorkel into the area where the airbox is, without the entire pathway being completely sealed.

On a side note I did some IAT logging using my OBDII Bluetooth scanner tool for the factory stock airbox. Ambient temp was 109F with 8% humidity. After 10 min of city driving the IAT average was 132F. For speeds over 60 mph, the IAT average was 126F. Max IAT reached was 142F at the end of my 45 minute trip and I was traveling at about 30mph when that occurred.
 

Attachments

  • 3yc8Ydk (2).webp
    3yc8Ydk (2).webp
    162.2 KB · Views: 102
  • Airbox 1.webp
    Airbox 1.webp
    327.4 KB · Views: 104
Last edited:
______________________________
@StungBlueGT2 & @Hyperjetta, have you removed the factory snorkels? I bought an extra set of airboxes and did some modifications over the weekend to them thinking it may help, but after looking at the factory design, I'm with @SteveCo on how it works.

The factory airbox is completely sealed all the way from the airbox through to the snorkels. The engine, therefore, pulls air in actively. Air won't actually blow in, like it would with the Velossa Tech scoops installed. I can't see any way that air would actually flow from the factory snorkel into the area where the airbox is, without the entire pathway being completely sealed.

On a side note I did some IAT logging using my OBDII Bluetooth scanner tool for the factory stock airbox. Ambient temp was 109F with 8% humidity. After 10 min of city driving the IAT average was 132F. For speeds over 60 mph, the IAT average was 126F. Max IAT reached was 142F at the end of my 45 minute trip and I was traveling at about 30mph when that occurred.

Huh. I did not realize the inlets were sealed like that. A couple weeks ago I put the bottom portion of the factory air boxes back in and flipped my cone filters around so they would fit in sorta like the BMS setup. It pulls great and sounds a lot louder for some reason. Once I get some data on temps I will share.
 

Attachments

  • IMG_20190826_165355.webp
    IMG_20190826_165355.webp
    259.2 KB · Views: 143
Huh. I did not realize the inlets were sealed like that. A couple weeks ago I put the bottom portion of the factory air boxes back in and flipped my cone filters around so they would fit in sorta like the BMS setup. It pulls great and sounds a lot louder for some reason. Once I get some data on temps I will share.

How do they fit in there ? I wonder how much heat is not going on top of the cones that way though ...
 
From interior to exterior to high performance - everything you need for your Stinger awaits you...
How do they fit in there ? I wonder how much heat is not going on top of the cones that way though ...
I have mine inverted like that. The fit well enough but I added some foam padding to contact points to avoid rattles and abrasion over time. If the filters are too long, they won't fit, and you need to run the Spectre ABS elbows, the bigger aluminum 90 degree pipes don't work.

The filters still get hot in there. Normal driving I see temps about 30F above ambient, and I made a run at the track where the start of the run was sitting at about 164F, ambient was 68F...

I have a cardboard template made to build some heatshields around the filter on the top of the box and I want to design it to utilize the factory box clips so I don't need to keep removing them. I just need to get around to ordering and picking up the aluminum sheet I need for this. Maybe this weekend. The heatshield and the way I designed it won't do a lot for keeping hot engine bay air from getting to the top of the filter (they're only abou 6" tall and open top) but if "pulling air from the source of least resistance" is a thing, I should be pulling in a little more cold air from the airbox area rather than the filter tops pulling air from the hot engine bay.
 
So
How do they fit in there ? I wonder how much heat is not going on top of the cones that way though ...

I have definitely noticed a drop in IAT vs having the filters in with just the metal shields, but I don't know how much of that is due to the configuration vs the ambient dropping a bit recently. My suspicion is that it is colder in that configuration, but once I get my logger in I'll be able to test it and know for sure.
 
Revvmedia was saying that the cones are hot with the configuration.
with the head shield, I cant touch the cones and do not feel them being hot at all.
 
So I bought an extra set of OEM airboxes off eBay for $125 and decided to modify them by drilling them out and removing the little reducer/mating piece in the front that connects to the snorkel. The idea was that it would open it up quite a bit more and allow more flow. See attached pictures

I also did some IAT logging both before and after the modification on two separate hot days going to and from work (morning was ~85F and afternoon was over 100F). I'm attaching the graphs to show the difference. Overall the modded airbox seemed to perform better with an Average IAT vs Ambient delta being around 19 degrees. For the Stock airbox, the average delta was worse, at 22.5 degrees (IAT vs Ambient).

Highest IAT recorded on the modded airbox was 131F (against a 104F ambient) vs the stock airbox saw 142F (against a 108F ambient)

The two graphs plot time (in seconds) across the bottom, vs speed, IAT, Ambient Temp, and IAT-Ambient Delta. Total commute is about 45 minutes for each plot.
 

Attachments

  • Airbox 2.webp
    Airbox 2.webp
    220.4 KB · Views: 112
  • Airbox 3.webp
    Airbox 3.webp
    316.8 KB · Views: 110
  • Airbox 4.webp
    Airbox 4.webp
    260 KB · Views: 110
  • Modded.webp
    Modded.webp
    70.6 KB · Views: 108
  • Unmodded.webp
    Unmodded.webp
    78.3 KB · Views: 106
Last edited:
Nice work!
Not sure I'm ready to hack up my stock airboxes. I wonder what it would take to booty fab a box out of aluminum or kydex.
 
______________________________
From interior to exterior to high performance - everything you need for your Stinger awaits you...
@StungBlueGT2 & @Hyperjetta, have you removed the factory snorkels? I bought an extra set of airboxes and did some modifications over the weekend to them thinking it may help, but after looking at the factory design, I'm with @SteveCo on how it works.

The factory airbox is completely sealed all the way from the airbox through to the snorkels. The engine, therefore, pulls air in actively. Air won't actually blow in, like it would with the Velossa Tech scoops installed. I can't see any way that air would actually flow from the factory snorkel into the area where the airbox is, without the entire pathway being completely sealed.

On a side note I did some IAT logging using my OBDII Bluetooth scanner tool for the factory stock airbox. Ambient temp was 109F with 8% humidity. After 10 min of city driving the IAT average was 132F. For speeds over 60 mph, the IAT average was 126F. Max IAT reached was 142F at the end of my 45 minute trip and I was traveling at about 30mph when that occurred.
No I haven’t removed the snorkels yet but thanks for the pictures as I now see that would help even more for drawing cool air from outside the engine bay.:thumbup: 
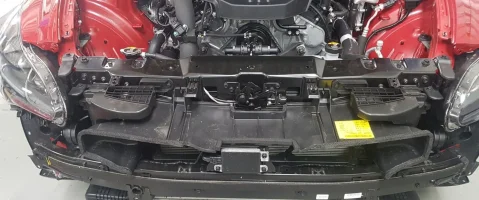
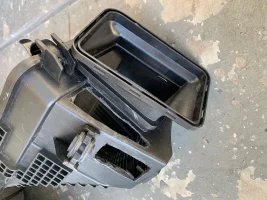
I knew the OEM airboxes were restrictive due to the tiny ~1”x2” air inlets, but didn’t realize how oddly shaped the snorkels were. I’ll definitely remove the snorkels to maximize the effectiveness of my intakes as soon as I get a chance.

However, I knew air wouldn’t blow in or have a ram-air effect and mostly agree with steveco’s assessment on how the intakes work. A completely sealed unit would draw all its air from the OEM air inlets & snorkels. But that principle would still be in effect with all the intake systems I listed, including mine. Since they all make a barrier between the filters and the engine they all will draw the air from the areas of least resistance. They will create a vacuum effect, and pull air from the front of the car & the OEM air inlets since the air in the engine bay is being blocked by the barriers. I agree it won’t be 100% from the snorkels like in the stock airboxes, but all the additional air from open filters will be drawn from the path of least resistance, or in these cases the front of the car.

Also thank you for proving that the sealed stock intakes don’t really help keep IAT lower as your results are similar to everyone I know with intakes & true heat shielding barriers.:thumbup: Most people average 20-30 degrees over ambient temps at idle and low speeds, 15-20 at higher speeds and 30-40 max temps sitting for extended periods of time. They are all within a few degrees of the stock airboxes so the benefits of all the additional airflow are much better than the few degrees cooler air from the sealed unit. Awesome to see that in hard data and appreciate your hard work helping clear the air, so to speak.:D
 
I finally got around to pulling my bumper and taking a look at those snorkels. I took some rough measurements and found the inlets to be ~10.5 cm x 4.5 cm. This comes out to an opening area of ~47.25 cm^2 which is a tad bit higher than the opening area of the 3" diameter piping (pi*(38.1 cm * 38.1 cm) = 45.6 cm^2).

So, unless I'm not accounting for something the stock snorkels aren't really a bottleneck unless we upgrade our piping to something bigger than 3".
 
Just an fyi, I did DIY and retained the lower half of the original air box. I am seeing on average 20-30 degrees above ambient when not moving and right at 5 degrees above ambient when moving.
 
Just an fyi, I did DIY and retained the lower half of the original air box. I am seeing on average 20-30 degrees above ambient when not moving and right at 5 degrees above ambient when moving.

I did the same (filters sitting in the lower half of the box). I'm "mostly done" making some custom heat shields with no lid out of 16 gauge galvanized sheet steel, I'll post up pics when I am done, maybe this weekend. I'm designing the shields with "retainers" on the side so I can use the factory clips to hold it down, but more importantly not constantly removing and putting the clips back on when changing from the factory lid to the open filter style, I'm sure something will break over time doing that.
 
I finally finished (except cosmetic) the heatshields that allow me to run the elbows and cone filters in the lower half of the factory airbox. I also installed some retainers so I can use the factory clips to hold down the heatshield and also so I don't need to keep taking the clips off when running the filters this way. Swapping back to stock is as simple as removing the braces, unclipping, unscrewing the elbows and then putting the factory lids back on.

These shields are made from 22 gauge galvanized sheet steel. I cut it with metal shears (that wasn't super easy), which was cut to the shape of a template I made with cardboard (cereal box to be specific). I bent the corners to match the box shape. I then made the retainers by cutting strips of the sheet steel and bending a 90 degree bend in them, then "curling" up the end for the clips to grab onto. To install the retainers, I lined everything up, used a punch so I could get a pilot hole started with a small drill bit, then finished with a larger drill bit, same process for both the retainers and heatshields. The retainers are held on with 1/8" diameter x 1/2" long screws with split lock washers and nuts. Since the steel is thin, it's easy to re-bend to get everything the way you want. I plan to finish it up over winter or in spring (if not sooner) by spraying the steel with black plasti-dip since I think a rubber coating helps more with heat rejection than just paint over steel. I added spongy foam tape around the entire perimeter so the steel doesn't cut into anything and it looks a little nicer.

I haven't tested temps yet, but the intakes sound less loud (I wish that wasn't the case), so there is some isolation going on.

Driver Side Shield.webp Passenger Side Shield.webp Installed Shields.webp
 
From interior to exterior to high performance - everything you need for your Stinger awaits you...
I finally finished (except cosmetic) the heatshields that allow me to run the elbows and cone filters in the lower half of the factory airbox. I also installed some retainers so I can use the factory clips to hold down the heatshield and also so I don't need to keep taking the clips off when running the filters this way. Swapping back to stock is as simple as removing the braces, unclipping, unscrewing the elbows and then putting the factory lids back on.

These shields are made from 22 gauge galvanized sheet steel. I cut it with metal shears (that wasn't super easy), which was cut to the shape of a template I made with cardboard (cereal box to be specific). I bent the corners to match the box shape. I then made the retainers by cutting strips of the sheet steel and bending a 90 degree bend in them, then "curling" up the end for the clips to grab onto. To install the retainers, I lined everything up, used a punch so I could get a pilot hole started with a small drill bit, then finished with a larger drill bit, same process for both the retainers and heatshields. The retainers are held on with 1/8" diameter x 1/2" long screws with split lock washers and nuts. Since the steel is thin, it's easy to re-bend to get everything the way you want. I plan to finish it up over winter or in spring (if not sooner) by spraying the steel with black plasti-dip since I think a rubber coating helps more with heat rejection than just paint over steel. I added spongy foam tape around the entire perimeter so the steel doesn't cut into anything and it looks a little nicer.

I haven't tested temps yet, but the intakes sound less loud (I wish that wasn't the case), so there is some isolation going on.

View attachment 30816 View attachment 30817 View attachment 30818
Great job and look forward to seeing the IAT results and performance improvements over non shielded versions.:thumbup:
 
______________________________
I finally finished (except cosmetic) the heatshields that allow me to run the elbows and cone filters in the lower half of the factory airbox. I also installed some retainers so I can use the factory clips to hold down the heatshield and also so I don't need to keep taking the clips off when running the filters this way. Swapping back to stock is as simple as removing the braces, unclipping, unscrewing the elbows and then putting the factory lids back on.

These shields are made from 22 gauge galvanized sheet steel. I cut it with metal shears (that wasn't super easy), which was cut to the shape of a template I made with cardboard (cereal box to be specific). I bent the corners to match the box shape. I then made the retainers by cutting strips of the sheet steel and bending a 90 degree bend in them, then "curling" up the end for the clips to grab onto. To install the retainers, I lined everything up, used a punch so I could get a pilot hole started with a small drill bit, then finished with a larger drill bit, same process for both the retainers and heatshields. The retainers are held on with 1/8" diameter x 1/2" long screws with split lock washers and nuts. Since the steel is thin, it's easy to re-bend to get everything the way you want. I plan to finish it up over winter or in spring (if not sooner) by spraying the steel with black plasti-dip since I think a rubber coating helps more with heat rejection than just paint over steel. I added spongy foam tape around the entire perimeter so the steel doesn't cut into anything and it looks a little nicer.

I haven't tested temps yet, but the intakes sound less loud (I wish that wasn't the case), so there is some isolation going on.

View attachment 30816 View attachment 30817 View attachment 30818

I did something very similar and have been really happy with the results. I used 6"×18" sheet aluminum from Home Depot to make the shields and added a heat barrier material on the side that faces the engine. I also wrapped the cross braces with that material because they stay pretty hot after running for a while and they are close to the filter. I know it's not the greatest looking but those cross braces are not hot at all anymore.

20190911_213508.webp 20190911_213559.webp 20190911_213525.webp 20190911_214057.webp
 
I did something very similar and have been really happy with the results. I used 6"×18" sheet aluminum from Home Depot to make the shields and added a heat barrier material on the side that faces the engine. I also wrapped the cross braces with that material because they stay pretty hot after running for a while and they are close to the filter. I know it's not the greatest looking but those cross braces are not hot at all anymore.

View attachment 30947 View attachment 30948 View attachment 30949 View attachment 30950

I had looked at that aluminum but it didn't have much rigidity compared to the 22ga steel I bought. Because of how mine is constructed, I thought I would need some strength in it, especially with the retainers I installed to use the factory lower box clips. I assume yours is working well. I really wanted to design something that can allow me to not have to remove those clips from the lower box as I was concerned taking them off and reinstalling them will eventually break something over time. I can't imagine my shields do any less heat blockage than the BMS heat shields.

Have you tested IAT? I haven't done any thorough testing but my preliminary checks (immediately after a low traffic volume drive - park and then check temperatures) aren't showing much lower than with out the shields. I'm thinking phase 2 might involve a partial lid for mine since I'm sure there is hot air seeping into the box from the top, but I don't want a full lid since I don't want any impedance on air volume, and I still want my turbo whooshes.

When I had the hood open and was trying to feel the air temp difference between the bay and the boxes, the boxes did feel cooler than the radiant heat near the turbos (obviously), but I felt heat dissipating from the hood, almost as if the hood liner/blanket is absorbing and dispersing heat? Very odd...
 
I did something very similar and have been really happy with the results. I used 6"×18" sheet aluminum from Home Depot to make the shields and added a heat barrier material on the side that faces the engine. I also wrapped the cross braces with that material because they stay pretty hot after running for a while and they are close to the filter. I know it's not the greatest looking but those cross braces are not hot at all anymore.

View attachment 30947 View attachment 30948 View attachment 30949 View attachment 30950

Very nice work! I just installed my filters last night into the lower half of the boxes like you. Mine are held down by the cross braces but it looks like yours are strapped down to the box? How are the heat shields attached? To the lower box as well?
 
I had looked at that aluminum but it didn't have much rigidity compared to the 22ga steel I bought. Because of how mine is constructed, I thought I would need some strength in it, especially with the retainers I installed to use the factory lower box clips. I assume yours is working well. I really wanted to design something that can allow me to not have to remove those clips from the lower box as I was concerned taking them off and reinstalling them will eventually break something over time. I can't imagine my shields do any less heat blockage than the BMS heat shields.

Have you tested IAT? I haven't done any thorough testing but my preliminary checks (immediately after a low traffic volume drive - park and then check temperatures) aren't showing much lower than with out the shields. I'm thinking phase 2 might involve a partial lid for mine since I'm sure there is hot air seeping into the box from the top, but I don't want a full lid since I don't want any impedance on air volume, and I still want my turbo whooshes.

When I had the hood open and was trying to feel the air temp difference between the bay and the boxes, the boxes did feel cooler than the radiant heat near the turbos (obviously), but I felt heat dissipating from the hood, almost as if the hood liner/blanket is absorbing and dispersing heat? Very odd...

Yeah once I folded over the edges of the aluminium and started shaping it became rigid enough. I haven't done IAT testing with/without shields but I don't really see a difference between it now compared to OEM. If anything there may be an snall increase in IAT while not moving but none at 30 mph+. Look into the heat barrier material, it's not expensive and I think it helps especially on that cross brace.
 
From interior to exterior to high performance - everything you need for your Stinger awaits you...
Back
Top