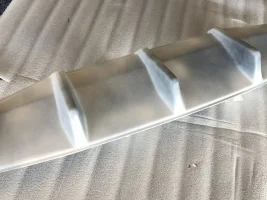
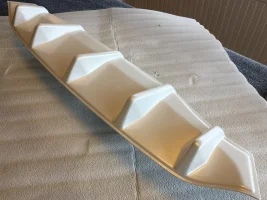
I painted my M&S rear Diffuser ......................

westcoastGT

5000 Posts Club!
Joined
Sep 29, 2017
Messages
7,224
Reaction score
3,157
Points
118
Location
Vancouver , Canada
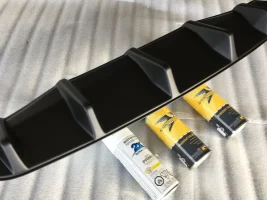
So after getting quotes up to $ 300 to paint my difusser I decided to research the "rattle can " process and do it myself . I ordered my OEM color from Microfinish , which incuded a 12 oz can of color coat and a 12 oz can of clear coat , cost was about $50 . I washed the part with dish detergent to remove any possible oil or grease then dried and cleaned it thoroughly with paint thinner . I dried it with a hairdyer and wiped all lint dust etc with a new micro fiber towel . I laid down 3 coats of primer , then 3 color coats followed by 3 coats of clear . The color and pearl finish is perfect . I'm going to leave it for a couple of days then wet sand and polish before applying the piece to the car . All paint and prep materials $65.................here's a few pics and I'll follow up with the finished job and install pics later . Cheers
paint1.webp paint2.webp paint3.webp paint4.webp
 
Looks good, I've done a lot of rattle paint jobs in my day and I've always found that as long as you're patient, have the right room temperature and apply in thin coats, it usually works out.
 
Looks good, I've done a lot of rattle paint jobs in my day and I've always found that as long as you're patient, have the right room temperature and apply in thin coats, it usually works out.
Thanks , I'm very happy with the outcome , coverage was excellent , no orange peel , and the color and pearl are spot on , the lustre will pop with a bit of wet sanding , polishing and wax .............I have a small knick in the lower front fascia , thats next on the list .
 
Last edited:
______________________________
So after getting quotes up to $ 300 to paint my difusser I decided to research the "rattle can " process and do it myself . I ordered my OEM color from Microfinish , which incuded a 12 oz can of color coat and a 12 oz can of clear coat , cost was about $50 . I washed the part with dish detergent to remove any possible oil or grease then dried and cleaned it thoroughly with paint thinner . I dried it with a hairdyer and wiped all lint dust etc with a new micro fiber towel . I laid down 3 coats of primer , then 3 color coats followed by 3 coats of clear . The color and pearl finish is perfect . I'm going to leave it for a couple of days then wet sand and polish before applying the piece to the car . All paint and prep materials $65.................here's a few pics and I'll follow up with the finished job and install pics later . Cheers
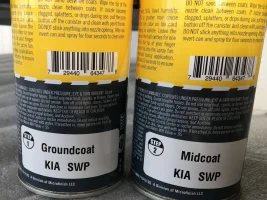
View attachment 18738 View attachment 18739 View attachment 18742 View attachment 18743

Looks great. I will be doing the same thing once my paint arrives. What are you using to attach it to the car? Mine came without any way to attach it.
 
Looks great. I will be doing the same thing once my paint arrives. What are you using to attach it to the car? Mine came without any way to attach it.[/QUOT 3M auto tape is all it needs , I got tape and 4 screws with mine but I'm not going to use the screws , good Luck !~ Light coats is the trick , I'm going to give mine a polish tonite , no wax for at least a month though
 
From interior to exterior to high performance - everything you need for your Stinger awaits you...
final pictures of the project @westcoastGT
I havent applied the piece yet , The weather is great now so in the next bit , also a guy scratched my rear bumper and I claimed it on insurance so its being repainted so I'll get the shop to do the install likely ...............pics will be forthcoming
 
I havent applied the piece yet , The weather is great now so in the next bit , also a guy scratched my rear bumper and I claimed it on insurance so its being repainted so I'll get the shop to do the install likely ...............pics will be forthcoming
Can you send me a picture of the side with the tape? Mine didn't come with any adhesive / 3m tape so I need to do it myself and wanted to see where I should be putting the adhesive / 3m tape.
 
Can you send me a picture of the side with the tape? Mine didn't come with any adhesive / 3m tape so I need to do it myself and wanted to see where I should be putting the adhesive / 3m tape.

+1 , from the pictures the seller sent me, I dont think they added the 3M tape... I'd like to see how it was applied too.
 
Can you send me a picture of the side with the tape? Mine didn't come with any adhesive / 3m tape so I need to do it myself and wanted to see where I should be putting the adhesive / 3m tape.
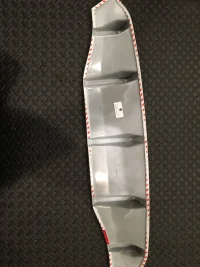
Heres a shot of the tape on the back side . Basically you apply to the entire perimeter , there are 4 vents where the "fins" meet the bottom where there is no contact with the oem part so I did not tape there and it also may act as a drain if any water did get in .....................difusser.webp
 
Last edited:
______________________________
From interior to exterior to high performance - everything you need for your Stinger awaits you...
Heres a shot of the tape on the back side . Basically you apply to the entire perimeter , there are 4 vents where the "fins" meet the bottom where there is no contact with the oem part so I did not tape there and it also may act as a drai if any water did get in .....................View attachment 23504

Thank you very much!
 
+ 1 thank you !!
Cant wait for you final pics !
 
Back
Top