Driver
Member
I've recently installed Dashcams and a UHF 2 way radio in my Stinger.
I thought I'd share some photos of how I got the cabling installed since this seems to be a question that often comes up. This is by no means a complete step by step guide - but hopefully will helps out others out!
First off, this video is a good watch:
- and was great assistance!
However there's a couple of bits I did differently.
Before beginning, buy some plastic automotive pry tools. An assortment is better than the tiny one that might some with a dashcam. Like these: ToolPRO Door Trim Remover Set - 5 Piece
Door Trims:
The rubber door seals will pull off fairly easily. This will give access to a nice gap between the metalwork and side airbag / roof lining and cables can be routed down the side of the car this way.
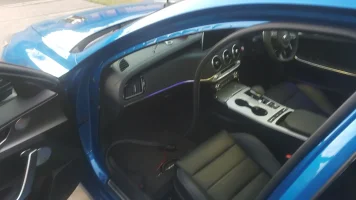
A Pillar:
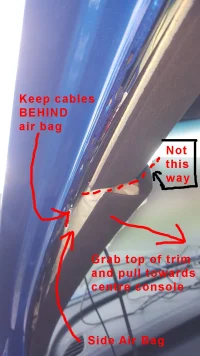
First off, the A Pillar has the side-air bag in it, so it's important to route cables behind the air bag; rather than 'cutting across' the front of it / deployment zone (if you'd call it that)
Remove the A pillar trim by nervously gripping top of the trim and pulling it straight out, towards the centre console. The top clip releases in two stages; firstly to loosen (as pictured); then it can be unclipped but that's not necessary. There's two more clips lower down; but they guide themselves & retention once the trim panel is pushed back in. I believe this is a fairly standard A pillar trim mounting design - as it was identical to how the recent Ford Falcons in Australia did it too.
B Pillar:
No photos - but with both the front & rear door trims pealed back, you can easily get the cable/s between the doors.
Use a Draw Wire:
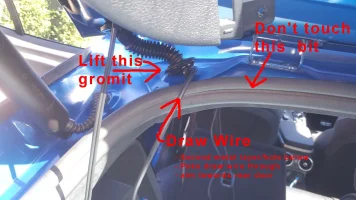
I recommend feeding a draw wire through initially as this will be easier than trying to shove through a very flexible cable with a fragile connector attached. I used a bit of scrap RG6 TV antenna cable for this - flexible but still fairly rigid for navigating any hidden void.
Poke this through first - then tape on your good cable - and you can gently 'draw' it through. Remember you can also attach the good cable from the opposite end; then pull the draw wire backwards too.
Tailgate Trim:
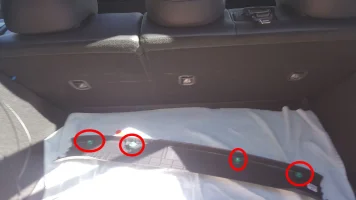
There's four clips holding the centre plastic panel - Pry near these to have them pop out. Be careful with the ends of any trims - they often have hooks to an adjoining panel.
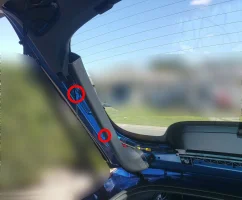
Removing the side tailgate trim also helps gaining access to the cable gromit within the tailgate. The above panel will reveal a screw that holds the side panel - remove this, then there's two more clips holding the panel on:
Cable Gromit:
After a bit of poking around - it turns out I didn't need to lift up the rubber tailgate seal at all!
1. Just peal back the Cable gromit to lift it up.
2. If you stick your finger in, you'll feel an inner hole; within another layer of metal work. The OEM cable loom is also passing through this. Below this inner hole is the roof liner.
3. Poke your draw wire in then aim it towards the rear door.
With the rear door seal pulled back; with any luck - and probably a lot of mucking around - you'll see the end of the draw wire!
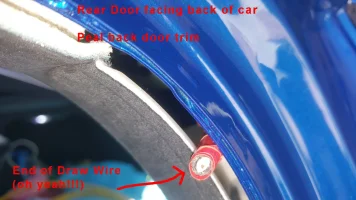
With enough cable slack I believe I've stayed clear of the end of side air bag.
Excess Cable:
Continuing to remove the rear door seal next to the back seat reveals a nice void that I could shove my excess dashcam cable in to.
End of Dashboard:
Back up front; the side panel in the end of the dashboard has clips that look like this:
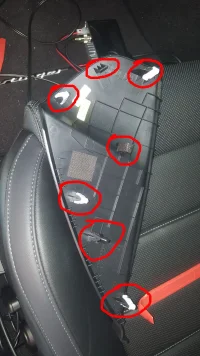
With a pry tool, being mindful of where the actual clips are; it pops off fairly easily to reveal the side of the dash - with the cables I'd routed - that then drop down the back corner of the dash; then along to the fuse panel.
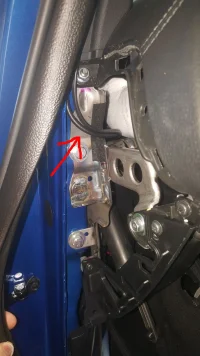
Running Cables from A Piller to Rear View mirror area:
After the cables have come out from under the A Piller; i've just poked them up in to the roof lining next to the windscreen. I also didn't see the point of trying to hide cables inside the OEM trim near the rear-view mirror. Not worth the effort.
The end result of the rear cameras:
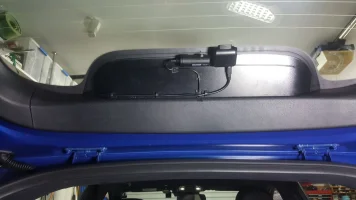
Also beware that centre panel has very little clearance under it. The Blackvue cable - being very thin - fits; but beware of much thicker cables. Unfortunately I notched out a gap for the much thicker Viofo cable only to then discover that there wasn't enough room. Doh! *sigh*
Hope that helps someone!
I thought I'd share some photos of how I got the cabling installed since this seems to be a question that often comes up. This is by no means a complete step by step guide - but hopefully will helps out others out!
First off, this video is a good watch:
However there's a couple of bits I did differently.
Before beginning, buy some plastic automotive pry tools. An assortment is better than the tiny one that might some with a dashcam. Like these: ToolPRO Door Trim Remover Set - 5 Piece
Door Trims:
The rubber door seals will pull off fairly easily. This will give access to a nice gap between the metalwork and side airbag / roof lining and cables can be routed down the side of the car this way.

A Pillar:
First off, the A Pillar has the side-air bag in it, so it's important to route cables behind the air bag; rather than 'cutting across' the front of it / deployment zone (if you'd call it that)
Remove the A pillar trim by nervously gripping top of the trim and pulling it straight out, towards the centre console. The top clip releases in two stages; firstly to loosen (as pictured); then it can be unclipped but that's not necessary. There's two more clips lower down; but they guide themselves & retention once the trim panel is pushed back in. I believe this is a fairly standard A pillar trim mounting design - as it was identical to how the recent Ford Falcons in Australia did it too.

B Pillar:
No photos - but with both the front & rear door trims pealed back, you can easily get the cable/s between the doors.
Use a Draw Wire:
I recommend feeding a draw wire through initially as this will be easier than trying to shove through a very flexible cable with a fragile connector attached. I used a bit of scrap RG6 TV antenna cable for this - flexible but still fairly rigid for navigating any hidden void.
Poke this through first - then tape on your good cable - and you can gently 'draw' it through. Remember you can also attach the good cable from the opposite end; then pull the draw wire backwards too.
Tailgate Trim:
There's four clips holding the centre plastic panel - Pry near these to have them pop out. Be careful with the ends of any trims - they often have hooks to an adjoining panel.

Removing the side tailgate trim also helps gaining access to the cable gromit within the tailgate. The above panel will reveal a screw that holds the side panel - remove this, then there's two more clips holding the panel on:

Cable Gromit:
After a bit of poking around - it turns out I didn't need to lift up the rubber tailgate seal at all!
1. Just peal back the Cable gromit to lift it up.
2. If you stick your finger in, you'll feel an inner hole; within another layer of metal work. The OEM cable loom is also passing through this. Below this inner hole is the roof liner.
3. Poke your draw wire in then aim it towards the rear door.

With the rear door seal pulled back; with any luck - and probably a lot of mucking around - you'll see the end of the draw wire!

With enough cable slack I believe I've stayed clear of the end of side air bag.
Excess Cable:
Continuing to remove the rear door seal next to the back seat reveals a nice void that I could shove my excess dashcam cable in to.
End of Dashboard:
Back up front; the side panel in the end of the dashboard has clips that look like this:

With a pry tool, being mindful of where the actual clips are; it pops off fairly easily to reveal the side of the dash - with the cables I'd routed - that then drop down the back corner of the dash; then along to the fuse panel.

Running Cables from A Piller to Rear View mirror area:
After the cables have come out from under the A Piller; i've just poked them up in to the roof lining next to the windscreen. I also didn't see the point of trying to hide cables inside the OEM trim near the rear-view mirror. Not worth the effort.
The end result of the rear cameras:

Also beware that centre panel has very little clearance under it. The Blackvue cable - being very thin - fits; but beware of much thicker cables. Unfortunately I notched out a gap for the much thicker Viofo cable only to then discover that there wasn't enough room. Doh! *sigh*
Hope that helps someone!
Last edited:


 .
.
