Installed Eibach lowering springs on 2021 GT2 AWD

DrRoboto

Member
Joined
Dec 13, 2024
Messages
40
Reaction score
20
Points
8
I just finished installing the Eibach Pro-Kit lowering springs on my 2021 GT1 AWD. The process was challenging but not as difficult as I expected based on forum comments.

For context, I’ve been modifying and working on cars for 30 years, so I’m comfortable with these kinds of projects. That experience—and having the right tools—was critical, especially for the front springs. I wouldn’t recommend this as a first-time DIY job, but it’s doable if you’re patient and prepared for a long install.

Install Overview

Each spring requires removing about 6–8 bolts/nuts, but as with most car work, that’s the easy part. The real challenge comes from awkward angles, stubborn fasteners, and the complexity of the Stinger’s mechanical assemblies.

Here’s how long each took me:
  • Rear springs: ~2 hours for the first (learning curve), ~1 hour for the second.
  • Front springs: ~2.5 hours for the first, ~1.5 hours for the second.
  • Total time: ~7–8 hours.
I referenced a long forum post (DIY: ARK Performance GT-F Lowering Springs Installation Guide) and compiled all the key info into a single document (see attached). That was immensely helpful. I’ll follow up with more detailed install notes soon.

Final Thoughts

The results are incredible! The front sits noticeably lower—no more "4x4" look—and the car looks how it should have from the factory. The ride is more controlled and predictable. Absolutely love it!

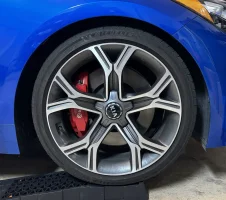
Here are some before-and-after pics with the Eibachs.

Before: 1738433697192.webp After: 1738433671306.webp
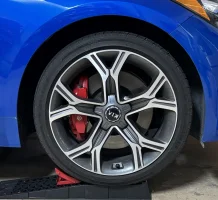
Before (note the big gap in the front):

1738433764631.webp
After (not the best pic, but it just sits tight and low now):

1738433791479.webp
 

Attachments

A few comments on the overall install.
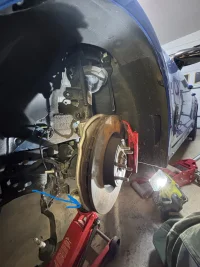
  • Most importantly (especially for the front), you will need two floor jacks. One to lift the car and one to lift the control arm. You can do this all by yourself, but a helper is a nice to have.
  • There are a few times where an extra set of hands to manage the jacking up/down the control arm while you position things is ultra helpful (mostly the front).

Rear:
  • The rear is not that bad at all. I suggest you do that first to get the hang of it.
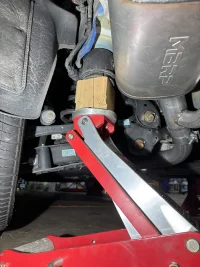
  • I lifted the car and put the back on jack stands. It is not required, but I was also working on my exhaust so it was worth it. I made a special spacer to jack the car because you cannot both jack by the lift point and put a jack stand under it.
1738434832288.webp
  • The thing that I did not expect was that my wheel was stuck on the spindle hub. That was a first in my many years. This was somewhat of an issue for all four wheels. The wheel fits very tightly onto an alignment hub. I had to hit it with a rubber mallet many times before it broke loose. The first wheel I did was the worst, the other needs so hitting, but where much easier.
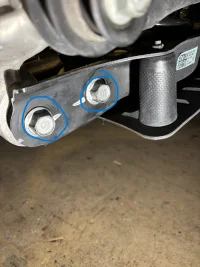
  • There are only about 4 nuts/bolts and a plug you need to remove. It is pretty straight forwarded. You do NOT need to remove the plate/guard under the control arm.
1738434894768.webp 1738434933531.webp
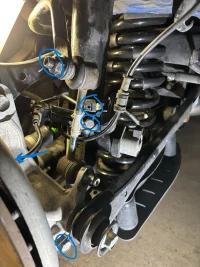
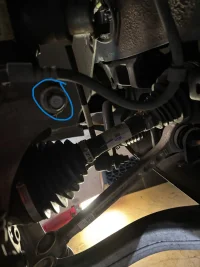
  • Getting the lower control arm bolt out is a bit tricky. The nut comes off easy, however pulling the bolt out takes some work. It has a rubber bushing in the spindle that due to the weight/force of the arm can get it stuck cockeyed. The bolt's threads don't have anything to catch on, so it just spins. This is where some upward lifting force from the second jack is helpful so it does not put force on the bolt. If it does get stuck, you will need to use something to act like a lever to help push the bolt out. I ended up using a couple of crescent wrenches to pry it out.
  • The shock bolt does not have this issue.
  • Getting the spring out does take some finesse, but no spring compressor is needed. The first time I was able to take it out over the control arm, the second time I was able to get it out of the bottom. It is not a big deal.
  • Putting the spring back is easy. NOTE: be sure to align the pigtails on the spring correctly with the rubber spacers.
  • Again, I used a jack to help hold up the control arm assembly and raise and lower things as needed.
  • It takes some work to realign the control arm bolt and spindle. You will need to use something to "align" the holes. I used a 3/8" ratch extension for this. The issue is the rubber bushing allows the spacer in the spindle to be twisted offset.
  • Getting the mounting hole in the shock to line up with the hole in the control arm takes some technique. This is an issue because the shock wants to extend itself and will bottom out in the control arm. That will make the shock mount hole too low. I found that jacking the arm up, releasing it a little, then "timing" shoving the bolt into the hole as the shock slowly extended down. It will make sense when you are trying to do it.
Note, I did not trim the bump stop for the rear. To do that, you need to remove the shock, which requires accessing it from inside the car. I did not want to do this, so just left it as is. I don't think it is a big deal, but for the front you will want to trim it.
 
Last edited:
Front:

The front springs are significantly harder because they are integrated with the front struts. You absolutely need a spring compressor tool to get the stock ones out. I "rented" one from my local AutoZone. However, the AutoZone ones are far from ideal on the Stinger and are designed more for older style cars with plenty of room around the spring. They are very bulky and required a lot of finesse to use them. I had to remove the safety pins to make them work. That said, they do get the job done but be prepared for a few curse words.

Just like the rears, there are only a 4-6 bolts/nuts you need to remove. The hard part is working with the whole strut and spring assemble in a very small space. Again, using a second jack to support the control arm assembly is key.

  • I did not use jack stands on the front. I could not find a simple place like the rear to jack it up and then place the stands. So, I went with one floor jack under the factory lift point. Not my favorite way for safety, but for this work you are never under the car.
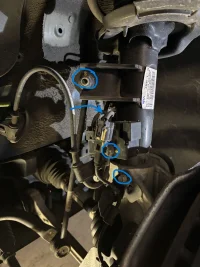
  • The are just a few basic things to remove. The trick to the vertical suspension arm (I forget its name) is to jack up the control arm assemble. DO NOT force it out. Just jack it up a little and wiggle, then it will come out without any force.
1738436299020.webp
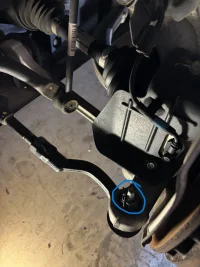
  • Removing the sway bar bolt is easy (don't lose the pin, though technically you are supposed to replace it). The "hard part" here is getting it out. There is a special tool for this, but you can remove it by hitting it. CAUTION: do not just hit it directly with a hammer. I used a "min-sledge" but placed another piece of metal on top of the bolt (actually it was the side of a regular framing hammer). Direct hammer strikes to the bolt run the risk of damaging it because you will need to hit it pretty hard a few times. Once it breaks loose, you will likely need to turn the steering/rotor assembly back and forth to get it to just drop out. DO NOT force it out. Once loose, it will drop out if you get the angle right.
1738436330499.webp

  • Don't forget to remove the bolt that holds the strut in place (it's on the back side). It is in your best interest to remove this bolt and then spray some lubricant into the slot. Later you will need to slide the strut out and it will "stick". The first one I did not use lube, and it was a pain to twist/slide it out. The second one I use some lube and it slid right out.
1738437335145.webp
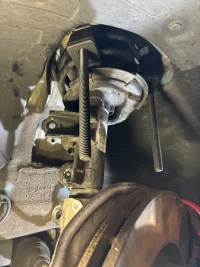
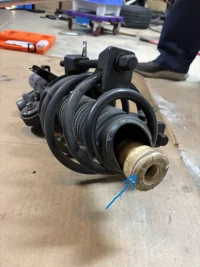
  • Next, the tricky bit with attaching the spring compressor. I don't really know the best technique, but for me, the solution was the following. Slide the "top" of the compressor in. I did it backwards/upside down from the normal way you use it (bolt side up). It will make sense in the next step. You want to go the to the side of the spring that spirals lower. This is a real PITA to get it in there. It will take some struggle, but you can get it in there. Once its up there, there is plenty of space to slide it around to side. Repeat for the second one.
  • I DID NOT compress the spring with the tool itself. I jacked the control arm assembly way up to and just hand tightened the lower bracket. That way the long bolts of the compressor hang down, and you let the floor jack do all the work.
1738437477751.webp
1738437100537.webp
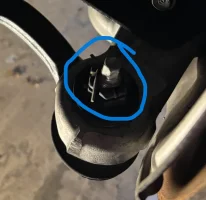
  • Now you need to remove the nut on top of the strut. This can be tricky because the nut is attached to the strut shaft, which can freely spin. On one side, the impact gun took it right off. On the other side, I broke it loose with the impact but then it just spun. I had to use an Allen wrench to turn the shaft while holding the nut with a crescent wrench. Not hard, but annoying. DO NOT remove the "top hat" (the 3 bolts). It is not required, just the strut nut.
  • With the strut nut removed, you just lower the jack down and eventually the strut will slide down out of the top hole, and you are now supporting the strut-spring assembly. You NEED TO put some kind of protective material on your fender. The strut and spring just barely clear the fender by a few millimeters. You will scratch your car if you do not!
  • Just keep slowly lowering the front assembly. It will likely go all the way down and you will have to remove the jack. At this point, it is just the weight of the assembly and strut/spring you are supporting (it's not heavy, just ackward). There will be zero force from the spring because it is being held by the compressor tool.
  • Just tip the strut/shock towards you. You will likely need to push down a little to get it to clear. Depending on how you attached the compressor tool, you may be able to just lift the spring off the strut and remove it.
  • THIS IS THE FUN PART! You now have to slide the strut out of the mount in the spindle. Though the concept is easy, you have practically no room to work with. You want to be careful not to push down to hard and risk bending something or damaging the CV joint. You will likely pop the CV joint out, but it is not that big of a deal. You still need to be careful but relax if it happens (see below). Don't just go bull in china shop on it and you will be fine. Now just slowly and carefully slide/twist the strut up until it comes out.
  • Now just undo the spring compressor and set aside.
  • Do not forget to trim the bump stop by about an inch. I did not do the rears because I didn't remove the shocks.
1738438227062.webp
  • The new springs are shorter and do not need the spring compressor.
  • Now just reverse the process.
  • Putting it all back together is tricky but if you made it this far, then you don't need me to tell you what to do. However, a few things.
  • If you do pop out the CV axle, it is really not a big deal. The passenger side was not an issue for me, but the driver's side it was unavoidable. You will know if it happens because you will not be able to tilt the strut back into place. Just wiggle the wheel hub around and turn it left and right. It will slide back into place. If it is being difficult, then you will need to take the strut back out and realign it. Then try again. Takes some patience, but it will work. I did it first try on the passenger's side, but took several tries on the driver's side.
  • Once you get the strut and spring to tilt back, you are in the home stretch. DO NOT Forget the rubber piece that goes on the top and make sure the pig tail on the bottom is aligned properly.
  • Just jack up the assembly and look down through the strut hole in the engine bay to guide it in the hole (good to have a helper here). Put the nut on and tighten using the Allen wrench and crescent wrench. The torque to spec.
  • Finish reinstalling all the stuff you took off and enjoy!
 
Last edited:
______________________________
Thanks for putting all this info up. Like you, I've been working on cars for 25ish years and these are the kind of posts that make these forums so valuable. Kudos for putting in the time and effort on helping out the community.
 
The only real advantage us RWD folks have is changing the front spring is SUPER easy. You don't even have to remove the strut, just the top hat. :D

Welcome to the drop spring club :cool:
 
From interior to exterior to high performance - everything you need for your Stinger awaits you...
The only real advantage us RWD folks have is changing the front spring is SUPER easy. You don't even have to remove the strut, just the top hat.
I'm gonna argue with those that chose not to remove the entire front strut for swapping out springs. If you are a seasoned shadetree, know what you are doing, and are okay with the risks... by all means. Heck, some folks have even skipped spring compressors and just use a floor jack under the front suspension to SLOWLY lower the strut body - after removing the top nut. Success can be a great deodorant.

Call it old fashioned, or risk adverse, or whatever... I'd rather take my time and take out the front strut assembly, secure the strut with the top pointing in a safe direction, before using spring compressors to take up the enormous stored energy in the coil spring, then AND ONLY THEN remove the top nut to disassemble the strut. This way, I have a wide open view of the whole strut during re-assembly - to make sure the whole thing goes back together properly. I have a pneumatic impact wrench, so the whole process doesn't really take up that much more time, vs. trying to do it with the strut in the cramped confines of the wheel well... where I'd have to stick my head right inside the wheel well next to the spring to check if the top of the spring is seating properly against the perch under the top hat.
  • The new springs are shorter and do not need the spring compressor.
I've done Eibach springs installs on both our Stinger and G70, and spring compressors are definitely needed to reassembly properly. Any MacPherson strut needs a healthy amount of spring preload to guarantee the spring won't relax to the point of moving inside the strut. Besides, the new coil needs to be compressed, while the top strut nut is tightened up. Otherwise, you'd need to count exposed threads on top of the shaft - before and after - to make sure that nut is all the way in and tight.
 
The only real advantage us RWD folks have is changing the front spring is SUPER easy. You don't even have to remove the strut, just the top hat. :D

Welcome to the drop spring club :cool:
yes the fronts on a RWD are ridiculously easy. I did my first one in about an hour and half, and the second in 45 mins since I knew what I was doing. there's a huge spring thread on this and the various methods, I posted my results in there over a year ago.
I'm gonna argue with those that chose not to remove the entire front strut for swapping out springs. If you are a seasoned shadetree, know what you are doing, and are okay with the risks... by all means. Heck, some folks have even skipped spring compressors and just use a floor jack under the front suspension to SLOWLY lower the strut body - after removing the top nut. Success can be a great deodorant.

Call it old fashioned, or risk adverse, or whatever... I'd rather take my time and take out the front strut assembly, secure the strut with the top pointing in a safe direction, before using spring compressors to take up the enormous stored energy in the coil spring, then AND ONLY THEN remove the top nut to disassemble the strut. This way, I have a wide open view of the whole strut during re-assembly - to make sure the whole thing goes back together properly. I have a pneumatic impact wrench, so the whole process doesn't really take up that much more time, vs. trying to do it with the strut in the cramped confines of the wheel well... where I'd have to stick my head right inside the wheel well next to the spring to check if the top of the spring is seating properly against the perch under the top hat.

I've done Eibach springs installs on both our Stinger and G70, and spring compressors are definitely needed to reassembly properly. Any MacPherson strut needs a healthy amount of spring preload to guarantee the spring won't relax to the point of moving inside the strut. Besides, the new coil needs to be compressed, while the top strut nut is tightened up. Otherwise, you'd need to count exposed threads on top of the shaft - before and after - to make sure that nut is all the way in and tight.

I would counterpoint that the jack under the spindle is safer than using spring compressors, since you have the whole weight of the car keeping the other side of the spring from going bonkers on you. if you line up the bottom of a properly made spring, the top should line up pretty easily as well. I just looked through the strut hole from the top to line up the assembly before I pumped the jack back up.

A spring compressor is holding a large amount of potential energy with two little clamps and a bolt. The floor stand spring compressors most shops have are a different story, but for those using the rental tools from the auto parts store or some amazon prime compressors, there's some inherent danger in there as well.
 
Last edited:
I've done Eibach springs installs on both our Stinger and G70, and spring compressors are definitely needed to reassembly properly. Any MacPherson strut needs a healthy amount of spring preload to guarantee the spring won't relax to the point of moving inside the strut. Besides, the new coil needs to be compressed, while the top strut nut is tightened up. Otherwise, you'd need to count exposed threads on top of the shaft - before and after - to make sure that nut is all the way in and tight.

you compress the new spring before tightening the strut nut using the jack as well. otherwise it'd be impossible to get the nut on there.
 
Hopefully I am misunderstanding the comments above.

To be clear, I jacked up the front assemble, installed the pair of spring compressors, removed the strut bolt, then lowered the entire assembly, removed the compressed spring, and then finally removed the strut. There are no safety issues that I observed with that approach. The spring comes right off when you do it that way and you just set it aside, removing the spring compressor with an impact gun. The spring is compressed and held by two compressors. Its not going to just fly off if you installed it correctly, not to mention the redundancy of two. It would have been extra safe if I did not have to remove the safety pins on the spring compressor hooks, but they would not fit up in the car with them on. If this basic processes scares anyone, then you should not be working on cars.

When you reinstall the front, you just jack the assembly back up. Sure, you need to align the strut top to go through the hole, but that is super easy. It does help to have a second person but not required. Once aligned, you just slowly jack it up and through the hole. You absolutely need to ensure that you jack it up high enough that the spring is compressed and the strut bottoms out. Put on the nut and tighten. I cannot see how that is not sufficient.
 
CAUTION: do not just hit it directly with a hammer. I used a "min-sledge" but placed another piece of metal on top of the bolt (actually it was the side of a regular framing hammer). Direct hammer strikes to the bolt run the risk of damaging it because you will need to hit it pretty hard a few times.
Really thorough write-up. On this point about hammering out the bolt, is it threaded all the way to the tip? If so, one old trick to protect the threads is to have a nut threaded on, flush with the end of the bolt, so you're hammering on the side of the nut with the threads protected.

There's a similar trick for cutting bolts (or threadstock) where you thread a nut on (or two if you need something to hold it with) before cutting, then as you unthread it'll act like a die and straighten/deburr any distorted thread end that might keep a nut from engaging.
 
______________________________
From interior to exterior to high performance - everything you need for your Stinger awaits you...
Really thorough write-up. On this point about hammering out the bolt, is it threaded all the way to the tip? If so, one old trick to protect the threads is to have a nut threaded on, flush with the end of the bolt, so you're hammering on the side of the nut with the threads protected.

There's a similar trick for cutting bolts (or threadstock) where you thread a nut on (or two if you need something to hold it with) before cutting, then as you unthread it'll act like a die and straighten/deburr any distorted thread end that might keep a nut from engaging.
Thanks.

It's not threaded all the way up (see pic). Maybe I was being overly cautious, but hammering directly on the end of a bolt never seems to be a good idea in my experience. I would hate to mushroom or damage the head or inadvertently hit the threads or the arm itself. Thanks for the useful advice.

1738869860218.webp
 
Pickle fork, I got lucky mine wiggled off no force needed
 
Pickle fork, I got lucky mine wiggled off no force needed
In This House, We Believe In Improvised Tools. Your options are wood block on the end of the bolt, or deep well socket against a threaded nut.
 
I would counterpoint that the jack under the spindle is safer than using spring compressors, since you have the whole weight of the car keeping the other side of the spring from going bonkers on you. if you line up the bottom of a properly made spring, the top should line up pretty easily as well. I just looked through the strut hole from the top to line up the assembly before I pumped the jack back up.

A spring compressor is holding a large amount of potential energy with two little clamps and a bolt. The floor stand spring compressors most shops have are a different story, but for those using the rental tools from the auto parts store or some amazon prime compressors, there's some inherent danger in there as well.
That is a valid point. There are two separate safety concerns: Tool safety, and method safety.

If I have any doubt as to whether a tool is built safe to use for a given task, I wouldn't use it. In fact, I most likely wouldn't have bought it in the first place. You do not need pro-shop tools in order to work on your cars safely. If that was the case, then shadetree mechanics wouldn't exist in any level of competence.

I do choose my tools rather judiciously, quite often as much as I choose the methods with which I work on my own cars... sometimes more so. The two goes hand-in-hand. I would never compromise the METHOD, simply because I am unwilling to spend $$$ on the proper tools. That was what I was trying to warn against.

At the end of the day, we all make decisions on how we go about our ways... and live with the consequences accordingly.
FWIW, dealing with this is another perfect example. There are pitman arm pullers and tie-rod end removers that are meant for this job specifically. Even a bearing puller (2- or 3-legged) can work quite well. Have I banged on this sort of thing with a hammer - with a threaded-on nut? Yeah... but sooner or later, you find out that there is no substitute for having the right tool for the right job.
 
Back
Top