You are using an out of date browser. It may not display this or other websites correctly.
You should upgrade or use an alternative browser.
You should upgrade or use an alternative browser.
Can this tool make installing rear sway bar easier?
- Thread starter ghodge
- Start date
Rynil2000
Stinger Enthusiast
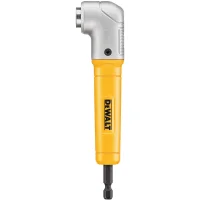
Having done the sway bars this past weekend, I would say that this tool looks like a definite maybe. A few things to worry about here are the height of the space and the depth at which your working. I was using an 18" flex head ratchet with a deep 14 mm socket. The flex head feature wasn't necessary, but the length was. Once the socket was on the nut the ratchet came out past the wheel well just far enough for the handle and a couple inches of shaft. In the Amazon pics, this thing looks kind of beefy so have a plan on how to get a 1/4" adapter onto the end plus a 14 mm socket and still have clearance to maneuver to get on top of the nut. I'm guessing you'll also want something to increase the length of this as well.I have a set of sway bars and am trying prepare as much as possible for that ONE NUT on the driver side. Can anyone that has done the deed comment on the possibility of using the tool below to get a 14mm socket on the nut while the rear suspension is in full droop?:
View attachment 48583
Thanks,
George
Give it a try. I'd love to know the results.
Snowwhite
Sustaining Member
- Joined
- Feb 3, 2020
- Messages
- 1,018
- Reaction score
- 596
- Points
- 118
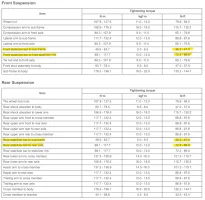
my question would be how much torque that thing can handle. that damn nut is on there tight. at least 40+ lb-ft by my hand's estimate. Space around and above the nut is aIso at a premium.
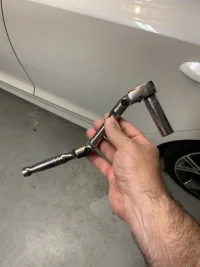
I ended up using a multi-hinged 3/8" wrench, that fully extended, made it to about 11" long. Would life have been easier with the 18" one everyone is saying is required? sure. but for 5 minutes more effort (and cursing) I got it out and back in later without having to buy anything else.
one tip I would recommend: do that bastard FIRST. that way you're at full energy and not tired and frustrated yet. at least to the point you can turn it with your fingers. then do the two endlinks and then the other 3 bolts. the right side bracket nuts are CAKE in comparison to the driver's side. All in it took a little under 2 hours including picking my tools up afterwards.
I also wrapped the bars where the bushings are with teflon tape (I only had plumber's tape, not the yellow gas line stuff.) I didn't use the lube they provided. So far, not a peep from the suspension.
update: here is the wrench I used and the position I used it in:

Last edited:
______________________________
Rynil2000
Stinger Enthusiast
Good guesstimate. Below are the torques spec'd out for suspension components in the service manual:at least 40+ lb-ft by my hand's estimate

I was able to squeeze my 3/8" drive torque wrench onto all but the "one nut", which I just tightened down as best (hard) I could.
Cursing is encouraged in such situations; it shows the car you mean business. I would do the rear bar first as well, because doing the front is so easy that it will be a lovely way to wrap up the job after fighting that rear driver's side nut. For comparison, I used all the supplied lube on the bushings.
Hockster
Stinger Enthusiast
Probably not. It looks to be too large. Just get a swivel head ratchet and a midsize 14mm socket. I ended up removing the fender liner, removed 2 bolts and snipped 1 zip tie on the fuel lines that allowed them to be moved a couple inches. Made it worlds easier to tighten the bolts on the new Eibach mounts.
From interior to exterior to high performance - everything you need for your Stinger awaits you...
Snowwhite
Sustaining Member
- Joined
- Feb 3, 2020
- Messages
- 1,018
- Reaction score
- 596
- Points
- 118
Good guesstimate. Below are the torques spec'd out for suspension components in the service manual:
well, it was tighter than the oil drain plug, but much less than the lug nuts. that'll do.
Cursing is encouraged in such situations; it shows the car you mean business. I would do the rear bar first as well, because doing the front is so easy that it will be a lovely way to wrap up the job after fighting that rear driver's side nut. For comparison, I used all the supplied lube on the bushings.
Agreed. Cursing while the kids aren't around loosens up bolts.
The front was so easy I didn't even bother to take the wheels off- I did it on a set of ramps. I don't like getting under cars that are held up by jack stands. Took a bit longer to get the endlinks off that way, but it was still way less time than the rear. the bracket bolts came off in seconds using an impact driver.
ghodge
Active Member
Thanks everyone,
I picked one of those tools up since I can use it for other jobs. I like Huckster's idea of removing the fender liner, cutting the zip tie and moving the lines a little if it doesn't work. Being in a hot garage loosening and tightening that ONE NUT one click at a time will be very depressing.
George
Snowwhite
Sustaining Member
- Joined
- Feb 3, 2020
- Messages
- 1,018
- Reaction score
- 596
- Points
- 118
Thanks everyone,
I picked one of those tools up since I can use it for other jobs. I like Huckster's idea of removing the fender liner, cutting the zip tie and moving the lines a little if it doesn't work. Being in a hot garage loosening and tightening that ONE NUT one click at a time will be very depressing.
George
you won't have to do the whole process one click at a time. it'll get loose enough to do the rest with your finger after about 1/2-3/4 turn.
ghodge
Active Member
Thanks Snowwhite. Also thanks again for pointing me in the right direction for the ARK bars.
Rynil2000
Stinger Enthusiast
Any reason you went ARK over Eibach?Thanks Snowwhite. Also thanks again for pointing me in the right direction for the ARK bars.
I'm guessing the thicker (+2 mm front and +1 mm rear) bars plus the solid vs tubular in the front is better for the added weight of the AWD.
______________________________
From interior to exterior to high performance - everything you need for your Stinger awaits you...
Snowwhite
Sustaining Member
- Joined
- Feb 3, 2020
- Messages
- 1,018
- Reaction score
- 596
- Points
- 118
Any reason you went ARK over Eibach?
I'm guessing the thicker (+2 mm front and +1 mm rear) bars plus the solid vs tubular in the front is better for the added weight of the AWD.
Mine‘s RWD, but I already had the ARK GT-F springs, so I wanted a matched set. The swaybars are significantly heavier and thicker than the stock units. The front one is massive. The mounting bracket design looked easier to deal with in that damn rear bolt, as well. The increased diameter over the eibachs sealed the decision.
absolutely the best mod I’ve done to date. Those weird suspension movements when the car didn’t seem to know which way to bounce at times are gone. It feels like the structure itself is stiffer, without making the ride any harsher than stock, at least on the roads down here in FL.
Rynil2000
Stinger Enthusiast
Nice. Have to love a matching set.Mine‘s RWD, but I already had the ARK GT-F springs, so I wanted a matched set. The swaybars are significantly heavier and thicker than the stock units. The front one is massive. The mounting bracket design looked easier to deal with in that damn rear bolt, as well. The increased diameter over the eibachs sealed the decision.
absolutely the best mod I’ve done to date. Those weird suspension movements when the car didn’t seem to know which way to bounce at times are gone. It feels like the structure itself is stiffer, without making the ride any harsher than stock, at least on the roads down here in FL.
I totally agree about the improved feel of things. The Eibach’s did the same to settle the back end down and keep the cornering flat. Also got rid of the odd, floaty feeling without hardening the ride much if at all. The stock bars really let the car down.
ghodge
Active Member
I also preferred the mounting bracket design as they didn't have the "walls" that would have made securing the nuts more painful as well as the brackets having holes instead of slots. That makes it easier to ensure both sides are even when bolting down.
ghodge
Active Member
I did the did and installed the ARK Performance sway bars today. What a pain that ONE NUT was. It was actually harder getting back on than getting off. The one tool that made it bearable was actually an old craftsman boxed end 14 mm wrench with the angled head. I used it "upside down" so the part of the wrench I held was underneath the fuel lines. With the other flex ratcheting tools that I had, there wasn't even enough room to get "1-click at a time".
In retrospect, I wish I had tried Huckster's idea of removing the fender liner to be able to move the fuel lines to see which way was better.
Anyway, I have my bars set to "soft" and love it so far. Finally the car feels as good in the turns as my former two ton go kart (Pontiac G8 with sways, springs, shocks/struts). I am so happy.
George
ephone
Member
I used a craftsmen box wrench that has an angle on it to loosen the evil nut. I could barley get enough torque on it, but it worked. My hack that got me through installing the new bar was using a 1/4 inch ratchet with a deep 14 mm socket. I had to put a piece of paper in the socket to hold the nut, then used the socket without the wrench to get it threaded. You can't thread with your bare hand because there's no room. Once I got it threaded and tightened by hand with the socket, I put the ratchet on the socket (one handed) and tightened it. The small 1/4 inch has plenty of room in the cavity and I felt I could get more torque on it than a 3/8 ratchet moving one click a time.
Also, it was said earlier to use a mid sized 14mm for your 3/8 ratchet. That's important, but note, you can't just buy one at Lowes. You might have to order one.
Also, it was said earlier to use a mid sized 14mm for your 3/8 ratchet. That's important, but note, you can't just buy one at Lowes. You might have to order one.
Last edited:
From interior to exterior to high performance - everything you need for your Stinger awaits you...
ghodge
Active Member
I wish I had thought about the small ratchet with a deep 14 mm socket. I also wish I had a short craftsman box wrench with an angle to loosen that ONE NUT. It would have provide more space to turn with out hitting the sides.
______________________________
Hockster
Stinger Enthusiast
Moving the fuel lines made a huge difference for me.
ghodge
Active Member
What you did was next up for me. I don't even think the whole fender liner would have needed to come out. Probably just enough fasteners to bend it down and unbolt the bracket holding the lines.
Hockster
Stinger Enthusiast
I tried that, kept snapping back at my face.
Having done the sway bars this past weekend, I would say that this tool looks like a definite maybe. A few things to worry about here are the height of the space and the depth at which your working. I was using an 18" flex head ratchet with a deep 14 mm socket. The flex head feature wasn't necessary, but the length was. Once the socket was on the nut the ratchet came out past the wheel well just far enough for the handle and a couple inches of shaft. In the Amazon pics, this thing looks kind of beefy so have a plan on how to get a 1/4" adapter onto the end plus a 14 mm socket and still have clearance to maneuver to get on top of the nut. I'm guessing you'll also want something to increase the length of this as well.
Give it a try. I'd
Last edited:
From interior to exterior to high performance - everything you need for your Stinger awaits you...


