Adding VT LIT Snorkels to Gen 3 Ducts

SKStinger

1000 Posts Club!
Joined
Mar 18, 2018
Messages
1,182
Reaction score
863
Points
118
Location
Saskatchewan, Canada
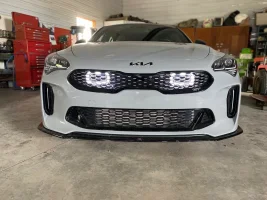
VT says it's not possible to convert their Gen 3 snorkels to use the LIT Flares.

It is. I did it today. Takes a bit of patience but it probably only took me 20 minutes to separate the old flares from the ducts. For anyone like me who had the Gen 3 Snorkels and wants to upgrade to the "LIT" version, this save you from having to shell out for a whole new kit. All you have to purchase is the LIT Flares.

The flares are held on to the duct by adhesive, to remove them:
1. Remove the snorkels from the car.
2. Douse the backside of the seams that hold the flare onto the ducts in Goo-gone and let it soak for 5 minutes.
3. Run a flat edge screw driver back and forth along the seam to loosen the adhesive.
4. Work your way around the duct using your hands to press down on the duct to break the adhesive bond between the duct and the flare.
5. Use a flat-head screw driver to gently pry up the seam on the flare in stubborn spots.
6. Pull off the flare and replace it with the LIT flare. It fits perfectly in place. The screws on the LIT flare may not hold it completely snug so I used a dab of adhesive on top and bottom as a back-up.

Enjoy!
 

Attachments

  • LIT.webp
    LIT.webp
    220.5 KB · Views: 21
Last edited:
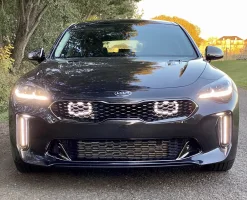
Those look great! I just got a set of lit snorkels but I'm hesitant to put them on this late in the year with winter not too far away.
Thanks! They’re fun to play with and even when they’re off they are more visible than my old flares. They also glow in the dark after you’ve had the LEDs on for a while and shut them off. Cool ghostly green look.

I don’t think winter will hurt them but I don’t know for sure as I store mine over winter.
 
______________________________
That's cool that they glow after shutting down. That will freak out my wife when its in the garage. I also have the CK71 running lights so I'm pretty pumped up for how it will look when its all done
 
Got my Lit Kit installed yesterday. It took longer to re-install the bumper cover and that stupid bottom engine cover. I like the look but I wish it had come with a fuse tap so it would turn on and off with the ignition. Also I wish they could give some instructions on how to route the wires into the cabin so the on/off switch was accessible and you didn't have to open the hood to power it on.
 

Attachments

  • B300344D-14C2-4BE4-A31E-5FE7D2E6DD06_1_201_a.webp
    B300344D-14C2-4BE4-A31E-5FE7D2E6DD06_1_201_a.webp
    477 KB · Views: 8
From interior to exterior to high performance - everything you need for your Stinger awaits you...
Got my Lit Kit installed yesterday. It took longer to re-install the bumper cover and that stupid bottom engine cover. I like the look but I wish it had come with a fuse tap so it would turn on and off with the ignition. Also I wish they could give some instructions on how to route the wires into the cabin so the on/off switch was accessible and you didn't have to open the hood to power it on.
Hahaha i wondered if you'd have the patience to wait until spring to install these. I was going to wait and install mine over the winter but I couldn't wait, they look way too good to not install.

I agree with your feedback, not sure why they don't include a fuse tap. I'll likely change that because it is annoying to have to manually turn them on/off. I'm fine with the switch hidden under the hood if I can tap an ignition fuse.
 
It occurred to me that spring was 7 months from now and that was too long to wait. I want to enjoy my car now. One day I will maybe attempt to push a couple of wires through the OBD grommet to install the switch inside. I might have attempted it yesterday but after my fight with the bumper and the bottom tray my patience was all used up and I was uncertain about disconnecting the ECU harness so I could get my hands down inside beside the brake booster.
 
It occurred to me that spring was 7 months from now and that was too long to wait. I want to enjoy my car now. One day I will maybe attempt to push a couple of wires through the OBD grommet to install the switch inside. I might have attempted it yesterday but after my fight with the bumper and the bottom tray my patience was all used up and I was uncertain about disconnecting the ECU harness so I could get my hands down inside beside the brake booster.

It might be easier to just leave the switch and fuse tap instead? There are several "spare" fuses that may provide switched power.
 
The kit they sent me was the inline fuse type. It's set up to be attached by bolting on to one of the live power studs in the fuse box. to convert it to a fuse tap I would have to cut wire and crimp new connectors on. One day soon I may try to run the existing wires into the cabin. I sent an email to Velossatech asking if you could leave it switched on and they replied that it would take a couple of weeks of not driving before it would drain the battery. I left it switched on last night and I'll see if it starts later today. I turned the lights off with the app so the only thing drawing power would be the Bluetooth connector looking for a connection. I wonder how long the thing lasts? Eventually it would probably burn out if it was left powered but who knows?
 
______________________________
From interior to exterior to high performance - everything you need for your Stinger awaits you...
Looks like in the instructions they want you to tap into the headlight fuse. for the kit I have you would eliminate the switch and the extra ground. I guess the lit flares don't draw a lot of power. Also the advantage of the switched setup is you can turn them on when it's not running like if you were at a car show or something like that. I don't mind the switch but it would definitely be more handy to have it in the cabin under the dash or something so you could power it off without lifting the hood. I never go to shows I think the fuse tap is the best idea for me. I'll pick one up this afternoon and start slicing it up!
 
Looks like in the instructions they want you to tap into the headlight fuse. for the kit I have you would eliminate the switch and the extra ground. I guess the lit flares don't draw a lot of power. Also the advantage of the switched setup is you can turn them on when it's not running like if you were at a car show or something like that. I don't mind the switch but it would definitely be more handy to have it in the cabin under the dash or something so you could power it off without lifting the hood. I never go to shows I think the fuse tap is the best idea for me. I'll pick one up this afternoon and start slicing it up!
What instructions do you have? The ones i have don't talk about tapping a fuse?
 
On the Velossatech website there's two places to get instructions. If you go to the page where you buy the Stinger lit kit and scroll down it will have a link for installation guide. That link shows how to hook up the kit with the inline fuse and the switch. But if you go to the main page and click on the menu in the upper left and scroll all the way down to the bottom there's a link for "instruction manuals" and then it shows a list for every kit that they make. Scroll down to the Kia section and there are two sets of instructions. One for fuse tap and one for inline fuse. I found this by accident when I went to get the instructions to install mine. I was sent the inline fuse version of the kit. Maybe they don't make the kit with the fuse tap anymore? I'm not sure. But I believe that you purchased the lit flares only so maybe you got a different style of wiring setup than I did because I ordered the whole kit.
 
On the Velossatech website there's two places to get instructions. If you go to the page where you buy the Stinger lit kit and scroll down it will have a link for installation guide. That link shows how to hook up the kit with the inline fuse and the switch. But if you go to the main page and click on the menu in the upper left and scroll all the way down to the bottom there's a link for "instruction manuals" and then it shows a list for every kit that they make. Scroll down to the Kia section and there are two sets of instructions. One for fuse tap and one for inline fuse. I found this by accident when I went to get the instructions to install mine. I was sent the inline fuse version of the kit. Maybe they don't make the kit with the fuse tap anymore? I'm not sure. But I believe that you purchased the lit flares only so maybe you got a different style of wiring setup than I did because I ordered the whole kit.
Thanks for this. I think i have the same wiring kit as you, with the switch and the inline fuse. I'll go grab their fuse tap instructions and change up the install to use the headlight fuse.

Edit - Found the instructions for the fuse tap method. Thanks again. I'll just cut the end off of the inline fuse red wire and put the fuse tap wire on that. Inline fuse is redundant but it should still work.
 
Last edited:
Thanks for this. I think i have the same wiring kit as you, with the switch and the inline fuse. I'll go grab their fuse tap instructions and change up the install to use the headlight fuse.

Edit - Found the instructions for the fuse tap method. Thanks again. I'll just cut the end off of the inline fuse red wire and put the fuse tap wire on that. Inline fuse is redundant but it should still work.
It can't hurt to leave it. If you ever decide to use the switch setup you just have to crimp a new connector on
 
From interior to exterior to high performance - everything you need for your Stinger awaits you...
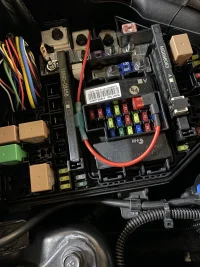
I pulled out the switch and inline fuse wires and cut and tapped the red wire from the controller directly into the 10A "spare" fuse at the bottom of that same row where the 10A headlight/high fuse is. I initially tried the headlight/high fuse but it's not switched power. The spare is and works great. The controller light and the flares shut off with ignition off now. Happy with the result. Cleaner install with less wires and it's not going to drain the battery.
 
______________________________
I pulled out the switch and inline fuse wires and cut and tapped the red wire from the controller directly into the 10A "spare" fuse at the bottom of that same row where the 10A headlight/high fuse is. I initially tried the headlight/high fuse but it's not switched power. The spare is and works great. The controller light and the flares shut off with ignition off now. Happy with the result. Cleaner install with less wires and it's not going to drain the battery.
I was wondering about the headlight fuse since you can turn the headlights on without the car running. If the flares are lit and you shut the car down do they come back on when you start the car or do you have to turn them back on with the app?

I'm going to rewire mine this afternoon as well for a cleaner install.
They come back on when you start the car. You no longer have to turn them on in the app.
 
A much cleaner install than that bundle of wire and loose switch. And I'm much more comfortable with it powering off with the ignition.
 

Attachments

  • FC12BB55-0467-46B5-BD2D-3890795220C1.webp
    FC12BB55-0467-46B5-BD2D-3890795220C1.webp
    222.8 KB · Views: 36
Back
Top