Hey everyone! I just bought these exact ones for my GT2 and spent a full afternoon troubleshooting them. The instructions are all in korean and there really aren't any translations of it, but I finally figured it out and they're working flawlessly! See details below:
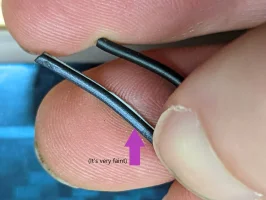
- Each light has two wires, both are black, but one has a stripe on it. The one with the stripe is negative, the solid black is positive ("Pos and Neg Wires" photo)
- All lights run off 12v
- You can wire the lights in parallel, on my car I ran the scuff plate's wiring so the left rear door's run forward and then connected together with the driver's door wires, and then to the fuse panel
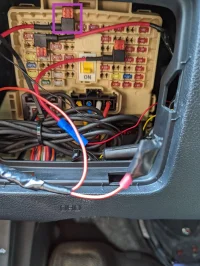
- I connected the ground to a chassis connected bolt (to the left of the fuse panel, I can take a photo if you want but pick a chassis ground wherever you like really)
- I connected the 12v power to the Interior Lamp fuse (4th one from the left, top row) and used a fuse splitter. (the other extra bits in there are for my dashcam, ignore those, "Fuse Panel" photo)
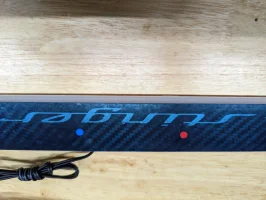
- THE TROUBLE - so as you can see ("The Two Dots" photo), the plates come with a protective film over them and there are two dots, one red - one blue. The red one is to change the flash pattern, the blue one is for one of the four magnets that come with the kit. Each plate has a magnetic sensor in it so it knows when the door is ajar or not, this magnetic sensor turns them on/off. THE BLUE DOT DOES NOT LINE UP WITH THE ACTUAL SENSOR! Lay the magnet on the plate while the lights are on and slide it around a little until the lights shut off. It should be pretty close to where I'm pointing ("Magnetic Sensor Location Approximately" photo)
- Once you find a spot where you can set the magnet down, take your hand away, and the lights stay off you will need to close your door and the magnet will pop up to the door and show you where you need to stick it.
- Move the magnet from where it stuck to the door down just far enough so it's entirely on the flat surface of the underside of the door.
- Now try closing the door again, wait a second, and then open it - you should see the lights turn on (i recommend picking a slow pattern so you can see the animation and know that it's them doing the turning on sequence)
- Worked? great! stick the magnet to the door in that exact spot then move on to the others following the same process!
Hope that saves someone else a few hours! Now I just have to do the passenger side............ good thing we love our cars

")